[Dementia Prevention] Introducing Easy Knitting!

Knitting is effective for preventing dementia.
When you knit, various brain functions are activated, which can slow the progression of dementia.
Because knitting involves using your hands, it stimulates the brain’s motor and sensory areas.
Also, working while looking at a knitting pattern helps train cognitive abilities such as concentration and memory.
Furthermore, the sense of accomplishment you feel when you finish a piece brings joy to the brain and helps relieve stress.
The projects we’re introducing this time are all easy enough for beginners.
By all means, consider adopting knitting as a new hobby for older adults.
- [For Seniors] Ideal for Finger Rehabilitation: A Collection of Simple Ideas Made with Yarn
- Perfect for winter! Easy yarn crafts for seniors
- [For Seniors] Simple Handicrafts Recommended for Finger Exercise
- For seniors: Recommended for day services. Hands-on activities that help prevent dementia.
- [For Seniors] Small craft ideas: for yourself and as gifts!
- For Seniors: Needle-Free Crafts. A Safe and Easy Collection of No-Sew Project Ideas
- [For Seniors] Amazing Scrap Fabric Hacks! Easy Handmade Small Item Ideas
- [For Seniors] DIY Rehabilitation Aids: A Collection of Easy-to-Make Ideas
- [For Seniors] Get Started Easily: Simple Handicraft Kit Ideas
- For Seniors: Easy, No-Sew! Felt Craft Ideas
- [For Seniors] Straw Craft Projects: Lightweight, Durable Baskets and Storage Boxes
- Cognicise you can do while seated. Simple dementia prevention.
- Hand games that liven things up for seniors—also great brain training
[Dementia Prevention] Introducing Simple Knitting! (11–20)
ribbon

What do you do with leftover, odd-length yarn from knitting? This time, I’ll introduce a ribbon you can make even with small remnants.
Some care facilities incorporate knitting because it’s expected to help stimulate the brain.
However, you often end up with yarn in awkward lengths after finishing a project.
Let’s use a crochet hook to turn those leftovers into a ribbon.
Crochet two rectangular strips, layer them to form a ribbon shape, and tie the center with yarn.
If you shape the lower piece into a slight chevron, it will look more like a ribbon.
You can attach it to a wreath or a bag—there are many ways to enjoy this project depending on your ideas.
A placemat woven from cardboard

Add color to your table with a placemat you make yourself.
Create an easy yarn placemat using a cardboard loom.
Tape the edges of the cardboard with duct tape, cut small slits along the edge, then thread yarn into the slits.
The duct tape reinforces the cardboard when you cut it and when you thread the yarn.
After threading the yarn through the slits and wrapping it around, begin weaving.
When weaving, pass the yarn through a dedicated shuttle or a piece of cardboard.
Try changing the yarn color partway through to give it a different look.
When you finish weaving, tie the yarn at both ends to complete your placemat.
A flower made with a fork and yarn

We’re introducing a flower craft you can make using just a fork and yarn.
Wrap the yarn around the tines of the fork 12 times, holding it lightly with your fingers to keep it in place.
When you’re done wrapping, leave a longer tail and cut the yarn, then bring it to the back and thread it through from top and bottom.
Repeat this inward, tightening and shaping as you go—this is the key step.
Cut at two points, remove the bundle from the fork, and fan the yarn out into a circle to form a fluffy flower.
Finally, tie a pearl at the center to add a touch of elegance and create a piece with a nice accent.
It’s easy to make, and moving your fingers can help stimulate the brain, so it’s a recommended craft for older adults.
Weaving a coaster with a paper plate
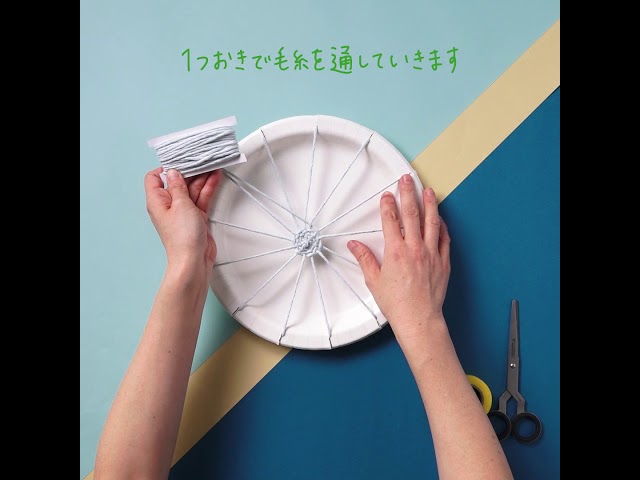
Let’s make round yarn coasters that take advantage of a paper plate’s circular shape.
Cut slits around the rim of the paper plate.
The key is to make sure the number of slits is odd.
Thread yarn from the back of the plate through a slit, then across to the slit on the opposite side.
Continue threading the yarn through all the slits, and then start weaving from the center of the plate.
With this method, you can easily make a circular coaster.
Switching yarn colors partway through will create a cute design.
Both paper plates and yarn are sold at 100-yen shops, so it’s easy to gather the materials.
It also sounds fun to make matching coasters together with your child.
A trivet woven from toilet paper rolls
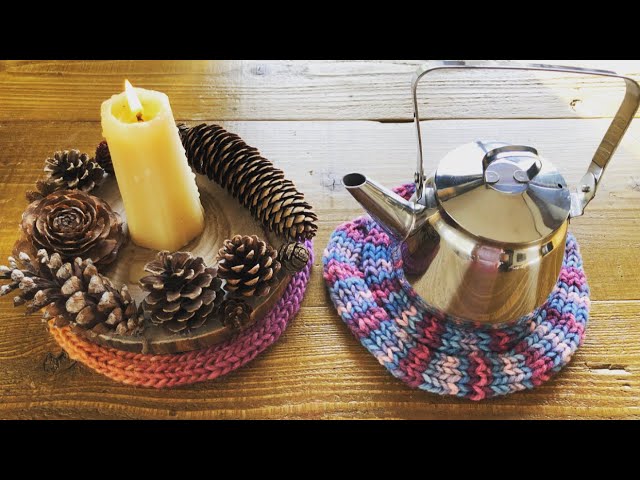
A simple-to-make trivet woven using toilet paper rolls has a warm, original feel.
Prepare the materials: disposable chopsticks, toilet paper rolls, cellophane tape, yarn, and a needle.
First, make the base for weaving the trivet using the toilet paper rolls.
Cut the chopsticks in half and tape them vertically around the toilet paper roll, spacing them evenly.
Once that’s ready, string the yarn in an alternating pattern to form the base.
Next, gently loop the yarn over the chopsticks so it sits on top; the key is to drape the yarn lightly and loosely.
Hook the yarn onto the needle and weave around in circles until it forms the shape of a trivet, and you’re done.
Using colorful yarn will give you a bright, cheerful trivet.
Finger-knitted ribbon

This is a fun project you can make using only your fingers, without any tools.
Wrap yarn around one finger and use your other hand to move the yarn along.
Because it requires nimble movements of your hands and fingers, it can also be good brain training.
The hands and fingers are closely connected to the brain, and moving them is said to stimulate it.
This knitting method is recommended for children and older adults as well.
When the knitted yarn starts to gather around the middle finger, it’s time to finish off the yarn.
Tie what you’ve made into the shape of a bow, and you’ll have an adorable ribbon.
You can also enjoy customizing it, like attaching the ribbon to a bag.
[Dementia Prevention] Introducing Simple Knitting! (21–30)
A fluffy, cozy pouch woven from cardboard

A fluffy, fuzzy pouch you can use for cosmetics or quick outings.
You’d never guess it was woven with cardboard.
Cut slits into both ends of a piece of cardboard and glue chopsticks to it.
Thread yarn through the slits and wrap it around the cardboard.
Using yarn attached to the chopsticks, weave over-under, over-under along the threaded yarn—similar to how you’d use a loom.
Once you’ve woven a sufficient length, cut it free from the cardboard.
Make two woven panels and tie the yarn at the ends to join them.
Turn it inside out, insert an inner pouch, add decorations, and you’re done.
Try making one with fluffy yarn!