[Dementia Prevention] Introducing Easy Knitting!

Knitting is effective for preventing dementia.
When you knit, various brain functions are activated, which can slow the progression of dementia.
Because knitting involves using your hands, it stimulates the brain’s motor and sensory areas.
Also, working while looking at a knitting pattern helps train cognitive abilities such as concentration and memory.
Furthermore, the sense of accomplishment you feel when you finish a piece brings joy to the brain and helps relieve stress.
The projects we’re introducing this time are all easy enough for beginners.
By all means, consider adopting knitting as a new hobby for older adults.
- [For Seniors] Ideal for Finger Rehabilitation: A Collection of Simple Ideas Made with Yarn
- Perfect for winter! Easy yarn crafts for seniors
- [For Seniors] Simple Handicrafts Recommended for Finger Exercise
- For seniors: Recommended for day services. Hands-on activities that help prevent dementia.
- [For Seniors] Small craft ideas: for yourself and as gifts!
- For Seniors: Needle-Free Crafts. A Safe and Easy Collection of No-Sew Project Ideas
- [For Seniors] Amazing Scrap Fabric Hacks! Easy Handmade Small Item Ideas
- [For Seniors] DIY Rehabilitation Aids: A Collection of Easy-to-Make Ideas
- [For Seniors] Get Started Easily: Simple Handicraft Kit Ideas
- For Seniors: Easy, No-Sew! Felt Craft Ideas
- [For Seniors] Straw Craft Projects: Lightweight, Durable Baskets and Storage Boxes
- Cognicise you can do while seated. Simple dementia prevention.
- Hand games that liven things up for seniors—also great brain training
[Dementia Prevention] Introducing Simple Knitting! (21–30)
Woven mats and vase doilies made from cardboard
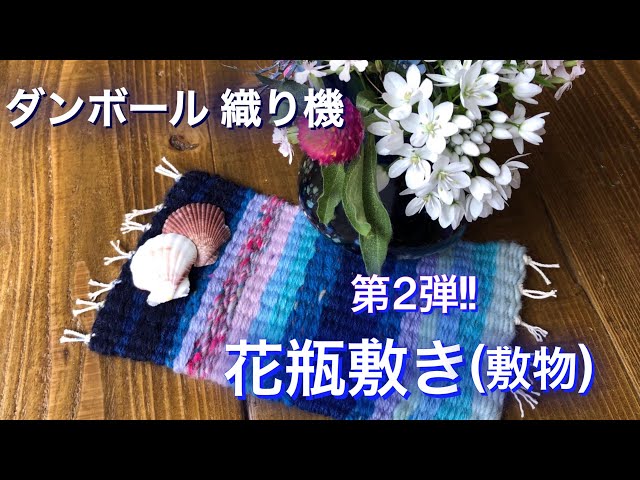
It’s fun to make knitted items with a handmade loom, isn’t it? Your child will probably enjoy creating projects with excitement, too.
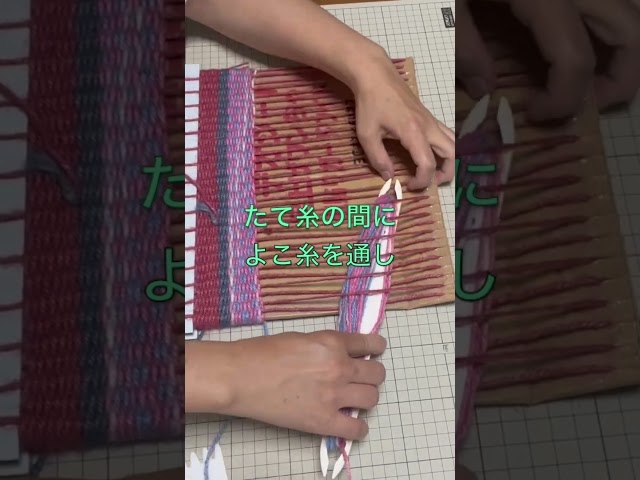
You can make a cardboard loom by cutting slits in two edges of a piece of cardboard and attaching chopsticks.
Thread twine through the slits, and use two colored markers to dye the yarn alternately.
Attach the yarn to a toothpick and start weaving, passing it over and under the twine of the same color—that’s the trick.
It also looks lovely to change the yarn colors for a gradient effect.
Try making it with your favorite colors of yarn.
Tie off the twine at the edges and you’ll have a finished mat or a vase coaster.
Cushions woven from cardboard
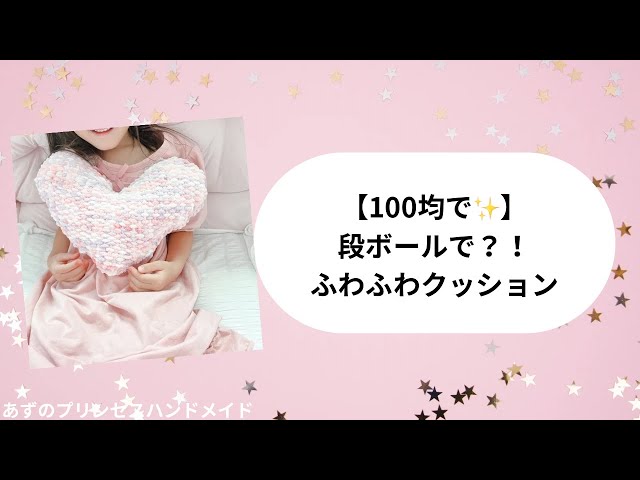
A cute cushion woven with cardboard feels nice to the touch and can be easily made with everyday materials.
Get your yarn, cardboard, chopsticks, and a comb ready.
Trace a heart shape made from construction paper onto the cardboard and cut it out.
Make small, frequent slits around the heart with scissors and hook the yarn onto them.
Next, use the chopsticks to weave the yarn so it goes over and under alternately; using a comb as you work will help the process go smoothly.
Tie off the yarn, trim it, and remove the piece from the cardboard.
Make a second heart of the same shape, stack the two together, and stitch around the edges with yarn.
Stuff generously with filling, and you’re done.
It’s a great project for parents and kids to enjoy together, so give it a try!
Woven ring bag made from cardboard
You can make a genuine hemp bag using a simple homemade loom.
Cut slits into both ends of a piece of cardboard and thread the hemp twine through.
Pass a stick wound with hemp through both the front and back sides, weaving as if using a loom.
This way, you can create a seamless, tubular piece.
Once you finish weaving, cut it free from the cardboard and tie the yarn.
Attach your preferred handles and a base for the bag, and your lovely hemp bag is complete.
It’s an easy method, but the natural finish will elevate your style when you carry this bag.
Butterfly and flower decorations woven with a cardboard Y-shaped knitting spool

Lillian, which was popular in the Showa era, has made a comeback during the self-isolation of the COVID period.
Some of you may remember the cylindrical knitting tool, but there’s also a wooden Y-shaped Lillian knitting tool.
The cylindrical one uses a knitting needle, while the wooden one is worked with your fingers.
Even small children can use their hands to make projects.
You can even make a Y-shaped Lillian tool out of cardboard, so why not give it a try? By wrapping yarn around the Y-shaped part, you can create simple decorations like butterflies and flowers.
With their rustic look, these handmade pieces bring a warm, handcrafted feel when displayed indoors.
A mat woven with anti-slip sheets

Many people use non-slip mats to prevent shifting at the entrance or in the bathroom.
If you use a non-slip sheet with small holes, you can make a knitted mat by taking advantage of those holes.
Thread yarn through the holes in the sheet and keep knitting.
Layer another non-slip sheet on top and crochet the edging around both sheets together.
Add a frill to complete a cute, furry-looking mat.
Since the steps aren’t too complicated, it seems like something you could make with your child.
The frilled design also gives it a princess-like feel, so children who love princesses are likely to enjoy it.
A scarf woven from milk cartons

With an empty milk carton and some disposable chopsticks, you can make a knitted scarf.
Cut several chopsticks in half and attach them to the milk carton.
Now you’ve got a simple loom.
You can also use thin black bobby pins instead of chopsticks, but the chopsticks are easier to knit with.
By threading the yarn through the chopsticks in sequence, you can knit, so even young children can make a project.
As the knitting progresses and the scarf grows longer and longer, kids will probably get excited watching it.
When you’re finished, add yarn pom-poms to complete a cute scarf.
Cardboard knitting

Did you know that knitting has recently become a trend, especially among young people? Some older adults may also enjoy knitting.
However, there may be seniors who find it bothersome to knit as they get older.
And when it comes to knitting, many people imagine using two needles, which can seem difficult.
So here’s a simple knitting project using cardboard.
You just cut slits into both ends of a piece of cardboard and weave the yarn through—that’s all.
By changing the material, you could even make items like coasters.
Please use this as a reference and try creating some lovely pieces.