[For Seniors] Perfect Finger Exercises! Seasonal Flower Origami


We’d like to introduce various flower origami projects especially for seniors.
In Japan, beautiful flowers bloom with each of the four seasons.
In spring, there are cherry blossoms; during the rainy season, hydrangeas; in summer, sunflowers; in autumn, cosmos; and in winter, Christmas roses.
Why not try making seasonal flowers with origami?
We’ve gathered many easy projects so that even beginners can enjoy them.
If you love flowers—or if you’re looking for a fine-motor rehab activity—please join us in creating lovely origami flowers together.
- [For Seniors] Add Color to Your Room: A Collection of Flower Craft Ideas
- Easy origami that delights the elderly. Enjoy a heart-lifting time with seasonal origami.
- [For Seniors] Easy Origami Recommended for Winter
- Recommended Origami for Seniors: Fun December Theme
- [For Seniors] Autumn Origami to Enjoy in October
- [For Seniors] Lovely Crafts Made with Tissue Paper: Ideas Collection
- [For Seniors] Enjoy Something New Every Day! Today’s Origami
- Craft ideas with plum blossoms for seniors
- [Recreation] Summary of Recommended Origami Ideas for Seniors
- [For Seniors] Make with Origami: Enchanting Wisteria Hanging Decoration Ideas
- [For Seniors] Easy Sunflower Origami Craft
- [For Seniors] Make an April Calendar: Fun Ideas to Brighten Your Mood
- [For Seniors] Recommended September Origami to Feel the Autumn Season
[For Seniors] Perfect for Finger Exercises! Seasonal Flower Origami (21–30)
lily of the valley

Lily of the valley blooms around April to May and is strongly associated with heralding the arrival of spring.
In this project, we’ll recreate this quintessential spring flower with origami, making the bell-shaped blossoms in three dimensions.
First, cut white origami paper into a flat shape like spread petals, then attach it to a long, rolled stem piece.
From there, overlap and adjust each petal to form the bell shape.
Once the flower components are complete, attach them to a backing sheet decorated with leaves and other parts to finish.
Aim for a design where the flowers appear to pop out.
dandelion fluff
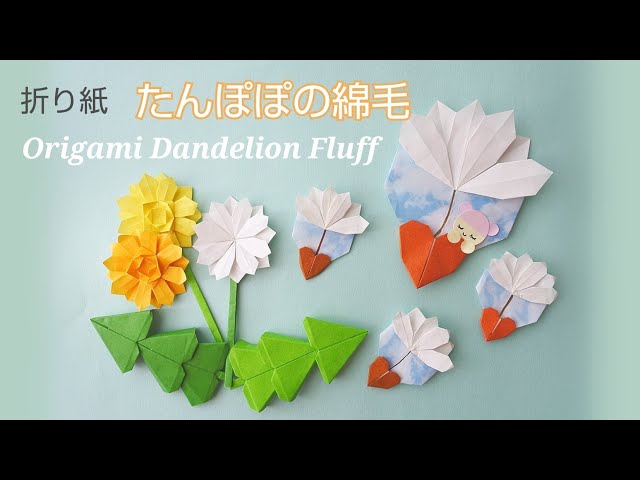
When you see dandelions in bloom, you can’t help but think, “Spring has come,” right? Older adults may also feel the arrival of spring.
In spring, you might make dandelion crafts as part of recreation activities.
It’s also a great idea to make dandelion fluff and display it together with the dandelion pieces.
If you use them as a wall decoration, they’ll create a lovely atmosphere indoors.
Seeing the displayed dandelions and fluff may bring back memories for some seniors—of their childhood or moments with family.
Be sure to enjoy a pleasant time together while sharing those memories.
Double-flowered, softly three-dimensional peach blossoms

This origami piece—featuring a soft, eye-catching, double-flowered, three-dimensional peach blossom—has a striking presence when displayed.
Its hallmark is the process of layering petals; by shaping each one individually, you achieve a gently fluffy finish.
Unlike flat works, the completed piece can stand on a wall shelf or tabletop, which adds to its appeal.
By varying color gradations or adding a small touch to the center, you can create different expressions using the same method.
It’s an origami idea that lets you fully enjoy both the hands-on, imaginative process of shaping with your fingertips and the satisfaction when it’s complete.
Dandelion wreath

Spring is the season when the weather warms and many flowers begin to appear, and you’ll likely spot more dandelions as well.
This craft recreates dandelions—a quintessential spring flower—using origami and combines them into a wreath-like shape.
To make the dandelion flowers, fold a strip of origami paper in half and then fold it again to make it narrower, cut fine slits along the edge, roll it up, then spread and shape it.
The wreath base is made by assembling triangular units, and it’s recommended to use green to evoke leaves.
Finally, combine all the parts and add decorative elements like leaf pieces to complete the project.
Tulip wreath

Tulips are one of the flowers that color the spring season, and their rich variety of hues conveys the excitement of spring.
This is a wreath that captures that springtime joy by arranging colorful tulips on a circular base.
It’s recommended to make the wreath base in green to evoke leaves; create triangular pieces and insert adjacent pieces into the gaps to form a circle.
Then just add tulips and other decorations to the base to finish.
To make the tulips really stand out, it’s important to use folds to give them a three-dimensional look.
Three-dimensional origami iris

We’d like to introduce an origami craft featuring a beautiful three-dimensional iris.
You’ll need green washi paper, craft wire, and purple origami paper.
First, make the flower.
Fold the origami paper vertically, horizontally, and diagonally to create crease lines.
Fold along these lines to collapse the paper, then fold and open each edge one by one.
Once the shape is set, gently open it while curving with your fingertips to form the flower.
Next, make the stem.
Apply glue to the washi paper and attach the wire and the flower together.
For the leaves, cut the washi into long, narrow strips and neaten the top edges.
When everything is ready, arrange the flower and leaves in a vase.
You’ll be pleased with a result that hardly looks like it was made from origami.
The fingerwork involved and the task of arranging with an eye for balance can also be expected to help prevent cognitive decline.
Poppy

Poppies, which bloom from spring to summer, are also known as hinageshi or gubijinsō, and they produce colorful, round, and charming flowers.
This craft aims to create poppies that feel like the joy of spring, making them look three-dimensional as if they’re popping out from the backing paper.
You cut origami into petal shapes and assemble them into a flower, layering the pieces after making slits to give the flower a three-dimensional form.
Once the petal outline is done, place yellow in the center, and finally combine it so it looks like it’s blooming from the stem and leaf pieces attached to the backing paper, and you’re finished.