[For Seniors] Small craft ideas: for yourself and as gifts!


Many people enjoy making small items like sewing, knitting, and felt crafts, don’t they?
Some people find joy in the act of making itself, while others look forward to taking the finished piece home—everyone has their own purpose when creating.
In this article, we’ll introduce small craft ideas for older adults!
Make cute little items to use for yourself, or give them as gifts—they’re sure to be appreciated.
Please consider using these ideas for recreation at senior day services and other elder care facilities as well.
- Handmade Gifts: Ideas That Will Delight Older Adults
- [For Seniors] Handmade gifts they’ll love: a roundup of simple ideas
- [For Seniors] Simple Handicrafts Recommended for Finger Exercise
- For Seniors: Simple and Lovely Crafts – A Collection of Take-Home Project Ideas for Day Service
- [For Seniors] Introducing Fun Crafts Made with Plastic Bottle Caps
- [For Seniors] DIY Strap Craft Ideas. Great as Gifts, Too!
- [For Seniors] Practical Crafts to Make in Day-Service Recreation: Idea Roundup
- [For Seniors] Recommended for day services! Simple and cute small craft ideas
- [For Seniors] Easy Felt Craft: Warm and Cozy Projects
- [For Seniors] Easy and Fun! Tsumami Zaiku Craft Ideas
- Take-Home Craft Ideas for Winter: Perfect for Day Services for Seniors
- [For Seniors] Amazing Scrap Fabric Hacks! Easy Handmade Small Item Ideas
- [For Seniors] Recommended for Craft Activities! Milk Carton Accessory Box
For Seniors: Small Craft Ideas for Yourself and as Gifts! (71–80)
minibasket

A big appeal of handmade crafts is that you can easily enjoy them with familiar materials, right? Here’s a paper craft that will make people think, “I might be able to do this!” How about a mini basket made with paper cord and a paper cup, both available at 100-yen shops? Use the paper cup as a base and wrap the paper cord around and around, securing it with glue or double-sided tape.
Next, braid some paper cord separately to make the basket handle.
Attach the handle to the base, add any decorations you like, and you’re done! It’s also great for finger exercises, so give it a try.
Vase mat & coasters

Colorful and cute coasters woven from string.
You might think they’re difficult to make, but actually, if you use a paper plate as the base and weave onto it, you can create simple, customizable coasters with repetitive steps.
Cut evenly spaced slits, 2 cm apart, around the rim of the paper plate.
Tape the end of the string to the back of the plate, thread it through a slit, and then continue threading the string so it radiates outward like spokes.
Next, starting from the center, weave another string over and under the spokes alternately, continuing until you reach your desired size.
It’s also cute to change colors partway through or add beads to the fringe!
Flower memo stand made with origami

Let’s gather the materials at a 100-yen shop and give it a try! Here’s an idea for making an origami flower memo stand.
A memo stand is an item that holds papers or cards with notes written on them, right? It’s practical because you can display messages or things you tend to forget.
What you’ll need: origami paper, wood glue, a needle bottle, tweezers, scissors, a wooden clip, and wire.
If you make the flowers with your favorite colors of origami paper, or colors that match the recipient’s image, your feelings are sure to come across.
spring pouch

A spring pouch that pops open with one hand and works great as a pen case or eyeglass case.
Does it look hard to make at first glance? Amazingly, you can easily handcraft it without sewing—just combine your favorite fabrics! Prepare two pieces of your preferred fabric cut to the specified size, one piece of felt, a spring clasp you can find at a 100-yen shop, and strong double-sided tape for fabric.
It’s super easy: simply fold the fabric and stick it together with the tape.
Even those who aren’t confident in sewing will enjoy it.
How about making one as a gift for a friend or grandchild who always needs their glasses?
basket

Let me show you a cute basket you can make using ice cream sticks.
Get your ice cream sticks, a hot glue gun, fabric, string, and some decorations to attach to the basket, and let’s get started.
First, make the box shape that will serve as the base of the basket.
When gluing the fabric to the box, the key is to stretch it as you attach it so it doesn’t wrinkle.
When attaching the ice cream sticks to the box, glue them so there are no gaps.
If you braid the string or attach it directly as you go, it will add a unique, cute touch.
Finally, attach the handle while checking the balance on both sides, add your decorations, and you’re done.
A trivet woven from toilet paper rolls
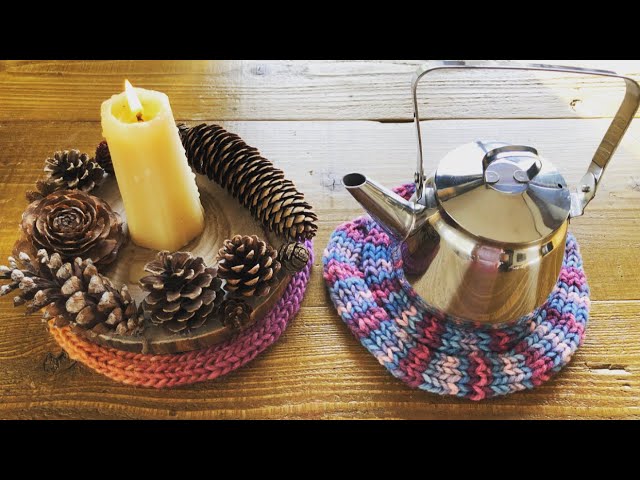
A simple-to-make trivet woven using toilet paper rolls has a warm, original feel.
Prepare the materials: disposable chopsticks, toilet paper rolls, cellophane tape, yarn, and a needle.
First, make the base for weaving the trivet using the toilet paper rolls.
Cut the chopsticks in half and tape them vertically around the toilet paper roll, spacing them evenly.
Once that’s ready, string the yarn in an alternating pattern to form the base.
Next, gently loop the yarn over the chopsticks so it sits on top; the key is to drape the yarn lightly and loosely.
Hook the yarn onto the needle and weave around in circles until it forms the shape of a trivet, and you’re done.
Using colorful yarn will give you a bright, cheerful trivet.
Finger-knitted ribbon

This is a fun project you can make using only your fingers, without any tools.
Wrap yarn around one finger and use your other hand to move the yarn along.
Because it requires nimble movements of your hands and fingers, it can also be good brain training.
The hands and fingers are closely connected to the brain, and moving them is said to stimulate it.
This knitting method is recommended for children and older adults as well.
When the knitted yarn starts to gather around the middle finger, it’s time to finish off the yarn.
Tie what you’ve made into the shape of a bow, and you’ll have an adorable ribbon.
You can also enjoy customizing it, like attaching the ribbon to a bag.