[For Seniors] Small craft ideas: for yourself and as gifts!


Many people enjoy making small items like sewing, knitting, and felt crafts, don’t they?
Some people find joy in the act of making itself, while others look forward to taking the finished piece home—everyone has their own purpose when creating.
In this article, we’ll introduce small craft ideas for older adults!
Make cute little items to use for yourself, or give them as gifts—they’re sure to be appreciated.
Please consider using these ideas for recreation at senior day services and other elder care facilities as well.
- Handmade Gifts: Ideas That Will Delight Older Adults
- [For Seniors] Handmade gifts they’ll love: a roundup of simple ideas
- [For Seniors] Simple Handicrafts Recommended for Finger Exercise
- For Seniors: Simple and Lovely Crafts – A Collection of Take-Home Project Ideas for Day Service
- [For Seniors] Introducing Fun Crafts Made with Plastic Bottle Caps
- [For Seniors] DIY Strap Craft Ideas. Great as Gifts, Too!
- [For Seniors] Practical Crafts to Make in Day-Service Recreation: Idea Roundup
- [For Seniors] Recommended for day services! Simple and cute small craft ideas
- [For Seniors] Easy Felt Craft: Warm and Cozy Projects
- [For Seniors] Easy and Fun! Tsumami Zaiku Craft Ideas
- Take-Home Craft Ideas for Winter: Perfect for Day Services for Seniors
- [For Seniors] Amazing Scrap Fabric Hacks! Easy Handmade Small Item Ideas
- [For Seniors] Recommended for Craft Activities! Milk Carton Accessory Box
For Seniors: Small Craft Ideas for Yourself and as Gifts! (81–90)
A scarf woven from milk cartons

With an empty milk carton and some disposable chopsticks, you can make a knitted scarf.
Cut several chopsticks in half and attach them to the milk carton.
Now you’ve got a simple loom.
You can also use thin black bobby pins instead of chopsticks, but the chopsticks are easier to knit with.
By threading the yarn through the chopsticks in sequence, you can knit, so even young children can make a project.
As the knitting progresses and the scarf grows longer and longer, kids will probably get excited watching it.
When you’re finished, add yarn pom-poms to complete a cute scarf.
Weaving a coaster with a paper plate
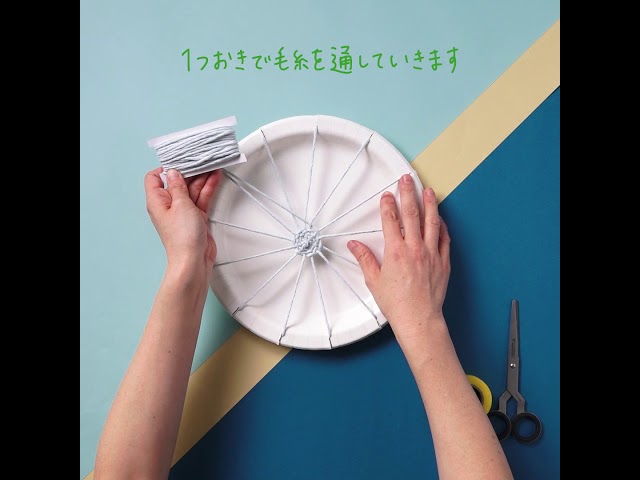
Let’s make round yarn coasters that take advantage of a paper plate’s circular shape.
Cut slits around the rim of the paper plate.
The key is to make sure the number of slits is odd.
Thread yarn from the back of the plate through a slit, then across to the slit on the opposite side.
Continue threading the yarn through all the slits, and then start weaving from the center of the plate.
With this method, you can easily make a circular coaster.
Switching yarn colors partway through will create a cute design.
Both paper plates and yarn are sold at 100-yen shops, so it’s easy to gather the materials.
It also sounds fun to make matching coasters together with your child.
Simple coaster
@hitotema_sourcier I made colorful, personality-packed yarn coasters ♡TranslationHitotema#Shonan#WantToConnectWithCaregivers
♪ Original song – hitotema_sourcier – hitotema_sourcier
Brighten up your daily tea time! Here are some easy coaster ideas.
Coasters are flat items placed under glasses or cups.
They protect your table from condensation and stains that appear when a cold drink sits for a while, and they also serve as decorative accents to elevate your table’s look.
This time, let’s handcraft coasters using materials from a 100-yen shop.
You’ll need mesh used for plant pots, a yarn needle, and yarn in your favorite colors.
With so much freedom in design and color, it’s exciting, isn’t it?
Pine cone wall-hanging decor
When it comes to autumn flowers, cosmos definitely come to mind.
This time, let’s make a wall-hanging interior decoration that recreates cosmos using pine cones.
First, use nippers to cut off the scales of the pine cones.
For safety, it’s recommended to wear gloves.
Have a staff member assist with the hard parts.
Attach each pine-cone piece, decorated with acrylic paint, onto a cutting board available at 100-yen shops.
A cosmos wall-hanging made with autumn materials will instantly fill your entryway or room with an autumn atmosphere.
Birthday cake trinket box

How about giving a must-have birthday cake as a trinket box to someone special? It looks just like a real cake and delivers an exciting surprise.
First, make the base of the cake—the trinket box—out of origami.
Then create decorations like roses, candles, and ribbons.
Up to this point, it feels just like making a real cake, and it’s a lot of fun.
Finally, tuck a lovely gift inside the trinket box and present it—there’s no doubt it’ll make for the perfect birthday!
snow globe

A snow globe packed with a dreamy little world is soothing just to look at, isn’t it? If you think making one sounds hard, this method is exactly what I want you to try! Using a jar you can even find at a 100-yen shop, glue your favorite decorations to the inside.
Next, fill the jar about halfway with water, then pour liquid glue in up to the very top of the jar’s opening.
To finish, add your choice of glitter or sparkles, close the lid, and you’re done! When adding the glitter, the trick is to stir with a chopstick to avoid introducing air.
It also makes a great gift for your grandchild, so why not try it during your time at home?
[For Seniors] Small Craft Ideas: For Yourself & As Gifts! (91–100)
book-style desk calendar

Practical and stylish item! Here are some ideas for a book-style desk calendar.
These ideas are recommended for those who want to give a calendar or a chic handmade present.
Just displaying it on a desk will brighten up and enliven the room, and since it can be used as a calendar too, it’s perfect as a gift for Respect-for-the-Aged Day.
This time, it seems to be made using design paper that can be purchased at 100-yen shops and the like.
One of its charms is that the materials are easy to prepare.