For seniors: Heartwarming and cozy. Recommended handmade Hina dolls


Hinamatsuri is an event filled with the wish for girls to grow up healthy and happy.
On March 3rd, many families traditionally display Hina dolls and celebrate.
In this article, we introduce handmade Hina doll ideas especially for seniors.
One-of-a-kind handmade Hina dolls have a warm, charming feel, don’t they?
The Hina dolls featured here are all easy to make using familiar, readily available materials, so please feel free to use them as inspiration.
- [Day Service] Excited for Hinamatsuri! Craft ideas to brighten up your room
- [For Seniors] Brighten Up Hinamatsuri: Wall Decoration Ideas
- For Seniors: Simple and Fun Hina Matsuri Crafts—An Idea Collection Using Various Materials
- [For Seniors] Origami Crafts to Brighten Hinamatsuri: A Collection of Decorative, Festive Ideas
- [For Seniors] Crafts to Make in March! Recommended Project Ideas
- For Seniors: Recommended Wall Decoration Ideas for March
- [For Seniors] Hinamatsuri Recreation: Fun Ideas for Games, Crafts, and Snack Making
- For Seniors: Feel the Arrival of Warm Spring. Cherry Blossom Wall Decoration Ideas
- [For Day Service Centers] February Craft Ideas: Decorations for Setsubun, Valentine’s Day, and the Feeling of Spring
- [For Seniors] Fun to Make, Soothing to Display! Snowman Craft Ideas
- [For Seniors] Color Your Care Facility’s Spring: Wall Decoration Ideas
- [For Seniors] Feel the Arrival of Spring: A Collection of Cherry Blossom Craft Ideas
- [For Seniors] Fun February Crafts: Ideas Inspired by Setsubun, Valentine’s Day, and Other Events
[For Seniors] Heartwarming and Cozy: Recommended Handmade Hina Dolls (21–30)
Toy capsule Hina dolls
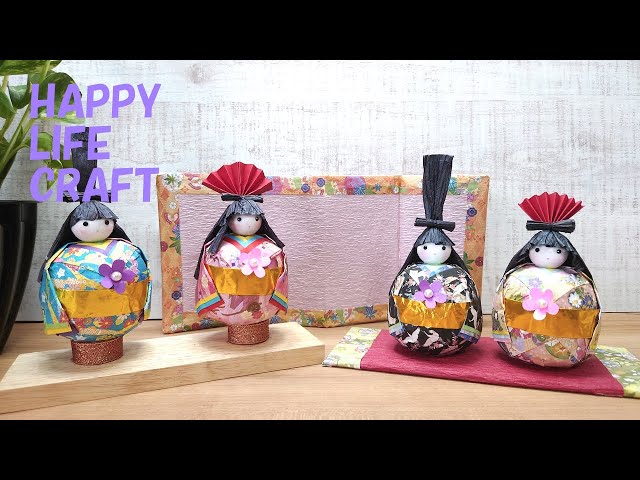
Let’s make use of the plastic capsules that come with gachagacha/gachapon toys, which usually contain small toys or trinkets.
Attach paper towels to the capsules using glue diluted with water.
Do the same and attach paper towels to small pieces of Styrofoam.
Use washi-patterned origami on the capsule toy, arranging it like a kimono.
With a hot glue gun, adhere the paper-towel-covered pieces to the capsule toy, add hair and decorations, and you’re done.
If you make two—an Emperor doll and an Empress doll—you’ll have a splendid Hina dolls set.
It looks good enough as interior decor and is likely to delight older adults as well.
Handmade Hina decorations made of felt

Felt crafts have a soft, fluffy touch that gives a sense of warmth.
Hina decorations made from felt would suit the atmosphere of the Peach Festival.
You can also use chirimen fabric to make the Emperor and Empress dolls.
Make two bases as well, and add peach blossoms made of felt or chirimen fabric.
If you attach a string, you can hang it on the wall, or you can paste it onto a backing board.
Using artificial flowers—like the ones sold at 100-yen shops—for the blossoms would also result in a lovely piece.
Enjoy creating it while chatting with seniors and having fun arranging the design.
Just cut and paste: felt Hina dolls

These are cute Hina dolls you can make using only items from a 100-yen shop.
Since they use spherical Styrofoam, the finished pieces have a plump, rounded look.
You’ll use chirimen fabric with adhesive on one side, and felt with double-sided tape applied.
Because there’s no sewing involved, it should be easy for older adults to try this craft as well.
If you make both the Emperor and Empress dolls, you’ll have a splendid Hina display.
It’s also lovely to decorate them by making a base from an empty box, for example.
Seeing the decorations might even help older adults recall Hinamatsuri celebrations spent with their families.
Hina dolls made with origami and paper plates

An origami and paper-plate Hina doll activity is especially appealing because you can enjoy it easily with everyday materials.
Cut a paper plate in half, then roll it into a cone so there’s a small hole at the top.
Layer and glue two half-circle pieces of origami paper on top to represent the doll’s kimono.
Next, prepare white drawing paper and cut out a shape consisting of an oval on top of an overlapping rectangle.
Draw the doll’s face on the oval, then attach hair and ornaments made from origami.
Roll the rectangle into a tube, insert it into the hole in the paper plate, spread it open inside the plate, and secure it with tape.
Finally, give the doll a fan to hold, and it’s complete! Make the male doll as well and be sure to display them side by side.
Three-dimensional wall-mounted Hina doll display

The three-dimensional wall-hanging Hina doll decoration is an origami piece that, while adorably stylized, still conveys the essence of traditional Hina dolls.
You cut and glue the origami paper for each part to create the faces and kimonos.
A key point is shaping the sleeves into rings to give them a soft, voluminous finish.
By mounting the pieces on construction paper, you can hang the work directly on the wall, adding festive depth and color to the space as a seasonal decoration.
With thoughtful choices of expressions and colors, the impression changes, making it a subtle yet striking origami idea you can enjoy as a work with presence.
Three-dimensional Hina dolls made of paper

These Hina dolls are striking for their beaming smiles.
Although they’re three-dimensional, you can make them using tissue paper and construction paper.
Create the Emperor and Empress’s faces and the ornaments above their heads with construction paper.
Draw the facial features with a pen, or make them from construction paper or origami.
Form the base with strips of construction paper and crumpled tissue paper, then attach the face pieces to finish.
Since this craft uses lots of fine hand movements, it’s a fun activity for seniors that also exercises the fingertips and may offer brain-training benefits.
Roly-poly Hina doll
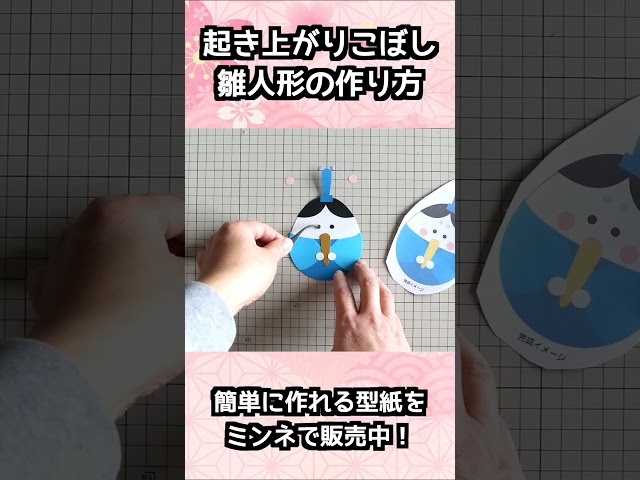
These wobbling dolls are adorable okiagari-koboshi-style Hina dolls.
You can easily make the wobbling mechanism using paper cups.
Create the Emperor and Empress with construction paper or origami, then attach them to paper cups cut to the right size, and you’re done.
Because they sway, these Hina dolls seem like something older adults could enjoy even after making them.
They also look cute displayed on a table or shelf.
Templates for the Emperor and Empress are available online, so using those can make the process easy and casual.