[For Seniors] Have Fun with Recreation! Origami Ideas

Origami, which is incorporated into recreational activities at care facilities.
Origami seems familiar to many older adults, as they often folded paper when they were young and it was a common pastime.
Because you can fold while chatting with other seniors, it also helps promote communication!
So this time, we’ll introduce origami that’s perfect for recreation activities for older adults.
Using your fingertips and thinking about what shape it will become when finished also serves as brain training.
Please make good use of these origami ideas in your recreational programs!
- [Recreation] Summary of Recommended Origami Ideas for Seniors
- [For Seniors] Enjoy Something New Every Day! Today’s Origami
- [For Seniors] Perfect Finger Exercises! Seasonal Flower Origami
- Easy origami that delights the elderly. Enjoy a heart-lifting time with seasonal origami.
- Enjoyable for seniors! Easy heart origami
- [For Seniors] Simple Handicrafts Recommended for Finger Exercise
- [For Seniors] Fun Origami That Also Works as Rehabilitation
- For Seniors: Effective Recreation for Preventing Care Needs—Have Fun While Staying Healthy
- [For Seniors] Simple and Fun: Craft Ideas You Can Make with Everyday Items
- Recommended for seniors! Origami gifts
- [For Seniors] A Collection of Fun Classic Caregiving Activities
- [For Seniors] Fun to Make! Paper Quilling Ideas
- [For Seniors] March Origami: Ideas to Brighten Your Room with Seasonal Flowers and Events
[For Seniors] Have Fun with Recreational Activities! Origami Ideas (1–10)
Kusudama made with six sheets of origami
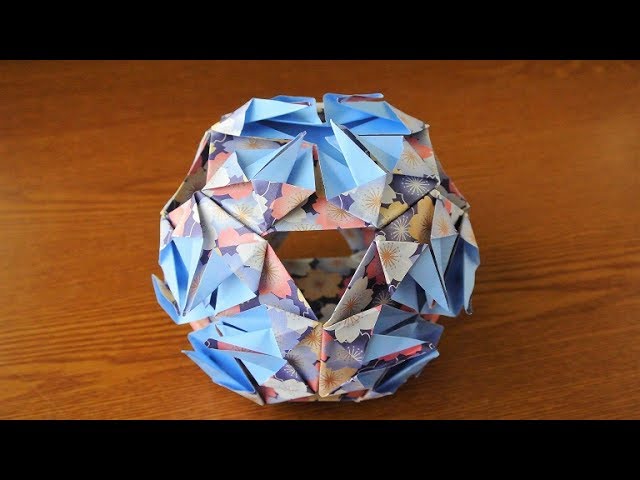
Kusudama balls, densely covered with flowers and decorations, are festive ornaments that symbolize wishes for longevity.
Let’s recreate that flower-packed, three-dimensional look by combining origami.
Prepare six sheets of origami paper with different patterns on the front and back, and use them to make dimensional units.
Carefully and gently fold the pleats with precise reverses—this is a key point that contributes to the roundness when the units are assembled.
The gaps that appear when the six units are combined are also part of the charm, and their light-transmitting structure adds an airy feel.
Origami-Only Spinning Kaleidoscope

This craft uses eight colors of origami paper, creating a twirling motion that looks like a kaleidoscope.
The key is the shape of each piece: making precise, fine creases and producing uniform parts will ultimately enhance its beauty.
After unfolding the parts and connecting them in a straight line, extend both ends to link them together; once you form a large ring, it’s complete.
By fitting the parts together firmly, the shape won’t collapse when you rotate it inward or outward, and you can enjoy the beautiful pattern changes that make use of the white on the reverse side.
Origami bookmark

These colorful origami bookmarks are helpful as a guide to show how far you’ve read in a book.
A single sheet works as a marker, but opting for a colorful, sturdy design can make you more eager to keep reading.
The structure features a folded tab that tucks in, and the glue-free approach shows consideration for not sticking to the pages.
Just punch a hole and tie a ribbon to finish.
Mixing origami patterns with different ribbons adds originality, too.
You might also sandwich a piece of cardstock inside to make it even sturdier.
[For Seniors] Have Fun with Recreation! Origami Ideas (11–20)
Origami rosette

Let’s make a rosette, like those used as decorations for medals and orders, using origami.
The pleated section surrounding the central circle is essential for creating the rosette’s look, so be mindful of achieving clean, beautiful tiers.
First, use plain origami paper to make the central circle, then attach pleats made from long, narrow strips of paper to the back.
Using patterned origami paper and keeping the pleats as uniform as possible are key to making it look beautiful.
Finally, add ribbon-themed embellishments to complete the piece, and use layered origami to create a sense of depth.
Hanami dango
@sachimama_asobi I tried making hanami dango using that thing 🍡🌸 It was so warm today that it really felt like spring had arrived! Yesterday my boys said they wanted to make dango out of origami, so I thought, why not make them into three-colored hanami dango? 🥰 Have you ever made an origami balloon? If you make the balloon and stick it onto a chopstick, it’s done 👏 It’s super easy, so be sure to save this and give it a try!! +——————————————+ I’m Sachi-mama, raising three rambunctious boys aged 8, 6, and 2 ❀ I share play ideas and simple crafts with kids using 100-yen items, nature finds, and recycled materials. Feel free to like, follow, or DM me! +——————————————+#AtHomePlay #AtHomePlaywork Play with children#I love crafts Handmade #origami#papercraft#Hinamatsuri The Doll FestivalHinamatsuri #Hinamatsuri Hina Dolls#Hinamatsuri Dolls #HinaDolls origamiOrigami Hina Dolls TranslationDango Cherry blossom viewing #CherryBlossomViewingDango
♬ Cute – Audiolist Productions
Let’s make the essential three-color dango for Hinamatsuri out of origami.
Prepare three sheets of origami paper in green, white, and pink, plus a pair of chopsticks.
Fold the origami paper in half into a square twice, then puff it up as you fold it into a triangle.
Next, fold the left and right pointed tips up toward the center to form a balloon shape.
Blow into the small hole to inflate and complete the balloon.
After making three balloons from the three sheets of origami, gently skewer all three onto the chopsticks so they don’t tear, and you’re done.
Place them beside the Empress and Emperor dolls to make a lovely decoration.
Accordion-fold Hina doll display
@mii_no_seisak If you want the pattern, follow my Instagram and comment “Ohinasama” (Hina dolls)! @mii_no_seisaku ◀︎ Search this on Instagram💕 🎎 Accordion-fold Hina dolls Just make an accordion fold in the origami: mountain, valley, mountain, valley. When you open it, it spreads out like a kimono—Hina doll complete✨ For infants, it’s fine just to experience the folding motion◎ Adults can help with the finishing touches. [Materials] • Origami paper • Glue • Face parts (construction paper) [Tips] • Make the fold width larger • It doesn’t have to line up perfectly • Enjoy the shape when you spread it out Easy prep, so you won’t rush even right before the event 🎎 Save this and use it before Hinamatsuri✨ .・。.・゜✭・.・✫・゜・。.・。.・゜✭・.・✫・゜・。 At @mii_no_seisaku, a current nursery teacher and mom of a 10-year-old and a baby share: 💞 A craft activity you can decide in 5 minutes for tomorrow 💞 Almost zero material cost! Use supplies already in your classroom✨ We’ll introduce handmade activities you can enjoy at home or in childcare🙆♀️ .・。.・゜✭・.・✫・゜・。.・。.・゜✭・.・✫・゜・。Hinamatsuri#japanNursery teacher / Childcare workerTranslationOrigami
♬ Cute heartwarming song(1425147) – sanusagi
Here’s an idea for representing the bodies of Hina dolls using accordion-folded origami.
Use two sheets of origami paper per doll.
First, accordion-fold a plain sheet, overlap the sides, and fold it in half.
Fold the second sheet the same way, then insert it into the first sheet and glue them together.
It’s recommended to use patterned paper for the second sheet.
Once the body is complete, attach a face and decorations made from construction paper, and hang it from a display stand made with a thick straw and kite string to finish.
For an even more festive look, you can also make and hang bonbori lanterns and hishi-mochi rice cakes.
Hinamatsuri wreath decoration

Introducing an idea for a Hina Matsuri wreath made entirely from origami parts! The parts you’ll make are the Emperor doll and Empress doll, lanterns, hishi-mochi rice cakes, cherry blossoms, a folding screen, a fan, a ritual baton (shaku), a stand, and a circular base to which all these parts are attached.
The base is made by combining 12 identical pieces.
Each individual part is created through simple steps, so although there are many pieces, it’s a project you can likely finish in a day.
For the Emperor and Empress kimonos, use washi-patterned origami paper—choose your favorite designs while imagining the final look.