![[For Seniors] Have Fun with Recreation! Origami Ideas](https://i.ytimg.com/vi_webp/HdZxGKThG48/maxresdefault.webp)

Origami, which is incorporated into recreational activities at care facilities.
Origami seems familiar to many older adults, as they often folded paper when they were young and it was a common pastime.
Because you can fold while chatting with other seniors, it also helps promote communication!
So this time, we’ll introduce origami that’s perfect for recreation activities for older adults.
Using your fingertips and thinking about what shape it will become when finished also serves as brain training.
Please make good use of these origami ideas in your recreational programs!
- [Recreation] Summary of Recommended Origami Ideas for Seniors
- [For Seniors] Enjoy Something New Every Day! Today’s Origami
- [For Seniors] Perfect Finger Exercises! Seasonal Flower Origami
- Easy origami that delights the elderly. Enjoy a heart-lifting time with seasonal origami.
- Enjoyable for seniors! Easy heart origami
- [For Seniors] Simple Handicrafts Recommended for Finger Exercise
- [For Seniors] Fun Origami That Also Works as Rehabilitation
- For Seniors: Effective Recreation for Preventing Care Needs—Have Fun While Staying Healthy
- [For Seniors] Simple and Fun: Craft Ideas You Can Make with Everyday Items
- Recommended for seniors! Origami gifts
- [For Seniors] A Collection of Fun Classic Caregiving Activities
- [For Seniors] Fun to Make! Paper Quilling Ideas
- [For Seniors] March Origami: Ideas to Brighten Your Room with Seasonal Flowers and Events
[For Seniors] Have Fun with Recreational Activities! Origami Ideas (1–10)
3D Origami Flower Bouquet

We’ll use origami and colored paper to make three-dimensional flowers and turn them into a bouquet.
Make the flower parts with origami, and use colored paper for the stems and leaves.
Folding the flower parts takes many steps, so it’s a bit challenging, but it’s great for stimulating your brain since it uses fine motor skills.
Let’s make lots of flowers in various colors and create a gorgeous bouquet!
Origami: Butterfly

Even among people who like origami, the way to fold a butterfly is surprisingly little known.
The folding method is a bit complex, but it results in a very charming look.
If you have some craft wire (pipe cleaners) ready, adding antennae is lovely, and drawing patterns on the wings with a pen is also nice.
Feel free to customize it to your liking.
By the way, this butterfly pairs well with artificial flowers and floral decorations.
When you make one, I hope you’ll try displaying it together with them.
Easy Origami Koinobori (Carp Streamer)

Just layer and glue origami paper—so simple, yet the brilliance will catch your eye! This carp streamer craft is made using eight 7.5 cm origami sheets and googly-eye stickers.
First, carefully pick eight sheets of your favorite origami paper and fold each one into a triangle twice.
Pair the triangular pieces in twos, then insert and overlap the corners where two layers meet.
Next, take the four completed parts and, in order, insert and stack them in the same direction to form the shape of a carp streamer.
Add the eye sticker and you’re done! The colors and patterns you choose will bring out your individuality, so make it uniquely yours.
Hoppy Frog

This is a cute origami frog that jumps when you press its back.
Fold the paper in half vertically so the edge is on the left, then fold the top-left corner to meet the right edge.
Unfold, then do the same with the top-right corner and unfold.
Fold down along the center line created by the creases, then open and flip the paper over.
Collapse along the creases into a triangle, and fold the corners of the triangle diagonally upward to make the frog’s hands.
Next, fold the lower square section upward to form the body and legs, and you’re done! It could be fun to have everyone compete to see whose frog can jump the farthest.
ribbon

This ribbon origami is perfect for decorating albums that compile memorable photos from the facility.
Fold the paper vertically and horizontally to make three creases in each direction.
Fold both sides inward to meet the outermost crease, then fold the top and bottom inward to meet at the center.
Fold it in half, then continue shaping it into a ribbon by folding further and opening into triangles as needed.
It’s a bit intricate, but if you follow the steps slowly, even beginners can create a cute ribbon.
When opening folded sections, be careful not to pull too hard and tear the paper, and work carefully.
crane

The origami crane is arguably the most iconic origami model! But if you haven’t made one in a while, it’s easy to forget the steps partway through.
After creasing both a cross and diagonals, fold into a triangle, then open both sides into a square base.
With the open end facing down, fold the left and right corners toward the center, then open up and squash into a diamond while spreading top and bottom.
Carefully shape the head and tail parts, and you’re done! Because you repeat steps of folding and opening, it’s surprisingly easy to lose track of the correct order even if you think you remember it.
Try tackling the classic crane while recalling how you learned it as a child.
Tonton Sumo
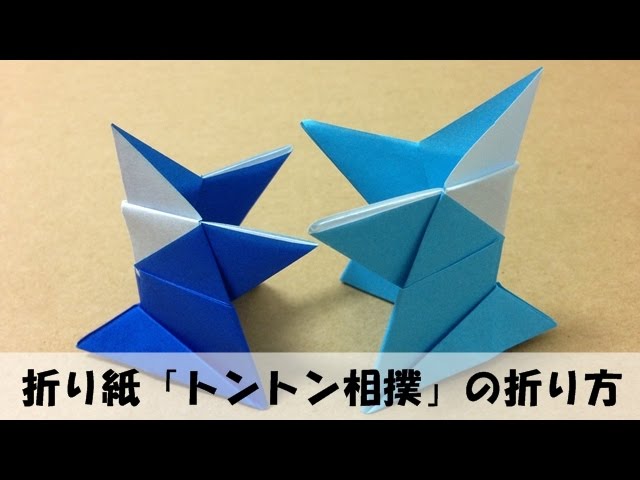
This is a sumo wrestler shape that uses creases to stand upright and can also be used as a piece for tabletop “ton-ton” sumo.
It’s important to be mindful of exactly where you align the folds; the more precise the creases, the more stable the balance when it stands.
The feet are firmly layered using reverse folds, so the shape is less likely to lose balance even when the ring is tapped.
By folding the wrestler accurately, you can develop fine finger movements, and then, when playing ton-ton sumo, focus on how to apply force and control your taps.