Easy flower craft ideas you can make with a single sheet of origami paper


Origami flowers in vibrant colors are often made as interior decorations for a room or as gifts for someone special.
Some people may feel they’re difficult because you add fine creases to express the petals or cut with scissors.
So in this article, we’ve put together an easy-to-make collection of flowers and folding methods using a single sheet of origami paper.
We’ll focus on beautifully colored flowers, including ones that are well known in Japan.
We hope you’ll enjoy the seasonal feeling as you have fun with origami.
- Children’s Origami: Easy Single-Sheet Flower Ideas
- [Easy!] Flower paper-cut art you can make using just scissors
- Simple origami that can be folded from a single sheet
- [Origami] She’ll love it if you fold these! Simple ideas for girls
- [For Seniors] Perfect Finger Exercises! Seasonal Flower Origami
- [April] Spring Origami for Kids: A Collection of Simple and Cute Ideas
- [For Kids] Let's Fold! Today's Origami Idea Collection
- Let's make it with origami! Ideas for simple 3D creations
- Cute Origami Ideas for Girls
- Collection of spring decoration ideas: glamorous and cute handmade creations
- Kids will love it! Easy origami ideas—great as gifts too!
- Kids’ Origami: Cute and Easy Ideas to Make for a Birthday
- Popular characters that are easy to make with origami. A collection of creations you can enjoy with children.
Flower craft ideas (11–20) that are easy to make with a single sheet of origami paper
dandelion

Dandelions are flowers you start seeing often along the roadside in spring.
Their yellow, puffball-like round shape is so cute.
Here’s an idea for making those dandelions with origami! First, do a “zabutons” fold once, then flip the paper over.
Fold the left and right edges in to meet the center, and bring the triangular flap on the back side to the front.
Fold the top and bottom edges the same way, but for the top and bottom, open the folded sections and spread them out like a boat, then squash them flat.
Use this part together with the triangle you brought to the front to fold the petals.
There are many steps, but the folding itself is simple, so give it a try with your child!
Margaret
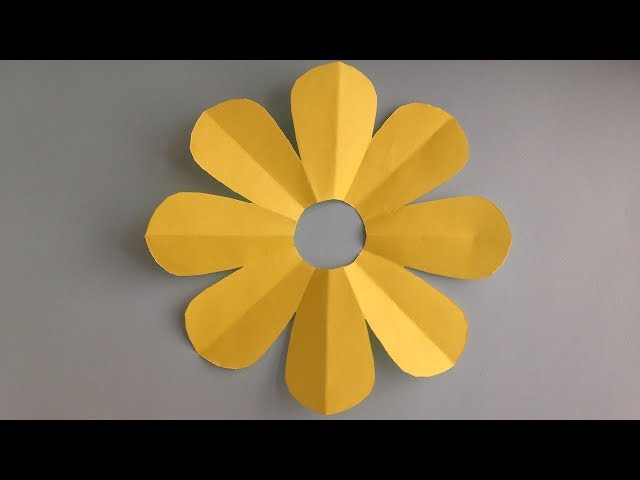
Marguerites have such a pure and elegant image, don’t they? You can make one with a single sheet of origami paper, so why not give it a try? After folding the paper, cut it into the shape of petals and trim the tips slightly.
Open it up and—voilà—it’s done in no time! Since the color of marguerite flowers varies by variety, it’s fun to choose different paper colors or add your own coloring.
This cute marguerite is sure to bring a touch of seasonal charm to your everyday life!
hibiscus

Let’s make a summery hibiscus out of origami! After folding the paper into a triangle twice, unfold it once so only the first triangle fold remains.
Then fold the lower left and right corners diagonally upward to the opposite sides.
Imagine forming a cone, and make sure the left and right edges of the paper align neatly.
Fold the top corner down to make a small triangle, then open the paper back up to its original shape.
From here, use the existing crease lines to form the hibiscus.
There are steps where you’ll make fine folds for the petals and use an inside reverse fold at the base, so take your time and proceed carefully, one step at a time.
cosmos

Cosmos flowers color the autumn landscape.
Why not try expressing their graceful form with origami? Among the flowers you can easily make from a single sheet of paper, cosmos are especially recommended.
Fold them in your favorite colors, like pink or white.
The key to creating delicate, three-dimensional petals is in the fine creases.
Add a bit of color to the center for a more realistic finish.
It’s a lovely activity to enjoy with the whole family, and it makes a charming autumn decoration as well.
Bring the richness of the season into your home while nurturing your artistic sense.
Why not begin that wonderful experience with origami?
Rose

Roses come in many varieties and are so popular they’re often called “the flower of flowers.” This rose is very simple to make, and up to a certain point it follows the same steps as folding a paper balloon.
After folding the triangular section upward, fold it downward and inflate a small square as you fold.
Once you fold the base of the rose along the creases, the key is to finish by twisting the center as you roll it.
Use a toothpick to shape the petals into their form, and you’re done.
Try using different colors of origami paper to create a vibrant bouquet of roses.
morning glory

The morning glory is one of the flowers that represent summer, isn’t it? Here, I’d like to introduce a morning glory you can make with a single sheet of origami paper.
The key is to crease the folds firmly as you go.
At the end, when you fold the origami along the creases from the opened state and shape it into a morning glory, if the creases are misaligned, the flower won’t puff out nicely—so the creases are very important.
It might also look lovely and festive to decorate a wall with them and add some morning glory leaves.
Flower craft ideas that are easy to make with a single sheet of origami (21–30)
Camellia

Camellias are known as flowers that bloom during very cold seasons.
They’re characterized by their tubular petals and stamens that look like a tea whisk.
Here’s an idea for making a camellia using a single sheet of origami paper.
First, fold the paper into a triangle, then open it and fold the bottom edge up to meet the crease you just made.
Next, fold the right corner to align with that new crease.
Rotate the paper and fold the remaining two corners in the same way so that the four edges form a spiral and the origami becomes a square.
Open the paper back to the state where only the first edge folds were made, then mountain-fold the four triangular sections at the corners and fold them down, continuing to shape it into a spiral.
Finally, fold the corners gathered in the center back outward, and you’re done!