[Summer Vacation Crafts] Stylish Ideas for Girls


When it comes to summer craft projects for girls, many people think of piggy banks or pen holders.
But why not try something even cuter and more stylish? Here, we’ll share craft ideas that girls will love.
You’ll find plenty of ideas that you’ll want to display at home or proudly show off to friends.
Even classic projects like piggy banks and pen holders can become more fashionable with a few simple tweaks.
Use these ideas as inspiration to create your own unique and wonderful pieces!
- Simple but awesome! Craft ideas for upper-grade girls
- [For Girls] Make It with Everyday Items! Easy but Super Cute Craft Ideas
- Simple and cute summer project crafts! A collection of ideas for girls that will make you want to create
- [For Adults] Simple yet Impressive Crafts: A Stylish, Eye-Catching Collection
- For summer vacation homework! Simple and amazing crafts for elementary school students that you’ll want to make after seeing them
- Cute Origami Ideas for Girls
- Stylish plastic bottle crafts. Packed with surprising ideas!
- Elementary School Students: Simple One-Day Science Project and Craft Ideas
- [Hand Sewing] Easy crafts recommended for elementary school students. Let's handmake something cute!
- A collection of summer vacation craft ideas made with 100-yen shop materials
- Christmas crafts for adults: stylish project ideas you'll want to display
- Crafts you can make with 100-yen shop items! A collection of fun project ideas that elementary school kids will love
- Crafts parents and kids can enjoy together. Recommended craft ideas to keep children entertained.
[Summer Vacation Crafts] Stylish Ideas for Girls (71–80)
A one-of-a-kind toy clock in the world

The idea is to make a clock using a clock movement and a board, then attach various toys to it.
You can get a clock movement at a 100-yen shop or a handmade goods store, and you can buy the board for the clock face at a home improvement store.
First, draw diagonal lines on the board to find the center point, and mark where to drill the hole for the movement.
Next, use a protractor to decide where to place the numbers on the clock.
After drilling the hole and painting if you like, it’s time to decorate the face.
Use a hot glue gun to attach the toys however you like.
Finally, secure the clock movement in the hole, and you’re done.
Arrange your favorite toys with style and create a wonderful clock!
disposable chopstick coaster

Introducing a chopstick coaster that lets you feel the warmth of wood.
Gather disposable chopsticks, glue, sanding sealer, varnish, and a brush, and let’s get started.
Glue chopsticks around the base board.
If you score the chopsticks with a utility knife before splitting them, they’ll break cleanly.
Lightly sand the tips to round them off.
Continue gluing the chopsticks from the outside toward the inside.
Adjust the size of the chopsticks as you go, fitting them while slightly changing the angle.
Brush on varnish and let it dry, and you’re done.
Give it a try!
small accessory case
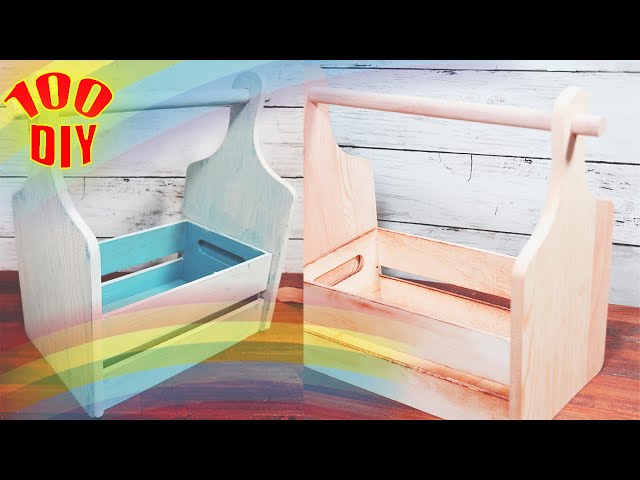
Let me introduce a cute and handy little storage container.
Get a wooden box, a cutting board, a round dowel, a hot glue gun, and a saw, and let’s get started.
Use the hot glue gun to attach the cutting board to the left and right sides of the wooden box.
Cut the round dowel to the appropriate length, sand the ends smooth, thread it through the holes, and secure it with the hot glue gun.
The process is simple and easy to make, so definitely give it a try.
It’s also recommended to paint it to add a personal touch.
[Summer Vacation Crafts] Stylish Ideas for Girls (81–90)
Handmade shaker coaster

Introducing original handmade “shaker” coasters that capture the feel of the seasons.
Gather styrofoam board, background design paper, a clear file, plastic sheet, double-sided tape, beads or seashells, and sand, and let’s get started.
First, decide what kind of coaster you want to make.
Cut the styrofoam board to create the coaster base.
Attach the base pieces together for the bottom section.
Apply masking tape around the edges, add seashells and sand inside, then seal it with the lid using double-sided tape—and you’re done! Give it a try!
Eyeball Tile Coaster

Here’s an idea where you use cork coasters sold at 100-yen shops as a base and decorate them with stickers and more.
Lately, tile stickers that were popular in the Heisei era have been making a comeback, and you can find a variety of patterns at 100-yen shops as well.
Decorations using remake sheets—those you stick on furniture or walls—are also recommended.
With a bit of creativity, the possibilities are endless, so go ahead and make coasters full of originality!
Let’s make a bamboo lantern

Here’s how to make a bamboo lantern that looks beautiful when it glows at night.
Use a saw to cut the bamboo.
Make slits in the cut bamboo, then gently tap from above with a hammer to create openings where the light will shine through.
The key is to tap with the hammer without using too much force.
Drill holes to create several small windows for the light to leak out.
Wrap yarn around the top and bottom of the bamboo tube, using double-sided tape to secure it.
Place an LED light inside, switch it on, and let it shine.
It emits a soft glow that gives off a traditional Japanese ambiance.
Let’s make a squishy.

Making squishies you can play with over and over is also a great idea for an independent study project.
Squishies are toys with a soft, fluffy feel.
You’ve probably seen squishies that look just like real food.
Since you’ll be making your own this time, enjoy taking the time to think about what kind of food-themed squishy you want to create.
Another fun point is that you can customize them depending on your ideas.
For example, you could use slime to represent stretchy cheese, or make one where something pops out when you press it—that sounds fun too.