Handmade Halloween Decorations! A Collection of DIY Decoration Ideas Using Everyday Materials


When Halloween season rolls around, many of us want to decorate our homes with a slightly spooky yet cute vibe! In times like that, how about using handmade Halloween decorations? Handmade pieces have a special charm you just can’t get from store-bought items.
If you make them with family or friends, the excitement for Halloween will double! And if they’re easy to craft with materials you already have at home, you can start the very day inspiration strikes.
In this article, we’ll introduce ideas for Halloween decorations that will beautifully brighten up your room.
Why not create special memories with warm, handcrafted decor?
- Halloween crafts made easy! A collection of cute ideas you can make with everyday materials
- Parents and kids will be hooked! Easy pumpkin origami ideas—perfect for Halloween crafts.
- Get kids excited in childcare! A collection of ideas for making Halloween treat bags
- Simple! Cute! Handmade Halloween accessories
- Paper cup crafts that elementary school kids will love! A collection of fun project ideas
- [Easy Halloween Vibes] Perfect BGM and Theme Songs for a Halloween Party
- At daycare and kindergarten! A collection of Halloween decoration ideas
- Halloween in childcare gets exciting! Dance ideas for moving and having fun
- [For Seniors] Have Fun Moving with Halloween Exercises! Introducing Songs You Can Dance To
- [Ghosts & Yokai] Horror Song Collection [Monsters & Zombies]
- [Classical] Recommended classical music perfect for Halloween
- Cute Halloween Song Collection! A carefully selected lineup of adorable tracks that both kids and adults can enjoy
- Songs that amp up Halloween: a roundup of perfect tracks for party BGM!
Handmade Halloween Decorations! A Collection of DIY Ideas Using Everyday Materials (21–30)
Eyeball flower
https://www.tiktok.com/@hornirakl/video/7426097128314899718Why not get ready for Halloween by making decorations with a delightfully eerie vibe? The key is a unique design, so definitely give it a try.
You’ll need lollipops, kitchen paper, colored pens, black construction paper, scissors, bamboo skewers, a hot glue gun, paint, glue, and more.
By rolling cut pieces of black construction paper around a bamboo skewer, you can achieve a petal-like finish.
Try adjusting the colors and the number of petals as you go.
These should work great both as decorations and as gifts.
Yarn Ball Halloween Wreath
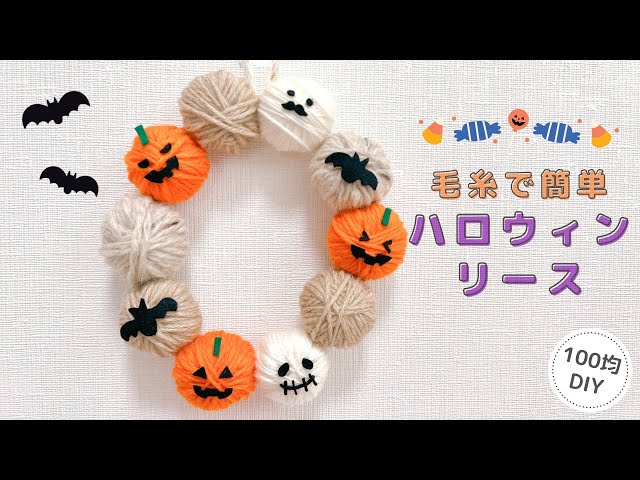
A handmade, cozy yarn Halloween wreath.
Prepare tissues, yarn, felt, scissors, and glue, and let’s get started.
Crumple three tissues into a ball to make the base for a pumpkin.
Wrap yarn tightly around it to add thickness, and secure the end with glue so it doesn’t unravel.
Make more in the same way, changing the yarn colors as you like.
After you’ve made about 10, glue them together in a circle.
Create original facial features with felt, attach them, and you’re done.
The steps are simple, so it’s an activity you can enjoy together with children around kindergarten senior age.
Halloween Snow Globe
https://www.tiktok.com/@rin_mama_ikuji/video/7546565410003373319Let’s create and display Halloween-themed decorations packed with your personal touches! You’ll need a lidded empty jar, a melamine sponge, adhesive, Halloween-themed figures or ornaments you like, picks, beads, liquid laundry starch, water, and glitter or sparkly materials.
The key is to use a water-resistant adhesive.
The look will change depending on the size and color of the glitter, so be sure to experiment.
Also, when children handle the adhesive, it’s best for them to work together with a parent or teacher to prevent it from getting on their hands.
[100-yen shop] Halloween wreath made with paper plates and paper napkins
https://www.tiktok.com/@sana_tanosi/video/7548615236337569032A Halloween wreath made with paper plates and paper napkins full of Halloween vibes.
Get your paper plates, ribbon, construction paper, paper napkins, scissors, and glue ready.
Cut a hole in the center of the paper plate to make the wreath base.
Cut the paper napkins for decoration into pieces about 1/16 of their original size and twist them.
Using glue, attach the twisted napkins to the paper plate.
The key is to place them so there are no gaps.
Wrap a ribbon around it for an accent, and finish by attaching decorations made from construction paper—witch’s legs, a hat, and bats.
Give this parent-and-child Halloween wreath a try!
Halloween wreath made with rubber bands
Thread about 60–80 rubber bands onto a tube, then remove them and tie the center with another rubber band.
Cut the looped sections on both sides with scissors, then trim the ends to shape it.
Pass a twist tie through the central rubber band and attach it to the base.
This will become the ghost, so make lots of them in various colors until the base is completely covered.
Attach googly-eye parts to the rubber bands, thread a hanging string through, and it’s done.
Mixing rubber band colors adds a nice accent.
[100-yen shop] Just stick on the parts! Halloween wreath
![[100-yen shop] Just stick on the parts! Halloween wreath](https://i.ytimg.com/vi/fcss4eulnjA/sddefault.jpg)
A cute Halloween wreath you can make just by attaching parts.
Get your ribbon, faux fur, pumpkin bouquet, artificial flowers, nuts, wreath base, adhesive, and nippers ready, and let’s get started.
Glue the fur material onto the wreath base.
Use nippers to cut flowers and greenery from the pumpkin bouquet, then glue them on.
Using velour flowers adds a warm, autumn feel and looks adorable.
Keep balance and volume in mind, and glue everything securely so it won’t come off.
Adding colored leaves and pumpkins is also a key point.
You can enjoy making a simple yet luxurious original wreath.
[Origami] 3D Halloween Wreath
![[Origami] 3D Halloween Wreath](https://i.ytimg.com/vi/aYVhyx9zI0g/sddefault.jpg)
This wreath is made by gluing circular pieces onto a 12 cm diameter base.
Use origami paper for the pieces.
The first piece is a circular part cut to a 3 cm diameter.
The second is made by folding a circular piece in half and gluing three of them together to create a three-dimensional element.
The third is a slightly larger pumpkin piece made the same way as the second.
After alternately attaching pieces 1 and 2 to the base, glue Halloween-themed craft decorations onto piece 1.
Then attach the pumpkin piece to the end of a strip of origami paper cut lengthwise, and stick it onto the base so it looks like it’s hanging from above.
That’s it!