![[Lesson Bags] Cute & Easy! A Roundup of Handmade Ideas](https://i.ytimg.com/vi_webp/hqxblYpqe0s/maxresdefault.webp)

How about making a handmade “lesson bag” for your child’s classes using fabric in their favorite colors and patterns?
In this article, we introduce a variety of handmade lesson bag ideas, including lined and reversible styles, shoulder bags, and backpack styles.
A bag made just for them will surely boost your child’s motivation for their lessons!
We’ve gathered ideas that use simple steps to create cute, high-quality bags with ease, so please use them as a reference.
- [For Boys] Cool and Stylish Handmade Lesson Bag Ideas
- Let's handmake an eco bag: a collection of convenient and cute ideas
- Handmade tote bag ideas: from how to make them to design
- [Hand Sewing] Easy crafts recommended for elementary school students. Let's handmake something cute!
- Let's make a handmade tissue case: a collection of stylish and easy ideas
- [Enrollment] Handmade bag ideas you can use at daycare
- A roundup of cute handmade kids’ clothing ideas
- [For Girls] Make It with Everyday Items! Easy but Super Cute Craft Ideas
- [Crafts] Cute! Handmade Drawstring Pouch Idea Collection
- Let’s make baby goods by hand! Introducing popular handmade recipes
- [Easy] Practical craft ideas. Great for beginners too!
- [Childcare] Handmade bag ideas for kindergarten commuting
- For summer vacation homework! Simple and amazing crafts for elementary school students that you’ll want to make after seeing them
[Lesson Bags] Cute & Easy! A Handcrafted Idea Pick-Up (1–10)
Lesson tote bag with divider

When you want to carry a lot of items, having dividers makes it easy to see what’s inside at a glance, which is convenient.
This one not only has dividers but also comes with four pockets, so you can store small items as well.
It’s also large enough to fit a tablet or a melodica.
After attaching handles to the outer fabric, attach hook-and-loop fasteners to the divider fabric.
Sew the lining with the pockets to the divider fabric, then sew the outer fabric and lining together to finish.
The hook-and-loop fasteners on the dividers help prevent items from falling out quickly, which is nice.
Adding a zipper would also be a good option.
Laminated fabric lesson bag

Let’s try making a tote bag with water-repellent laminated fabric.
It’s a handy item to have since you can use it on rainy days.
This idea also skips the lining, so it’s easy to make.
Prepare two pieces of the outer fabric, place them right sides together, and sew a zipper to the top.
Cut squares from both lower corners, sew to create boxed corners (gussets), then sew the sides.
Turn the fabric right side out, attach handles made from the same fabric, and you’re done.
You can add a tag if you like.
Lesson bag with lid

Lesson bags are characterized by their wide openings that make it easy to put things in, but on the flip side, items can fall out easily when tilted.
So how about making a lesson bag with a flap? First, round off two corners of the outer fabric and lining, then sew them together to make the flap.
Sew the outer fabric pieces together and the lining pieces together, and create the gussets.
Sew the bag strap tape and the flap onto the outer fabric, then attach the lining.
Finish by sewing hook-and-loop fasteners onto the flap and the outer fabric.
Thread an adjustable slide (tri-glide) through the bag strap tape so you can adjust the length.
Lesson bag with shoulder strap

It’s so convenient when you can sling it over your shoulder and keep both hands free, right? So, here are some handmade ideas for a lesson bag with a shoulder strap.
This one uses quilted fabric for the outer layer and a heavy fabric for the base, making it durable.
It also has gussets, so it holds a good amount.
Sew the bag tape (which will be the handles) onto the outer fabric, then layer the base fabric on top and sew.
Stitch everything together to form the bag shape, and sew bag tape with D-rings on both ends.
Sew the lining, attach the shoulder strap, and you’re done.
zipper tote rucksack

Here’s an idea for a bag that can be used both as a tote and as a backpack.
The bag opening has a zipper.
There’s a zippered pocket on the outside and one pocket on the inside.
With a gusset of about 10 cm, it looks like it can hold quite a lot.
Sew the pocket and handles onto the outer fabric, and sew the backpack straps and handles onto the lining fabric.
After sewing a pocket onto one side of the lining, attach the outer fabric and lining to the zipper at the bag opening.
Then sew the outer pieces together and the lining pieces together separately, create the gusset at the bottom, and you’re done! You could also add a tag or charm, or make the backpack straps removable.
Lesson bag with zipper
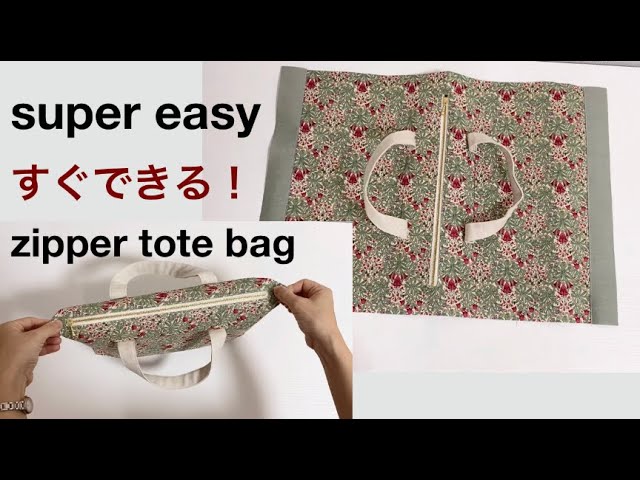
Here’s a handmade idea for a lesson bag with a zipper.
Having a zipper keeps the contents from being seen or falling out, making it convenient not only for children but for people of any age.
Layer the outer fabric with the lining, sew a tall rectangular shape down the center, then cut a slit inside it and turn the lining to the back through the slit.
Sew the zipper into this opening, and attach bag tape on both sides to form the handles.
Sew the outer fabric together and create the gusset, then leave a turning opening and sew the lining as well.
Turn the fabric right side out, close the turning opening, stitch down both ends of the zipper, and you’re done.
Reversible lesson bag

Here’s an idea for a reversible bag that lets you enjoy two patterns with a single bag.
Place the outer and lining fabrics right sides together, sandwich the bag tape (which will be the handles) between them, and sew.
After forming a tube, shift the fabric so the seam sits at the center.
Create gussets at the bottom, sew the remaining edges, then turn the bag right side out and topstitch around the opening.
If you need pockets, sew them onto the outer and lining fabrics first.
Try making it with two fabrics featuring motifs kids love—like cars and dinosaurs, or flowers and hearts!