Ideas for Tomica Maps You Can Make and Play With Your Kids

Speaking of Tomica, it’s a hugely popular series with kids because it sparks their imagination.
It’s not just fun to play with—the wide variety of vehicles is part of its appeal.
Through different work vehicles, roads, and traffic signs, children can also learn how society functions.
Here, we’ve gathered a variety of ideas for creating your own handmade Tomica world.
Everything can be made with familiar materials like cardboard and items from 100-yen shops.
Have fun spending time with your child as you think things through together!
Make and play with your kids! A collection of Tomica map ideas (1–10)
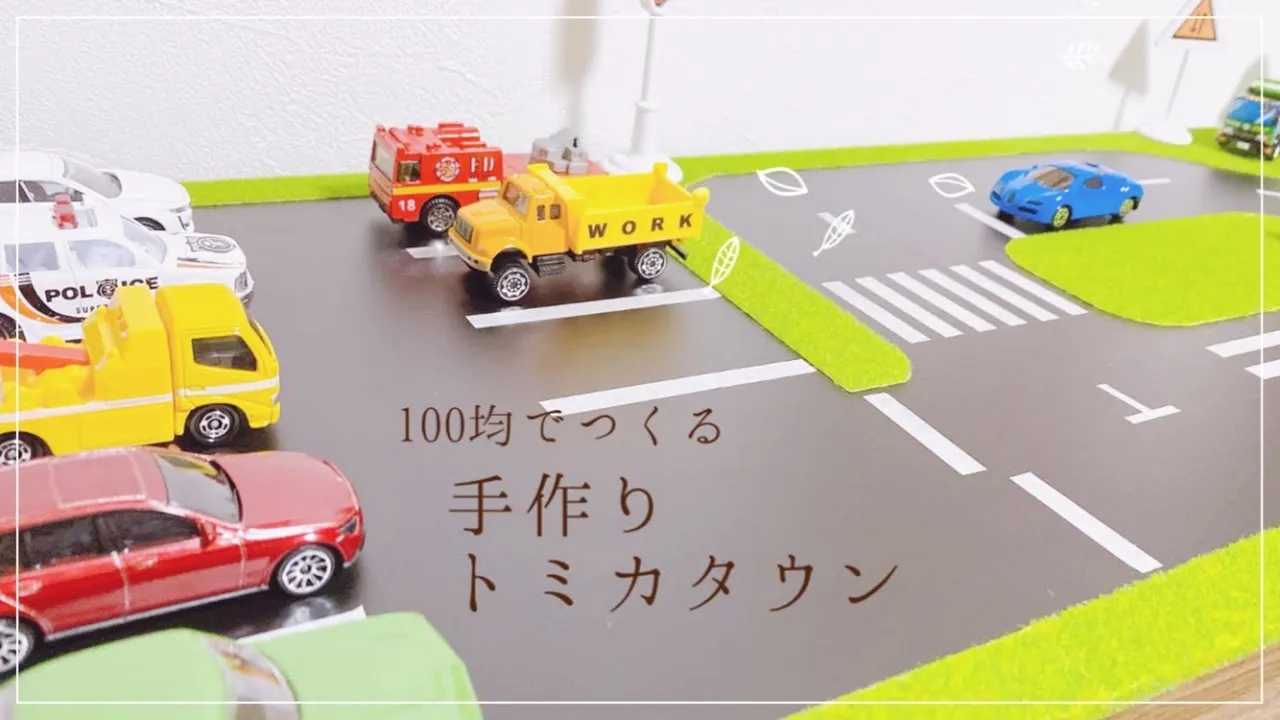
Handmade Tomica Town

Make it with items from the 100-yen shop! Here’s how to create a Tomica Town that both kids and adults who love Tomica can enjoy.
Materials: two black corrugated plastic boards, two chalkboard sheets, three grass sheets, a white paint marker, and double-sided tape.
First, use the black corrugated plastic as the base and stick the chalkboard sheets onto it.
Cut the grass sheets into strips about 3 cm wide and stick them on the base to resemble parking areas.
Use the white paint marker and double-sided tape to design crosswalks and more.
Have fun with your Tomica cars!
Tomica Town in a File Case

Recommended for kids who love Tomica! Here’s how to make a mini car play mat that’s easy to carry in a file case.
You’ll need an A4-size file case, double-sided tape, laminate film if you have it, and two A4-size mini car maps.
You can enjoy mini car maps whether you make them yourself or download them.
First, laminate the mini car maps.
Place the laminated maps inside the file case.
Add your child’s favorite mini cars and it’s complete!
Tomica map made with clear cases
https://www.instagram.com/reel/DAKUlxuOifZ/Easy to carry in a clear case! Here’s how to make a Tomica on-the-go map using a clear case.
You’ll need a B5-size clear case, a printed map split into two sections, laminating sheets, and a milk carton if you want to make roads.
First, laminate the printed map, cut it to fit the clear case, and slide it in—that’s it! If you’re making roads, draw lines on the milk carton to divide it into five sections.
Fold the milk carton in the order: valley fold, mountain fold, mountain fold, valley fold.
Glue the printed road map onto the milk carton, then attach it to the map, and you’re done.
A Tomica map you can make with felt material

Make it with felt! Here’s an easy-to-design Tomica play map.
You can get all the materials at the 100-yen shop.
What you’ll need: an MDF board, self-adhesive cork sheet, grass-pattern sheet, felt, double-sided tape, glue, and decorative materials.
First, stick the cork sheet onto the board, aligning the corners.
Trim off any excess.
Next, sketch the areas where you’ll place the grass-pattern sheet.
Cut the sheet along your sketch, then stick it down, aligning it with the top-left and bottom-right corners.
Add more pieces where it’s missing.
Finally, cut out the items you want to make with felt, and attach them with double-sided tape or glue—and you’re done!
A map made with materials from a 100-yen shop

Fun for kids and adults alike! Why not handcraft a mini car road using a file case? All you need is a file case, colored board, and artificial turf.
First, prepare a road design or drawing, then glue it onto the colored board.
Once it’s dry, cut out the road and arrange it inside the file case.
After you’ve decided on the placement, glue it down and let it dry.
Cut the artificial turf and fill in the gaps to finish! The artificial turf gives it a striking look you won’t find in store-bought products, so definitely give it a try.
A Tomica map you make by downloading and assembling printable road sheets

You can make it with cardboard! Here’s a craft project for creating Tomica Town.
What you’ll need: cardboard, printed road sheets (downloaded), wood glue, and packing tape.
First, open up a piece of cardboard to your preferred size.
Place the road sheets on the inside surface of the cardboard and plan your layout.
Make sure the roads connect to each other.
Apply wood glue to the cardboard and stick the road sheets on one by one.
Next, flip it over and trim off any excess paper.
Stick packing tape over the gaps in the cardboard, and you’re done! Since the cardboard can be folded, it’s handy for kids to tidy up and highly recommended.
Tomica map made with origami
https://www.instagram.com/reel/C7OOMCaOAEO/Let’s make it by cutting origami! Here’s how to create a Tomica play map you can make with kids.
Materials: white vinyl tape, poster board, and gray origami paper.
Cut the origami in half, then cut one of those halves in half again.
Cut one piece to match a 7.5 cm circle.
Prepare lots of these three types of parts.
Connect them like roads.
For curves, cut a quarter of a circle with a 15 cm radius.
Make crosswalks and other markings with colored vinyl tape and stick them on to finish! Using masking tape is also recommended.