Toddlers will love it! Fun-to-make July origami recommendations

Young children are beginning to take an interest in colors and shapes.
This is an important time for them to experience the joy of creating things with their own hands.
Here, we’re introducing fun origami ideas that also help develop concentration.
Try making a variety of items using colorful paper! If you create pieces that capture the feel of summer together, you can make even hot July days enjoyable.
There are also cute works perfect for decorating walls, so get creative and enjoy July origami with the children!
- Fun Origami Ideas for July That Older Kindergarteners Will Love
- Fun to make in childcare! A collection of easy origami ideas recommended for July
- Fun with preschoolers! July origami ideas to feel the season
- Enjoy August with preschoolers using origami! A collection of summer-perfect ideas
- Have fun in August! A collection of summer origami ideas recommended for preschoolers (4–5 years old)
- [Age 3] Simple summer origami ideas. A roundup of classic summer motifs.
- [Childcare] A roundup of easy summer origami ideas to enjoy with 5-year-olds
- Craft ideas to try in July for 3-year-olds
- Recommended for older preschoolers! A collection of origami craft ideas to enjoy summer in August
- [Age 4] Easy origami ideas perfect for summer! A collection of cool, refreshing motifs
- [For Preschoolers] Fold with Fun! January Origami Ideas for Little Ones
- [July] Recommended for 1-year-olds! Fun summer craft ideas
- For preschoolers! Cute origami ideas to make in December
Young children will love it! Fun-to-make July origami recommendations (1–10)
watermelon

When it comes to summer-perfect fruit origami, watermelon is the classic choice.
Here, we’ll show you how to make a watermelon using just a single sheet of origami paper.
Simply fold along the edges in sequence and you’ll have a watermelon.
For a more realistic look, it’s best to stack a green sheet and a red sheet back-to-back before folding.
Once it’s finished, draw the seeds with a felt-tip pen or similar.
You could even try making a yellow watermelon.
Why not create a seasonal vibe by putting them on the wall or displaying them in your entryway?
Orihime and Hikoboshi

July 7th is Tanabata.
It’s said that Orihime and Hikoboshi can meet once a year.
This time, let’s make Orihime and Hikoboshi using a paper plate and origami.
Fold each character with origami.
The key is to crease firmly, as if ironing along each fold line.
The kimono sections can get thick and may require a bit of strength, so encourage careful, slow folding.
Cut the rim of the paper plate, wrap it with black tape, and attach stars to complete the Tanabata night sky.
Then stick Orihime and Hikoboshi onto the paper plate to create a fun Tanabata decoration.
goldfish

Let’s try folding a goldfish with origami.
Origami goldfish look colorful when made in various colors, and they give a very cool, refreshing impression.
As for how to fold this goldfish, the steps are the same as the origami samurai helmet up to a certain point.
Flatten the helmet sideways and fold back the tail section, and a goldfish will appear.
The horn parts of the helmet become the goldfish’s fins.
If you put lots of colorful goldfish in a glass bowl or add paper that resembles aquatic plants, it will look even more refreshing.
Try getting creative and see what you can make.
Delight the little ones! Fun-to-make July origami recommendations (11–20)
Spinning paper toy

You’ll definitely get hooked watching it spin around and around! First, cut a 4 cm × 15 cm sheet of origami paper lengthwise into three long strips.
Fold each strip in half at the center.
Start by crossing two strips at a right angle, then thread the remaining strip through the loop created where the first two intersect at a right angle.
Pull all the ends tight to secure them, adjust the shape, and it’s done! Just drop it, and it will spin as it falls.
Try dropping it from different heights and have fun!
Quick and cute! Sunflower origami

This is an easy sunflower made with 7.5 cm square origami paper and 4 cm square origami paper.
Fold the larger sheet in half horizontally twice, then fold all four corners toward the center.
From the center, fold each corner back at the 2 cm mark and turn it over.
For the smaller sheet, fold it twice to make a triangle, then fold the corners toward the center.
Unfold, and make small folds toward the creases you just made.
Fold the remaining three corners the same way, then stick it onto the center of the larger piece.
Draw a face or sunflower patterns to finish.
It’s very simple, so it’s perfect as a recreational activity for young children up to seniors.
Origami sunflower seed

You’ve finished the yellow petals of the sunflower, but aren’t sure what to do for the brown center? This will help! Prepare a sheet of brown origami paper.
First, fold it in half into a square twice, then unfold to make crease lines.
Fold each corner toward the central crease, then fold toward the center two more times to form a small square.
After that, just draw a grid pattern and you’re done! Combine it with the yellow sunflower petals you made separately from origami, or with a drawing of a sunflower that has only the petals.
Kids will love it! Easy origami stag beetle
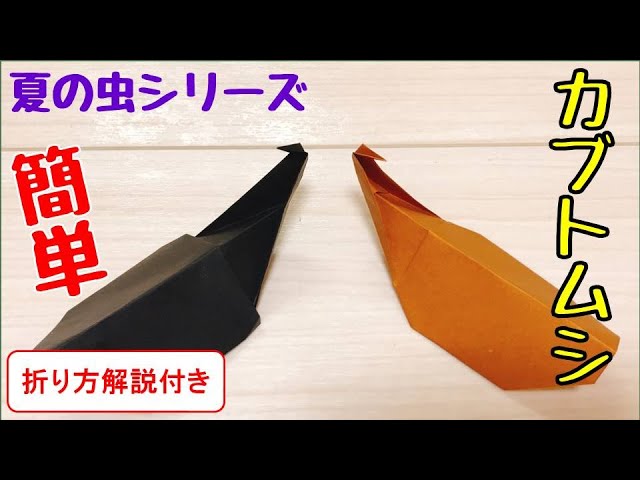
Introducing a versatile rhinoceros beetle that can be used in many ways—as a wall decoration piece or as an eye-catching touch on portfolio covers and the like.
It doesn’t have detailed legs or a cool horn, but it’s easy to fold, so it’s recommended even for small children.
For a beetle model, the unusually few folding steps are also noteworthy.
Add some round, beady eyes and it transforms into an adorable beetle.
Fold the paper along the center line created by a diagonal fold.
Match the tip of the folded section to the opposite corner.
Then fold back the part you just folded once… Written out, it may sound complicated, but it’s actually very simple.
Give it a try!