Fun to make in childcare! A collection of easy origami ideas recommended for July


A summer of continuing hot days! In childcare, we also worry about things like children getting heatstroke, don’t we? At times like that, how about enjoying origami indoors? Here, we’ll introduce origami ideas that are perfect for July.
Most of the folding methods are relatively simple, so they’re easy for children to try.
Once you’ve folded them, try decorating the wall with them or using them for pretend play.
Origami helps expand creativity, so it’s highly recommended.
Please use this as a reference and enjoy your origami time!
- Recommended in July! Summer craft play ideas
- Fun to make in childcare! A collection of easy origami ideas recommended for July
- Origami perfect for summer. Fun and easy for kids to make!
- [For Preschoolers] Fold with Fun! January Origami Ideas for Little Ones
- [For Preschoolers] Let’s Make It Together with the Kids! Origami Ideas for February
- [Childcare] A roundup of easy summer origami ideas to enjoy with 5-year-olds
- [Age 4] Easy origami ideas perfect for summer! A collection of cool, refreshing motifs
- Toddlers will love it! Fun-to-make July origami recommendations
- Fun Origami Ideas for July That Older Kindergarteners Will Love
- Fun with preschoolers! July origami ideas to feel the season
- [Childcare] Perfect for June! Easy origami ideas
- [Childcare] August origami: simple and cute ideas
- Childcare: Ideas for activities to enjoy in July
Fun to make in childcare! A collection of simple origami ideas recommended for July (11–20)
Double-sided origami sunflower

This sunflower features slightly three-dimensional petals and looks lovely.
For this method, use double-sided origami paper, so please prepare one that’s yellow on one side and brown on the other.
Fold it in half twice so the brown side ends up on the inside, forming a square.
Open it, then fold it twice again to make a triangle.
Fold the four corners toward the center where the creases intersect to create the petals.
Continue folding as you would when making a crane, and you’ll end up with eight petals.
A nice point of this piece is that it’s completed with just one sheet of origami paper.
Be sure to get double-sided paper and give it a try!
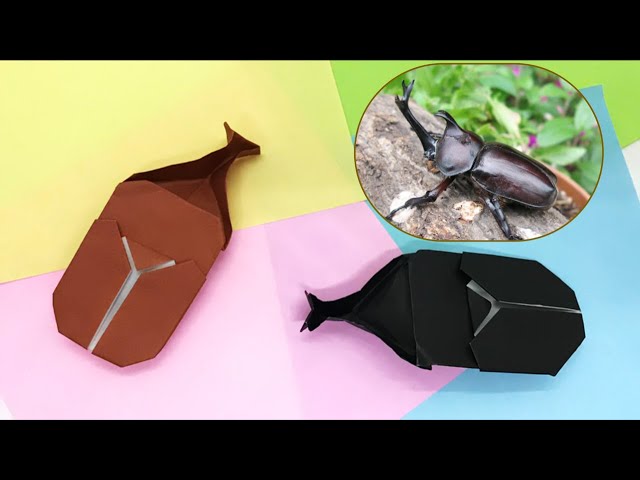
Summer Origami! How to Fold a Rhinoceros Beetle

Origami rhinoceros beetle creations have a cute, round, chubby shape.
Because the design is rounded, there are some parts where you need to make fine folds.
Still, carefully folding each step will give you a satisfying sense of accomplishment when the beetle takes shape.
Adding sticker-made eyes to the finished beetle or attaching legs folded from origami can change the overall style.
Trying different arrangements can be fun, don’t you think? Once it’s done, you can mount it on a backing sheet to display, or place it on a shelf to bring a seasonal touch to your room.
How to fold a small rhinoceros beetle

Introducing an adorably tiny origami rhinoceros beetle.
It’s so small it fits not only in a child’s palm but even in a baby’s.
It looks great as a letter decoration or a pop accent on a postcard.
Just note that the paper you fold is quite small, so take your time and enjoy the process without getting impatient.
You’ll use two 3.5 cm squares of paper.
You’ll make the horn piece, the body piece, and the leg piece separately, then glue them together at the end.
Scissors are also used, so it should be suitable for upper-elementary school students and older.
Once you make one, you’ll want to make more—such a cute mini-mini beetle!
King of insects! Origami rhinoceros beetle
Some families may do origami together with their children.
If you’re going to do it, you’ll want to fold something that’s easy for kids, right? There are beetle designs—king of the insects—that are simple to fold.
Even though they’re easy for kids, the wings and body are clearly separated like a real rhinoceros beetle.
It even has a long, impressive horn that gives it that authentic beetle presence.
It’s also a great idea to make a watermelon or a tree out of construction paper or origami and display them together with the beetle.
How about making lots of beetles and putting them on display?
The hole punch is cute! Sunflower paper cutout

How about making sunflower kirigami out of origami paper? Kirigami is a fun craft that lets you enjoy the surprise and excitement when you unfold it.
Fold a sheet of yellow origami paper twice to make a square, and once more to make a triangle.
Fold it in half again, then use a pencil to draw the shapes and patterns of the petals.
Cut along the lines you drew with scissors, punch some holes with a hole punch, and then unfold it.
Thinking about what shape it will become as you cut—only to open it and find something completely different!—is one of the real pleasures of kirigami.
Be sure to add your favorite patterns and try making your very own original sunflower.
shark
@azacraft44 DIY bikin origami ikan hiu mudah banget #origamitutorial#handmade#fyp
♪ Happy Cha-Cha BGM – MaksJ
A quirky shark that bends! Here’s how to fold a shark using a single sheet of origami paper.
You’ll need one sheet of origami paper in your favorite color and some decorations for the eyes and mouth.
First, fold the paper into a triangle twice.
Using the corner as a pivot, fold one corner up to the center, then fold the tip down along the crease.
Repeat the same steps on the other side, layering the folds.
Finish by decorating the shark’s eyes and mouth, and you’re done.
It’s also cute if kids draw the eyes and mouth with crayons, so that’s recommended!
Fun to make in childcare! Simple origami ideas recommended for July (21–30)
bug cage
@reitanreitannorigamiroo0 It only takes 10 minutes to fold! How to make a bug cage (origami)#origamiFour seasonsOrigamiSeasonal Origami Shop#Pokemon#Pokemon
♬ YouTube, relax, talk, live streaming(961396) – TAKACHAN
It’s just like a real bug cage! Let me share an idea for making and displaying a paper bug cage.
You’ll need light blue origami paper, yellow-green origami paper, scissors, glue, and a white pen.
This idea features making separate parts—the handle, lid, and basket—and then gluing them together.
When you assemble them, align the crease lines to stick them on straight.
You can also adjust the colors of the origami to match any bug cage you have at home or in the classroom.
Give it a try!