[Childcare] Butterfly craft ideas

When spring arrives and many flowers bloom, we often see butterflies fluttering from flower to flower.
They make you want to chase after them, or gaze intently as they rest—butterflies are fascinating insects for children, too.
Here, we’ve gathered craft ideas all about butterflies.
From classics like origami to projects using various materials such as tissue paper and colored cellophane, and even fun techniques like footprint art and cardboard stamping—these ideas are sure to spark children’s curiosity!
Let kids freely express their favorite colors and patterns to create colorful, adorable butterflies!
- [For 4-Year-Olds] Feel the Spring Up Close! Fun and Easy Craft Ideas You’ll Love
- [Preschool] Tulip wall display ideas to make in April
- [Childcare] Recommended for spring! Cute dandelion craft ideas
- [Childcare] Fun to Make! Recommended Craft Ideas for Spring
- [For Age 3] Let’s make it in April! A collection of craft ideas to feel spring events and nature
- [Childcare] Recommended for 3-year-olds! Craft activity ideas
- [Childcare] Let’s make things with various materials! A collection of recommended craft ideas for April
- [April Crafts] Useful for childcare! Spring craft ideas for 1-year-olds
- [Childcare] Recommended for nurseries and kindergartens! Cherry blossom craft ideas
- [Childcare] Ideas for March wall decorations
- [Childcare] Decorate in April! Butterfly Wall Display Ideas
- Origami Butterfly Ideas That Are Easy for 3-Year-Olds
- [Childcare] Simple origami ideas for kids, perfect for spring
[Early Childhood Education] Butterfly Craft Ideas (1–10)
Flappy butterfly
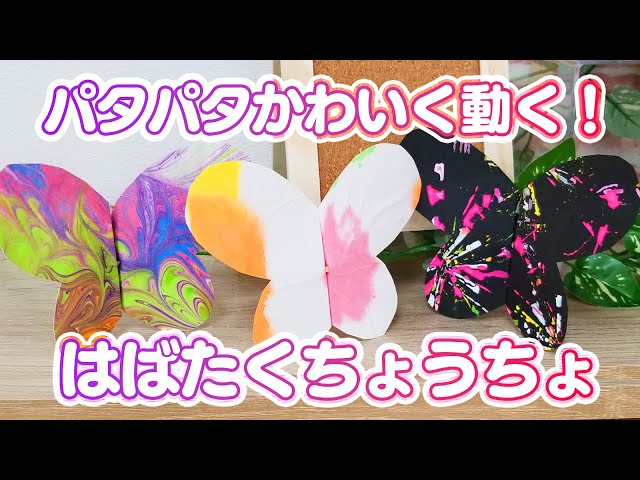
This is a butterfly gadget toy with amusing flapping wings.
The materials are straws, bamboo skewers, construction paper with your favorite drawings, double-sided tape, and so on.
The main wing part is fun because you can use any artwork you like, such as crayon scribbles, finger painting with paint, or marbling.
For the center section where the bamboo skewer goes through, just fold the construction paper and apply double-sided tape.
Fit a straw with a split tip onto the bamboo skewer, and you’ll have a butterfly that flaps its wings.
It’s great that you can make a simple moving toy that kids love so much!
A cute idea with butterflies and horsetails
@chooobo2 Making butterflies and horsetails ☘️#April Production#March productionProduction ideas#Nursery School Craft#Childcare Crafting
♬ Happy fun, pop acoustic – 3KTrack
March is the season when plants sprout and insects become active.
How about making “Butterflies and Horsetails,” perfect for welcoming spring? Stamp paint onto butterfly-shaped pieces cut from colored construction paper using water balloons.
On round pieces of brown construction paper, use a fork to draw the horsetail patterns.
Paste each onto a backing sheet, then add the butterfly bodies and horsetail stems made from colored paper to finish.
Display them in your room for an instant bright, cheerful atmosphere.
Let’s make a butterfly with heart-shaped packing material
@atsumichan774 Spring Craft: Hello! I’m Atsumi, a nursery teacher. Today I made a butterfly using heart-shaped cushioning material I found at Daiso! No glue needed—just thread a chenille stem (pipe cleaner) through and tie it. Super easy idea. Using springlike pink-toned cushioning makes it extra cute. Perfect for spring decorations or wall displays! I think it’ll look even cuter combined with spring flower motifs. Give it a try! ■ Materials: Heart-shaped cushioning material; chenille stems or twist ties ■ How to make: 1) Thread a chenille stem through two heart-shaped cushioning pieces. 2) Tie the stem to create the antennae. Sound effect: MaouDamashii Atsumi-sensei’s Nursery Diary @atsumichan774 Butterfly Daiso Spring Nursery school Kindergarten Craft Project
♪ Original song – Nursery Teacher Atsumi @ Handmade Toys and Kids’ Crafts! – Nursery Teacher Atsumi @ Handmade Toys and Kids’ Crafts!
When you ask a 4-year-old, “What comes to mind when you think of spring?” they’ll likely say “butterflies”—a true symbol of the season.
How about making a butterfly using materials you can buy at a 100-yen shop? Combine two heart-shaped cushion pads with pipe cleaners or twist ties to form a butterfly.
The cushion material is soft, so it’s easy to thread the pipe cleaners through.
Use a pen to curl the ends for a rounded finish.
This cute, tiny butterfly craft is sure to delight your child.
[Childcare] Butterfly Craft Ideas (11–20)
Butterfly decoupage with paint
@hoiku.labo Preschool craft to make in spring♪ Butterfly decoupage with paint 🦋ChildcareNursery teacher / Childcare workerKindergarten TeacherChildcare job openingsChildcare Column#NurseryTeacherThings#IWantToConnectWithChildcareWorkers#Nursery School Craft#DaycarePreparationNursery School PracticumChildcare studentAspiring childcare workerChildcare Job LabNursery teacher skillsJob change activities#JobChange#nursery_teacher_job_change
♪ Original song – Craft ideas for childcare ♪ Nursery Job Labo – Nursery Job Lab | Preschool teachers’ career changes and useful information
Here’s an idea for making cute butterflies using the decalcomania technique.
Decalcomania is a painting method where you fold a sheet with paint on it in half to transfer the paint.
Put several colors of paint on construction paper and fold it in half.
Cut it into a butterfly shape and open it up to reveal a lovely pattern.
Attach facial parts made from construction paper and pipe cleaners, and you’re done.
It’ll be exciting if you spark imagination and think about how the paints blend as you work! Let your child choose their favorite paint colors and proceed with the craft together.
Make it with hanshi paper! How to make colorful butterflies
@job_it A must-see for childcare workers! Try making it! [Spring Craft]#Nursery schoolNursery teacher / Childcare worker#NurseryTeacherThingsAspiring childcare workerTranslationChildcare studentChildcare student#Childcare Crafting
♫ Original song – Nursery Sommelier – Your ally in job change 👶 Nursery Sommelier
Here’s an idea for making butterflies using calligraphy paper, paint, and pipe cleaners.
Prepare two sheets of calligraphy paper and paint each with your favorite colors.
Using several spring colors will make it nice and colorful.
Once the paint is dry, cut the paper into circles.
These will become the butterfly wings, so cut them to whatever size you like.
Lightly accordion-fold the center of each circular sheet, then place the two together and tie them with a pipe cleaner.
Leave the ends of the pipe cleaner long, and curl the tips to create the antennae.
Perfect for walls! A butterfly craft that makes paint play fun
Cut an A4 sheet of drawing paper into the shape of a butterfly, then apply paint on just one side.
Once you’re ready, fold it in half and lift the wing—your design will have transferred beautifully to the other side! You can also enjoy the excitement of seeing what pattern appears the moment you open it.
After that, attach the wings to another A4 sheet for the background, and stick a photo of your child in the center.
You’ll have a one-of-a-kind, adorable butterfly! It will look very spring-like on a wall display and become a wonderful, memorable piece.
Fluttering butterfly
This is a butterfly craft that’s easy to make with simple materials and fun even for small children.
You’ll need construction paper, a pipe cleaner, origami paper or stickers, scissors, glue, and double-sided tape.
First, fold the construction paper in half, then make a valley fold about 1 cm wide down the center to form the butterfly’s wings.
Next, attach the antennae made from a pipe cleaner with tape.
After that, stick your favorite origami paper or stickers onto the wings.
When you’re done, place your fingers in the valley-folded section and enjoy fluttering the butterfly as you play!