Fun to play! A collection of handmade toy ideas made with construction paper

We’re introducing easy and fun toy-making ideas you can create with construction paper.
Construction paper comes in many colors, is easy to cut with scissors, and works well with glue or tape—so the possibilities are endless!
In this article, we share lots of toy ideas that will make you want to start crafting right away.
From toys made using only construction paper to creations that combine other materials, there’s plenty to explore.
Find your favorite toy idea and have fun making and playing with it!
- Introducing easy-to-make newspaper toys! Once they're finished, you can play with them.
- Recommended for 5-year-olds! Simple DIY toy ideas
- Simple origami for kids: cute, playable origami ideas
- Fun DIY Toy Ideas You Can Make with 100-Yen Store Materials
- Disposable chopsticks transformed! Fun toy-making using chopsticks!
- Let's make it with origami! A collection of ways to fold “dinosaurs”
- An empty box becomes a toy! A collection of ideas for handmade toys
- Age 4: Simple and Fun! Handmade Toy Ideas
- Toddler-approved fun! DIY toy ideas for 2-year-olds
- Handkerchief and Towel Play! A Collection of Fun Play Ideas
- It moves! You can play with it! Fun origami. How to make origami toys.
- Let’s make it with 3-year-olds! Fun handmade toy ideas
- [Educational] Spark and nurture curiosity: simple and fun DIY toys
Fun to play! A collection of handmade toy ideas made with construction paper (11–20)
Simple puzzle

Let me introduce a puzzle that kids will be obsessed with, even though it’s super easy to make with construction paper.
You’ll use a square sheet of construction paper for this.
First, fold the paper to create a 4-by-4 grid of creases.
Once you’ve made the creases, cut out the four squares in the center.
From here, color in the specified positions so it works as a puzzle.
There are fixed spots for each color, so be careful not to make mistakes.
If you draw popular characters for kids instead of using colors, they might enjoy it even more.
Umbrella garland
@sunaco_chiiku I made it with my two older kids 🥰#HowToSpendTimeAtHomeLife with children#LifeWithABaby#LifeWithABaby#HandmadeToys#Garlandrainy season (tsuyu)
Shuwa-shuwa Honey Lemon 350ml – Sharou
Here’s how to make a cute handmade umbrella garland.
Prepare construction paper, pipe cleaners, double-sided tape, and string.
Cut six circles from the construction paper, fold each into quarters, and apply double-sided tape in two places.
Peel off the backing and stick the six pieces together to form an umbrella shape.
On the last piece, also put double-sided tape on the side, and attach a pipe cleaner whose tip has been twisted into a small loop to the side.
Wrap the remaining double-sided tape around to seal it, then twist the end of the pipe cleaner into a handle shape, and your cute umbrella is complete.
Make lots of them, thread them onto the string, and enjoy them as a garland! It’ll brighten up your room, too!
Handmade triangle puzzle
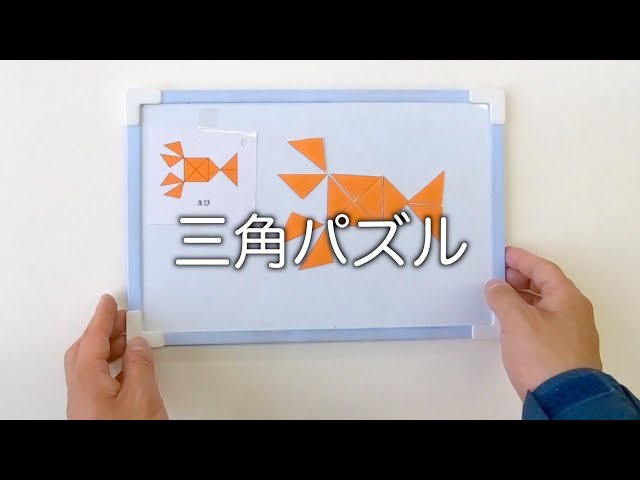
This is an indoor activity where you use colorful construction paper to make triangles of various sizes and combine them to complete pictures and shapes.
Children can work at their own pace and freely, which helps them enjoyably develop concentration, spatial awareness, and creativity.
Because there are few chances to fail and it’s easy to experience success, it’s also effective for boosting self-esteem.
The materials are simple and you can start right away, which is a big plus.
With a little ingenuity, kids can create their favorite animals, vehicles, or even story worlds—so adults, too, should dive in and enjoy it together!
Bug-catching toy

We’ll introduce how to make a bug-catching toy.
Get construction paper, magnets, straws, paper clips, glue, and some netting ready.
Cut colored construction paper into circles and assemble them into bugs.
Attach one paper clip to each bug and secure it with cellophane tape so it won’t come off.
Next, let’s make the bug-catching net.
Cut a ring out of thick paper and remove the center.
Thread the netting through the ring and staple it in place.
Make the handle out of a straw and attach it securely, then glue on a magnet, and you’re done! Have fun seeing how many bug cards you can catch.
Space Travel Game

Let me introduce a handmade space travel game.
Prepare 10 round magnets, round stickers, straws, and construction paper, and let’s make it together.
For the spaceship, attach a straw to a magnet, stick on a round sticker, and draw a rocket illustration.
Next, create a flight course for the spaceship on a base sheet of construction paper.
Cut black construction paper into circles and glue magnets at the center to make black holes.
Stick several of these black holes along the course, and you’re done.
Pilot the spaceship and try to reach the goal without getting swallowed by the black holes.
In conclusion
This time we introduced lots of ideas for cute toys to decorate your room and fun toys with clever mechanisms. You can buy construction paper at 100-yen shops, so pick a toy from the article that catches your eye, make it, and have fun playing with it!