[Hand Sewing] Easy crafts recommended for elementary school students. Let's handmake something cute!


Why not start some crafts that even elementary school children can enjoy safely? With simple hand-sewn projects using felt and fabric scraps, you can create lovely pieces with just the basic stitches.
Here, we introduce cute items like bi-color tassels, floral hair ties, and an adorable chick mascot.
The materials are easy to find, making it simple to give it a try.
Cherish children’s “I want to make it!” spirit, and share the joy of handmade creations together while having fun.
- Easy for elementary school kids! A cute collection of felt mascot-making ideas
- [Beginner Friendly] Easy Craft Ideas You Can Do
- Simple but awesome! Craft ideas for upper-grade girls
- Simple and easy! Crafts perfect for killing time
- Handmade plushies with everyday items! A collection of ideas perfect for beginners
- For summer vacation homework! Simple and amazing crafts for elementary school students that you’ll want to make after seeing them
- Simple yet amazing crafts: craft ideas that elementary school students will want to make
- [Easy] Practical craft ideas. Great for beginners too!
- [For Kids] Today’s Handmade Craft Ideas
- [For Elementary School Students] A Collection of Simple Handmade Gift Ideas
- Cute Origami Ideas for Girls
- Simple and cute summer project crafts! A collection of ideas for girls that will make you want to create
- [For Middle Grades] Simple Magic Tricks for Elementary School Students: Fun Magic Everyone Will Love!
Simple Crafts for Beginners (21–30)
A cute dog plushie made from a towel
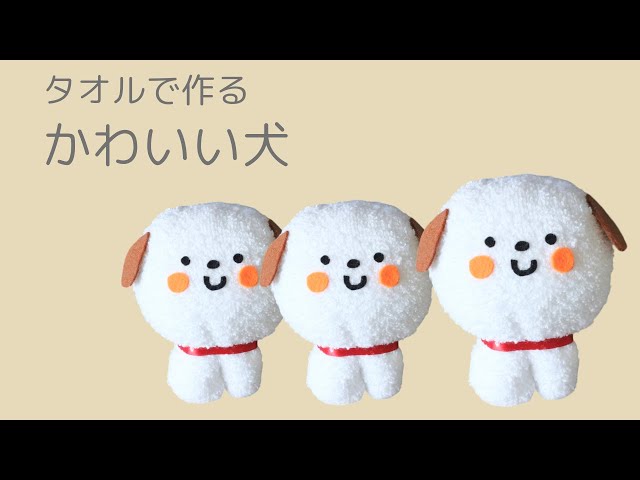
This is about making a cute stuffed dog using an everyday face towel you can find in any household.
First, cut the towel to create two identical pieces layered together.
Make small slits in both pieces, sew them together, turn the piece right-side out, and stuff it with cotton.
Then shape the overall form with thread and attach parts like the face made from felt to finish.
By changing the towel’s color and the facial expression, you can create plushies with a variety of looks.
A rabbit plush made from fleece

Using fleece fabric that looks and feels soft, let’s make a palm-sized stuffed bunny.
The key is how you construct the body: cut the fabric into the shape you want, embroider the facial expression, sew the pieces together, then stuff them with cotton and shape as you go.
The way you stuff it will change the overall roundness and softness, so it’s a good idea to focus on this to create your own unique bunny.
After that, attach parts like the hands, feet, and ears, and finish it so it looks like a bunny, and you’re done.
It can also be fun to change the fabric color and the shapes of the parts to add originality.
Practical handmade accessories and bags (1–10)
pom-pom rug

Let’s make lots of pom-poms with yarn and try creating a colorful rug! You can use leftover yarn or buy your favorite yarn at a 100-yen shop.
If you make plenty of pom-poms all in the same size, you’ll end up with a large rug.
Once the pom-poms are ready, simply tie them evenly onto a non-slip mat.
Using various colors of yarn makes it super cute! A pom-pom maker is convenient for easily mass-producing pom-poms, but if you don’t have one, try making them using cardboard or similar materials.
Mini felt pouch with gusset

How about making a handy little pouch out of felt? It even has a small gusset, so it holds more than you’d think.
It seems perfect for carrying around and keeping small items you don’t want to lose.
Since it’s made of felt, there’s no need to finish the edges—just cut the felt and sew the pieces together.
Adding a snap button to the flap and a decorative button on the outside makes it instantly cuter.
Why not try making it in various sizes?
Felt pencil case

A pencil case that comes in handy in all sorts of situations—even adults will want one.
How about making one by combining your favorite felt colors? You can make it with simple materials like felt, string, buttons, and embroidery thread, and you can pick them all up at a 100-yen shop, so you can start as soon as the idea strikes.
For the flap, cut the felt a bit longer so it wraps all the way around, then wind string around it from the top.
By adjusting the length, you can make not only a pen case but also a small pouch for accessories.
Keychains and Accessories

These days, 100-yen shops have an amazing selection of craft parts, don’t they? How about picking up alphabet beads, your favorite beads, and findings to make Korean-style name keychains and accessories? Parents will probably feel nostalgic too—many of them likely made things like this back in the day.
The method is very simple: just thread the beads onto fishing line.
Attach your preferred hardware and you’re done.
If you use stretchy cord, you can make bracelets as well.
You could even make matching ones with your friends.
kumihimo bracelet

Kumihimo, the braiding that also appeared in the film Your Name.
Traditional kumihimo is woven one strand at a time using a wooden frame, clacking as you go, but with embroidery floss and a paper cup you can make that same kumihimo bracelet.
Cut several strands of embroidery floss to the same length, fold them in half, tie a temporary knot at the fold, and clip a clothespin or similar onto that knot.
Place the clothespin inside the paper cup, then hook each strand into the slits cut into the rim of the cup.
Leave one extra strand unused and tuck it inside the cup; take the strand that’s three positions away and move it to the open slit, then again take the strand three positions away and move it to the newly open slit… Repeat this pattern and a kumihimo braid will form in the center.
Keep going until it reaches your desired length!