
Here’s an introduction to popular horse crafts for preschools and kindergartens.
Horses are familiar, friendly animals for children, often appearing in picture books and stories.
Using everyday materials like paper cups, paper plates, and milk cartons, these horse crafts spark children’s creativity and let them enjoy steps like coloring and gluing.
After they’re finished, kids can play pretend together with their horses or use them as decorations, expanding the fun beyond the craft itself.
We’ve gathered age-appropriate ideas, so feel free to incorporate them into your class activities.
- [Childcare] Handmade New Year’s cards with a horse motif: a collection of ideas to enjoy with kids
- [Childcare] Enjoy making horse origami! A collection of folding ideas
- Get the Classroom Buzzing! A Fun and Educational Collection of Horse-Themed Quizzes
- [Childcare] Fun to Make! Recommended Craft Ideas for Spring
- [Childcare] Let’s make things with various materials! A collection of recommended craft ideas for April
- [Childcare] Fun craft ideas and craft activities perfect for summer
- Fun Fish Craft Ideas to Make at Daycare and Kindergarten
- [Childcare] Playful craft ideas to enjoy with 5-year-olds
- [Childcare] Fun recreation ideas using paper cups
- [Childcare] Easter craft ideas: How to make bunnies and eggs
- [Childcare] Recommended for 3-year-olds! Craft activity ideas
- [Childcare] Fun Craft Ideas for Hinamatsuri (Girls' Day)
- [Childcare] Craft ideas perfect for June
Fun to make in childcare! A collection of horse craft ideas (1–10)
Let’s make horse hoof sounds!

The sound of hooves striking the ground is quite distinctive, isn’t it? In this idea, we recreate that “pakaran” sound using a simple craft.
You’ll need three paper cups, one pair of chopsticks, and some twine.
Prepare three pieces of twine in different lengths.
First, use an awl to make a hole in the center of the bottom of each paper cup.
Thread the twine through the hole and secure it on the inside with tape.
Finally, fasten the other ends of the twine to the chopsticks in order from shortest to longest, and you’re done! Hold the chopsticks with both hands and press the paper cups against a hard surface like a desk or flooring.
If you tap them in a steady rhythm from the shortest to the longest, it should sound like “pakaran,” just like hooves.
You can make it with a plastic bottle! A cute little horse

This is a craft idea for making a horse by using tissue-stuffed plastic bottles as the head and body.
For the horse’s neck and legs, use construction paper rolled into tubes.
Create the mane with slitted construction paper and the ears with paper cut into triangles.
Wrap some construction paper around the tip of the head to represent the horse’s distinctive nose.
Use tape for most of the assembly; instead of clear tape, which can look too plain, we recommend using brightly colored tape.
It will act like a pattern and give the piece a festive finish.
Finally, draw the eyes with a pen to complete your horse.
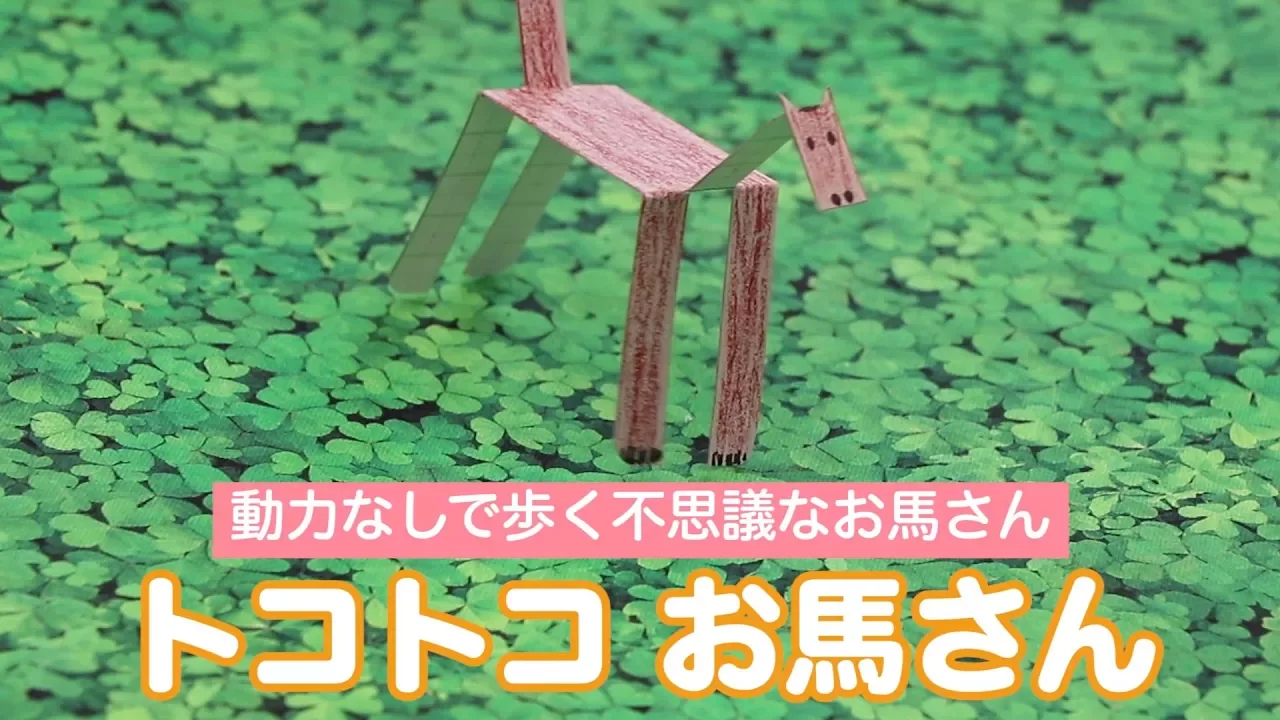
A mysterious horse that walks without power

Here’s an idea for making a moving horse out of construction paper! First, cut a rectangle from construction paper that’s 3 cm wide and 15 cm long.
Then, on both the left and right sides, make two slits each, 1 cm wide and 5 cm long.
Fold the middle of the slit sections into a valley fold to form the head and tail, and make mountain folds on the sides to create the legs.
Use scissors to round off the corners of the legs.
This will allow the horse to move.
Color it with crayons and draw the face to finish.
Try letting it walk down a slope and have fun!
Let’s make it together as a parent and child! A rocking horse craft

Let’s make a wooden hobbyhorse that toddlers can play with.
You’ll need two 1-meter pieces of wood and one 50-centimeter piece.
First, cross the two 1-meter pieces and fasten them together with screws.
Next, attach the 50-centimeter piece horizontally near the bottom of the crossed pieces to serve as a footrest.
That’s all for the steps, so as long as you have the tools, even beginners can make it.
When you cross the wood, adjust the lengths so that the intersection is about shoulder height for the rider.
Also, make sure the ends of the crossed wood do not extend beyond the rider’s shoulders.
The higher the footrest is, the harder it will be to mount, so it’s recommended to attach it at a low position.
Perfect for wall decorations! Cute little horses.

A perfect idea for wall decorations! Let me show you how to make a horse using construction paper.
Basically, you just cut out parts from the paper and glue them together, so it’s an activity even young children can enjoy.
It’s best for adults to prepare the small pieces in advance, but the larger pieces are great for scissor practice—draw clear cutting lines and let the kids cut them out.
Choose any color of construction paper you like for the clothes.
Adding patterns with stickers or crayons would be fun too!
Craft Challenge! Clippity-Clop Horse Riding

Let me introduce an idea for making a horse that makes a clacking sound when it moves.
Use one milk carton each for the head and neck, and two cartons each for the body and legs.
Use Meiji “Oishii Gyunyu,” the type with a screw cap.
The main step in this idea is connecting the milk cartons to form the shape of a horse.
Use masking tape to fix each part in place, and attach rubber bands to the caps of the milk cartons where the head connects to the neck and the body connects to the legs.
This creates a restoring force that returns the parts to their original position after moving, making the motion smoother.
Draw eyes on the face, attach a string, and it’s complete.
Merry-go-round! The horses that go round and round

Let’s make a toy where horses spin around like a merry-go-round.
For the base, use a paper bowl and a paper cup.
For the spinning mechanism, use a paper clip, a rubber band, a bead, a toothpick, and a wooden chopstick.
First, use an awl to make a hole in the center of the bottoms of both the paper bowl and the paper cup.
Straighten the paper clip, then bend one end into a hook shape.
Thread a bead onto a rubber band, hook one end of the rubber band onto the paper clip’s hook, and pass it through from the bottom of the paper cup.
On the other end of the rubber band, insert the wooden chopstick so it won’t slip out.
Next, pass the clip up through the bottom of the paper bowl, stack it with the paper cup, then remove the hook and insert a toothpick as a stopper.
Finally, attach paper with horse illustrations to both ends of the chopstick, and you’re done.