Simple origami for kids: cute, playable origami ideas


This time, we’re introducing lots of cute, playable origami that are perfect for kids.
Origami is a great indoor activity that you can focus on regardless of the weather, making it perfect for time at home.
Seasonal animals, creatures, and toys you can play with after folding are fun for adults too!
You can watch videos to check each step, so even if you find origami difficult, don’t worry.
If it’s too hard for your child to do alone, a parent or guardian can fold together with them and show them how fun origami can be.
- It moves! You can play with it! Fun origami. How to make origami toys.
- Let's make it with origami! A collection of ways to fold “dinosaurs”
- [For toddlers] Simple but amazing craft ideas — including toys they can play with
- [Childcare] Make and play! Origami ideas
- Cute Origami Ideas for Girls
- [For 5-year-olds] Let’s make origami! A collection of fun folding ideas
- Origami for 2-Year-Olds: Fun and Educational! Origami Ideas for Toddlers
- [Nursery/Kindergarten] Crafts you can play with after making them
- Origami perfect for summer. Fun and easy for kids to make!
- [Childcare] A roundup of easy summer origami ideas to enjoy with 5-year-olds
- [Childcare] Today’s Fun Origami Play
- [For preschoolers] A collection of origami ideas to enjoy February, including Setsubun and Valentine’s Day
- [Childcare] Let's make toys you can play with using origami!
Simple origami for kids: cute and playable origami ideas (31–40)
It keeps spinning and won’t stop! Sunflower spinning top

A sunflower spinning top that’s not only for display but also fun to play with is sure to delight children! First, with yellow origami, aim to make two boat shapes.
From there, form diamonds at the four corners, then fold the newly formed central corners outward and the diamond corners inward to complete the sunflower petals.
For the sunflower’s center, first crease vertical and diagonal “X” lines, then fold three times toward the center from each of the four corners along those creases, and finally fold the gathered central corners outward.
Make the top’s spindle using a separate sheet of brown origami, fit each piece into the yellow petal origami, and you’re done! Put your finger in the center and spin it around to play.
Also for Hinamatsuri! Cherry Blossom Papercut

Let’s cut origami paper and make lots of cherry blossoms! Fold the origami into a triangle twice, then open it once.
With the widest angle at the top, crease it in half from the top.
Fold both ends toward the far edge to form a shape like a triangle with three spiky points at the top.
Next, cut it into the shape of a single cherry blossom petal and unfold—done! If you want a papercut-style design, use the same folding method, but while cutting the petal shape, also cut out the center.
When you unfold it, each petal will look slightly hollowed out.
Make them in various colors and sizes, and decorate with plenty of them!
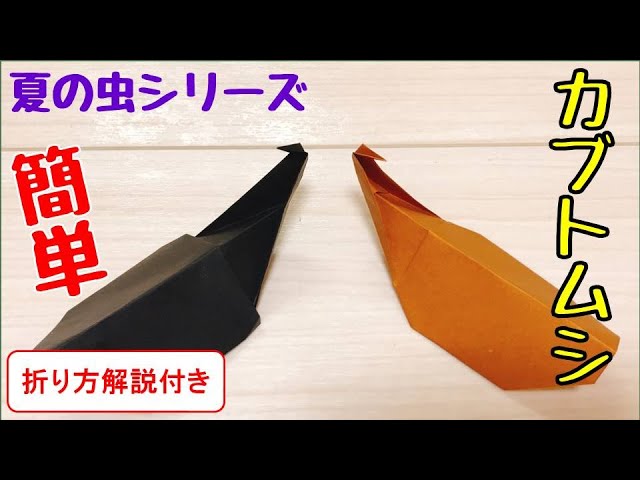
How to fold a Hercules beetle (origami)

The Hercules beetle, whose name was cemented by the smash hit “New Beetle Champion Mushiking,” is said to be the largest in the world, with the biggest specimens reaching 180 mm.
At that size, it’s not just cool—it’s a little scary, right? Let’s try making a Hercules beetle that’s hugely popular with kids.
Prepare two sheets of paper: one gray and one yellow.
Fold along the diagonal, then fold both sides inward to meet the center line.
Next, fold that section diagonally… this part will be the head.
Take the yellow paper, fold it in half and then in half again to make a square, and from there fold a section diagonally to form the tail.
Finally, attach the body and the head to complete it.
Even without using large paper, it’ll still have an impressive presence.
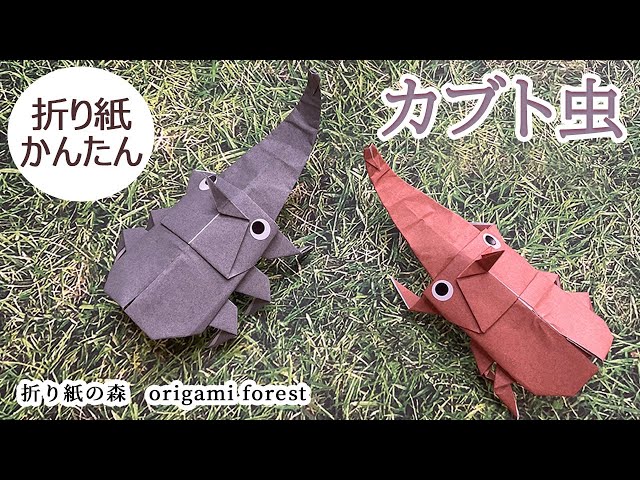
Realistic male and female rhinoceros beetles

Do you know the difference between male and female rhinoceros beetles? The biggest difference is that males have impressive horns, while females don’t.
It can be fun to explore these differences while making male and female beetles.
Let’s try making the male’s horn and the female’s face using rectangular pieces of origami paper.
It’s also nice to craft together with your child while talking about how males and females differ.
Besides the horn and face, you can twist origami to make legs and focus on the finer details, allowing you to create a rhinoceros beetle that looks just like the real thing.
Summer Origami! How to Fold a Rhinoceros Beetle

Origami rhinoceros beetle creations have a cute, round, chubby shape.
Because the design is rounded, there are some parts where you need to make fine folds.
Still, carefully folding each step will give you a satisfying sense of accomplishment when the beetle takes shape.
Adding sticker-made eyes to the finished beetle or attaching legs folded from origami can change the overall style.
Trying different arrangements can be fun, don’t you think? Once it’s done, you can mount it on a backing sheet to display, or place it on a shelf to bring a seasonal touch to your room.
Simple origami for kids: cute and playable origami ideas (41–50)
Kids will love it! Easy origami stag beetle
Introducing a versatile rhinoceros beetle that can be used in many ways—as a wall decoration piece or as an eye-catching touch on portfolio covers and the like.
It doesn’t have detailed legs or a cool horn, but it’s easy to fold, so it’s recommended even for small children.
For a beetle model, the unusually few folding steps are also noteworthy.
Add some round, beady eyes and it transforms into an adorable beetle.
Fold the paper along the center line created by a diagonal fold.
Match the tip of the folded section to the opposite corner.
Then fold back the part you just folded once… Written out, it may sound complicated, but it’s actually very simple.
Give it a try!
Flat 3D is cute! How to fold a rhinoceros beetle
Compared to other beetle origami, this one is a bit simpler and less difficult.
The leg parts are made separately and attached later.
If you’re doing this with a child, it might go smoothly if the child makes the body and the adult makes the legs.
First, fold the paper diagonally, then fold both sides along the center line.
Flip it over and fold so that the tips overlap.
You’ll start to see something like a beetle’s horn appear, and at this point it’s sure to get everyone excited and shouting, “A beetle!”