![[Demon Slayer] Character Origami: Easy How-To and Tips](https://i.ytimg.com/vi_webp/gLuPFCuszWo/maxresdefault.webp)

Why not try making characters from the hugely popular series Demon Slayer: Kimetsu no Yaiba with origami? Origami is easy for anyone—from kids to adults—to enjoy, and you can experience the joy of creating adorable characters.
In this article, we’ll introduce folding methods for characters that are relatively simple to make.
Express your favorite characters with origami and turn them into charming decor or handmade gifts.
Enjoy the spirit of Japanese tradition and the world of Demon Slayer, all starting from a single sheet of paper.
- Popular characters that are easy to make with origami. A collection of creations you can enjoy with children.
- Kids will love it! Easy origami ideas—great as gifts too!
- Origami Pokémon! A collection of simple and cute character ideas
- Let's make it with origami! Ideas for simple 3D creations
- [Origami] She’ll love it if you fold these! Simple ideas for girls
- [For Kids] Easy to Fold! Origami Ideas for Hinamatsuri (Girls’ Day)
- [Easy] Cute Origami Ideas Recommended for Tanabata Decorations
- Cute origami ideas
- Kids’ Origami: Cute and Easy Ideas to Make for a Birthday
- [For Kids] Easy Dragon Origami Collection
- Simple origami that can be folded from a single sheet
- Irresistibly fun to make! Simple mushroom origami ideas you can enjoy with kids
- Let’s make cosmos flowers with origami! A collection of simple ideas that both kids and adults can enjoy
Demon Slayer character origami: Easy how-to and tips (1–10)
Shinobu Kocho

Let’s fold Shinobu Kocho with origami.
First, make the face and draw the expression using round stickers for the eyes or colored pens.
A key point is to place the round stickers lower on the face.
Fold the long black hair and cut a slit in the center to create a part.
After attaching the face, layer purple origami on the tips of the hair and add the butterfly hair ornament.
Make the remaining torso and haori, then attach them to the head to finish.
For the sleeves of the haori, fold the corners to create rounded shapes to enhance a feminine look.
Tanjiro Kamado

Let’s fold Tanjiro Kamado in origami, featuring his green-and-black checkered haori and distinctive facial scar.
We’ll start with the face, shaping the outline by folding the corners of the paper inward.
Once you’ve checked the positions of the eyes and mouth and drawn his expression with a felt-tip pen, add the scar on his forehead in brown.
For the hair, create a three-dimensional look by lifting it up while folding so the forehead scar remains visible.
After making the haori and torso with black and green origami paper, attach them to the face.
Carefully draw the checkered pattern with colored pens, and you’ll have a cool Tanjiro Kamado all done!
Giyu Tomioka

Let’s fold Giyu Tomioka, who wears a distinctive haori, using origami.
First, we’ll fold the face.
The key is to fold evenly while checking the balance of the outline.
Once the face is done, attach round stickers as the base for the eyes and add the facial expression.
Next, use black origami paper to fold the hair.
As you shape it, make small cuts with scissors and carefully fold all the way to the tips of the hair.
Attach the face and hair so they are balanced and symmetrical on both sides.
Make the haori with two colors of origami paper and draw the pattern by hand.
If you have origami with a similar pattern, you can use that instead.
Draw the buttons and belt on the torso for the uniform, and finally make the sword to finish.
Zenitsu Agatsuma

Let’s fold Zenitsu Agatsuma, whose signature features are his yellow and orange hair, using origami.
Fold up the two bottom corners, then fold the newly made corners slightly upward to form the face.
Draw the eyes and eyebrows with colored pens.
When folding the hair, the key is to create a jagged, cut-edge look to capture its distinctive style.
Add the orange hair color with colored pens.
Next, after folding the torso, attach the haori (jacket) and draw the triangular pattern with a felt-tip pen.
Finally, attach the face to the torso to complete it.
Try making Zenitsu—he may be timid, but his Thunder Breathing is super cool!
Muichiro Tokito
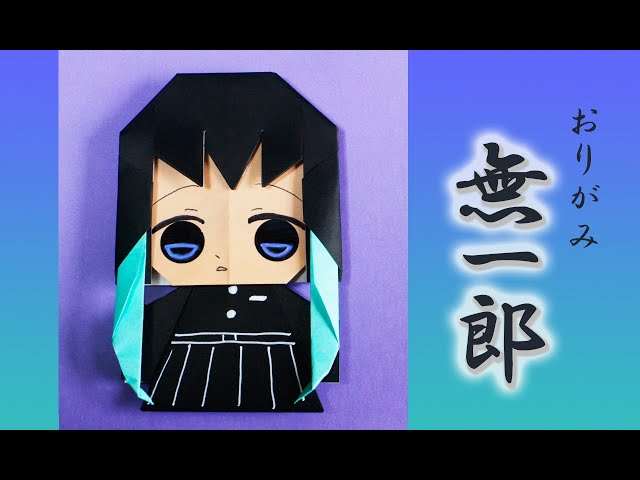
I’ll show you how to make Muichiro Tokito.
You’ll use a total of five sheets of origami paper: one light orange (7.5 cm × 7.5 cm), one light blue (7.5 cm × 7.5 cm), two black (7.5 cm × 7.5 cm), and one black (15 cm × 15 cm).
The hair is expressed with both the bangs and the back hair using a single sheet, so proceed carefully, paying close attention to where you make cuts and where you fold.
The signature emerald-green hair color is represented with light blue origami.
Since you’ll be folding small-sized sheets to create the parts, please check each step carefully as you work.
Nakime
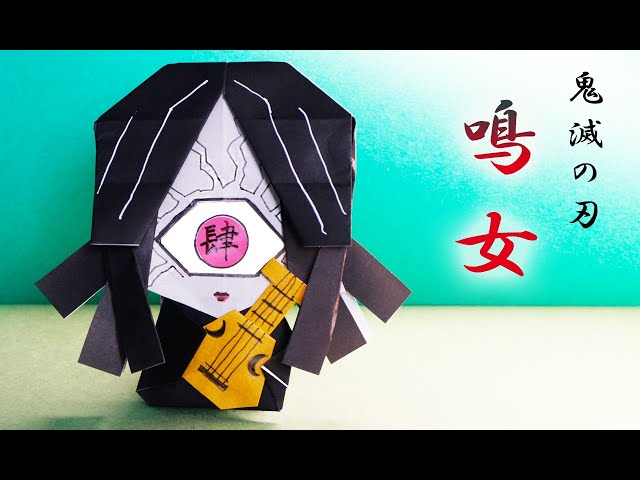
You can also make Nakkime, with her mysterious charm, out of origami.
Speaking of Nakkime, her defining feature is her single eye.
After folding the face, make the eye with a small piece of origami paper, decide on the position, and glue it on.
For the long hair that covers the face, the key is to cut straight slits into black origami paper.
Once you attach it to the face, fold the tips of the hair to give it a sense of movement.
Use black origami paper for the body and a brownish paper for the biwa.
Draw the strings on the biwa, attach it to the body, and you’re done.
Kanao Tsuyuri

Here’s how to make Kanao Tsuyuri.
You’ll use a total of six 7.5 cm × 7.5 cm sheets: one light orange sheet, three black sheets, one white sheet, and one green sheet.
You’ll make the parts for the face, hair, kimono, and hair ornament separately, then combine them to finish.
For the hair parts, there’s a step where you fold along fine cuts, so be careful not to tear the paper.
If you’re not confident drawing the eyes, you can color white round stickers black and stick them on for an easy, cute finish.
Have fun decorating it to resemble the real character!
Doma

Here’s an idea for Doma, characterized by rainbow-colored eyes and hair the color of white oak.
Let’s start by making the face with a small sheet of origami.
You can create the facial outline just by rounding the bottom of the paper, but if you add a folding step, you can also make the ears and neck.
Once the face is done, attach rainbow-colored eyes made from round stickers and draw in the expression.
The key to making it look like Doma is to give him a slightly unsettling smile.
When making the hair, consider the parting and the length.
After you make the hat and torso, draw the patterns, attach the head, and you’re done!
Akaza

Among the characters in Demon Slayer: Kimetsu no Yaiba, let’s fold an origami Akaza, who is especially popular.
We’ll make Akaza’s face using white origami paper.
The key is to draw the distinctive blue patterns with colored pens.
Use round stickers for the eyes and give them a sharp look to add intensity to the expression.
When folding the signature red hair, make firm creases and fold the tips to a point.
Adding small cuts with scissors will give it a three-dimensional effect.
Make the torso, attach everything together, and you’re done.
Try to keep the overall balance as you assemble it!
Inosuke Hashibira

We’ll show you how to make Inosuke Hashibira, known for his distinctive boar’s head.
For this, you’ll use a total of five sheets of origami paper: one thin orange sheet (7.5 cm × 7 cm), one ocher sheet (7.5 cm × 7 cm), one silver sheet (7.5 cm × 7 cm), one gray sheet (15 cm × 15 cm), and one pink sheet (3.75 cm × 3.75 cm).
You’ll create each part separately—the face, upper body, lower body, and swords.
The facial decorations may look tricky, but they’re easy to make by layering a white round sticker with a smaller light-blue round sticker.
The cuts and folds on both sides of the face are key points, so be sure to follow the steps carefully as you work.