[Childcare] Have Fun in March! Craft Ideas for 3-Year-Olds

Why not enjoy making some seasonal crafts together with three-year-olds? With spring-themed motifs like butterflies, flowers, and ladybugs, the bright colors alone make the process exciting. As they move their fingers and say “I’ll choose this one!” while selecting colors and shapes on their own, children greatly expand the range of their self-expression. Here, we’ve gathered craft ideas perfect for three-year-olds in March childcare settings. Please try incorporating them into your daily activities. Note: Since we treat the children’s creations as art pieces, we use the term “production” (制作) in the text.
- For three-year-olds: A collection of craft ideas featuring spring events and creatures that you’ll want to make with your three-year-old
- [For Age 3] Let’s make it in April! A collection of craft ideas to feel spring events and nature
- [Childcare] Recommended in March! A collection of craft ideas for 2-year-olds
- [Childcare] Recommended for 3-year-olds! Craft activity ideas
- [Childcare] Recommended for March! A Collection of Craft Ideas to Enjoy with 4-Year-Olds
- [Childcare] Recommended crafts and activities for March, such as Hina Matsuri (Doll’s Festival) and cherry blossoms
- [Childcare] Perfect for March! A collection of craft ideas recommended for 5-year-olds
- [For 3-year-olds] A collection of recommended craft ideas to make in February
- [Childcare] Spring craft ideas to enjoy with 2-year-olds! Techniques and materials included
- [May] Have Fun with 3-Year-Olds! Craft Ideas Perfect for May
- [Childcare] Ideas for March wall decorations
- [For 4–5 year olds] A collection of recommended origami ideas for March—featuring seasonal events and natural motifs
- [Origami] Simple Origami Ideas to Feel the Spring with 3-Year-Olds
[Childcare] Have Fun in March! Craft Ideas for 3-Year-Olds (11–20)
Pill bug made from a paper plate

This is a pill bug craft made from a paper plate cut in half that kids love.
First, draw patterns on the paper plate with crayons, then paint over it with black paint.
If you use a white crayon, the patterns will pop out like a resist painting.
After the paint dries, punch evenly spaced holes along the straight edge of the plate, thread short pieces of black chenille stems through, and twist to secure them.
These will be the legs, so attach antennae to the head the same way, then add the facial features to finish.
You can also make a version that curls up and opens out by cutting a round paper plate into six pizza-like slices, punching holes at the corners, and connecting them with split pins.
Let’s make a butterfly with heart-shaped packing material
@atsumichan774 Spring Craft: Hello! I’m Atsumi, a nursery teacher. Today I made a butterfly using heart-shaped cushioning material I found at Daiso! No glue needed—just thread a chenille stem (pipe cleaner) through and tie it. Super easy idea. Using springlike pink-toned cushioning makes it extra cute. Perfect for spring decorations or wall displays! I think it’ll look even cuter combined with spring flower motifs. Give it a try! ■ Materials: Heart-shaped cushioning material; chenille stems or twist ties ■ How to make: 1) Thread a chenille stem through two heart-shaped cushioning pieces. 2) Tie the stem to create the antennae. Sound effect: MaouDamashii Atsumi-sensei’s Nursery Diary @atsumichan774 Butterfly Daiso Spring Nursery school Kindergarten Craft Project
♪ Original song – Nursery Teacher Atsumi @ Handmade Toys and Kids’ Crafts! – Nursery Teacher Atsumi @ Handmade Toys and Kids’ Crafts!
When you ask a 4-year-old, “What comes to mind when you think of spring?” they’ll likely say “butterflies”—a true symbol of the season.
How about making a butterfly using materials you can buy at a 100-yen shop? Combine two heart-shaped cushion pads with pipe cleaners or twist ties to form a butterfly.
The cushion material is soft, so it’s easy to thread the pipe cleaners through.
Use a pen to curl the ends for a rounded finish.
This cute, tiny butterfly craft is sure to delight your child.
Cherry blossom art made with paper clay and tissue paper
@levwell_hoikushi Age-based craft ideas posted daily. See more crafts from my profile! ▷ @levwell_hoikushi Press tissue paper into air-dry clay to create fluffy, gorgeous cherry blossoms. While feeling the softness of the clay, it’s fun to see the tissue gently expand with each press—so engaging that little hands won’t want to stop. This craft is perfect for 4-year-olds. Which other spring flowers could you make with this technique? Share your ideas in the comments! Craft goals: • Enjoy fingertip sensations by exploring the textures of clay and tissue paper • Build focus through repeated pressing motions • Become familiar with the feeling of spring through making cherry blossoms Materials (stores where purchased): • Construction paper (Daiso) • Air-dry clay (Daiso) • Pink tissue paper (Amazon) • Thin stick (like a chopstick) (Daiso) • Parts (tree trunk) How to make it Steps for the teacher: 1) Pre-cut the tissue paper into small pieces 2) Glue the tree trunk onto the base sheet 3) Knead the clay into a ball 4) Flatten the clay on the base sheet 5) Place tissue paper on top of the clay 6) Use the stick to press the tissue into the clay 7) Let dry to finish Target age: 4 years and up Difficulty: Medium Craft time (approx.): 10–15 minutes Age-based ideas updated regularly! Follow and check out other posts ▷ @levwell_hoikushi Nursery crafts Cherry blossom craft Spring craft For 4-year-olds March craft
♪ Original Song – Lebawell Nursery Teacher [Official] – Lebawell Nursery Teacher [Official]
Speaking of spring, it’s all about cherry blossoms! Let’s try making cherry blossoms using brightly colored pink tissue paper.
Be sure to cut the tissue paper into small pieces in advance.
Create a tree trunk from brown construction paper, place a ball of clay, and flatten it from above using a clear file.
After placing the tissue paper on the clay, use a thin stick like a chopstick to press the tissue paper into the clay.
By pressing in lots of tissue paper, you’ll create cherry blossoms in full bloom.
This craft lets you enjoy both the step of cutting construction paper with scissors and the tactile feel of the clay and tissue paper.
Cute Footprint! How to Make a Caterpillar
A craft that can be fondly looked back on as a wonderful memory when your child grows up: a Very Hungry Caterpillar made using footprints.
Paint the soles of the feet with paint and make four footprints on construction paper.
Once dry, cut them out and stick them onto a backing sheet along with a caterpillar face made from construction paper, and you’re done.
Decorating with round stickers as you like makes it extra cute.
Preserving those tiny footprints that exist only now will be a lovely memory for your child, as well as for caregivers and parents.
It’s also delightful to feel how much they’ve grown when you look back on it later.
Be sure to try making it together with your child.
Spin and Swap! Dress-Up Hina Dolls

This spinning, mix-and-match Hina doll craft is an idea you’ll want to include in March childcare activities.
Use colored construction paper to make the emperor and empress’s faces, hair, and head ornaments.
Combine the parts and draw in the faces.
Cut a paper cup into a cone shape and paint it to color the kimono, then attach an obi piece made from origami paper.
Attach the faces and place them over another paper cup decorated with masking tape to finish.
Stick on various patterns of masking tape and enjoy swapping outfits!
Origami four-leaf clover
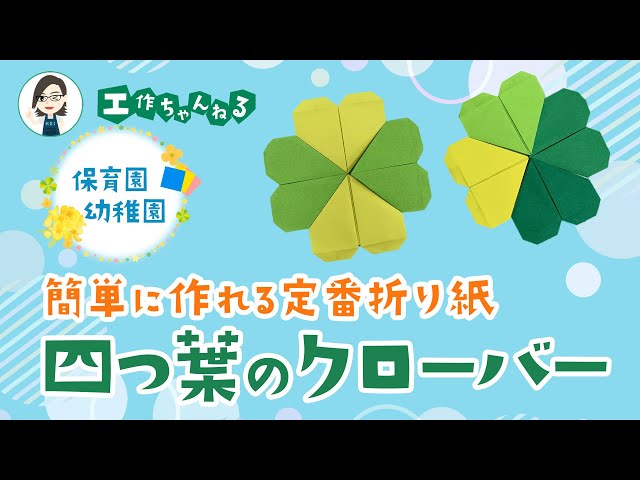
Let’s make a lucky four-leaf clover.
You’ll combine four sheets of origami to create it, but the folding itself is simple, so even children who aren’t used to origami should be able to do it.
Think of it as folding a heart-shaped origami four times.
Once it’s done, you can use it as a wall decoration or paste it onto construction paper as part of a picture.
By the way, the key is to make crisp initial creases.
If they’re misaligned, the whole piece will end up distorted, so be careful.
[Childcare] Have Fun in March! Craft Ideas for 3-Year-Olds (21–30)
Rainbow Bubble Art

How about trying “Rainbow Bubble Art,” an activity that’s likely to make many kids’ eyes sparkle with excitement because it’s different from the usual play? Cut off the mouth of a plastic bottle, cover the opening with a towel, and secure it with a rubber band.
In a bowl, mix neutral dish soap and water at a 1:1 ratio and stir well.
Dab some food coloring onto the towel attached to the bottle, then dip it into the soapy mixture—and you’re ready.
Blow through the bottle’s mouth, and fluffy rainbow-colored bubbles will appear.
It’s a fun way to strengthen oral muscles, so it’s also recommended for children who tend to breathe through their mouths or keep their mouths open.