[For Seniors] March Origami: Ideas to Brighten Your Room with Seasonal Flowers and Events

March, when the warmth grows little by little, is the season that makes you happy to feel the breath of spring.We’ve gathered origami ideas perfect for this time of year.Folding spring-themed motifs like Hina Matsuri decorations, bush warblers, and tulips will instantly brighten up your room.You can enjoy them in many ways—use them as wall decorations or stand them on a desk.They’re also recommended as gifts for your grandchildren.These are all projects that let seniors enjoy the season while moving their fingers, so please try whichever ones catch your eye.
- For Seniors: Recommended Wall Decoration Ideas for March
- [For Seniors] Crafts to Make in March! Recommended Project Ideas
- For Seniors: Come, Spring! Recommended March Craft Ideas for Daycare Services
- [For Seniors] Perfect Finger Exercises! Seasonal Flower Origami
- [For Seniors] Spring Wall Decorations: A Collection of Ideas to Brighten Up Your Room
- [For Seniors] Origami Crafts to Brighten Hinamatsuri: A Collection of Decorative, Festive Ideas
- [For Seniors] Enjoy Something New Every Day! Today’s Origami
- [For Seniors] Making a March Calendar: Introducing Spring-Themed Motifs and Arrangements
- [For Seniors] Enjoy Cherry Blossoms Indoors: Wall Decoration Ideas
- For seniors: Heartwarming and cozy. Recommended handmade Hina dolls
- Easy origami that delights the elderly. Enjoy a heart-lifting time with seasonal origami.
- [For Seniors] Introducing Fun Crafts Made with Plastic Bottle Caps
- [For Seniors] Recommended September Origami to Feel the Autumn Season
[For Seniors] March Origami: Ideas to Brighten Your Room with Seasonal Flowers and Events (1–10)
A school backpack from a single sheet of origami paper

The school backpack made from a single sheet of origami paper is a piece that combines folding and cutting steps to create its shape.
By proceeding in order, the structure is easy to understand, and you can work with your hands while keeping the finished form in mind.
Since you assemble parts with different roles—the body, shoulder straps, flap, and so on—the process of the shape gradually taking form is also easy to follow.
Though small, the finished piece is instantly recognizable as a school backpack, making it a handy origami craft for spring-themed displays or decorations.
Give it a try!
Simple bouquet
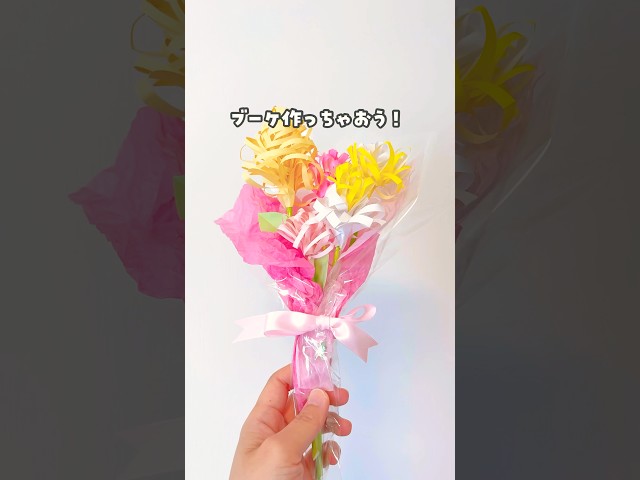
This origami piece stands out for its three-dimensional look, achieved by adding creative touches to the petal expression.
By leaving a border and making vertical slits in the paper, then curling them to create petals that clearly convey the feel of the seasonal event, a softly spreading flower shape emerges.
The work isn’t overly intricate, but the degree of opening changes depending on how you curl the strips, so it’s important to proceed with the final result in mind.
Bundling several together adds volume and creates a bouquet-like form.
Varying the color combinations changes the impression, allowing you to enjoy arrangements tailored to where you’ll display them.
dandelion fluff
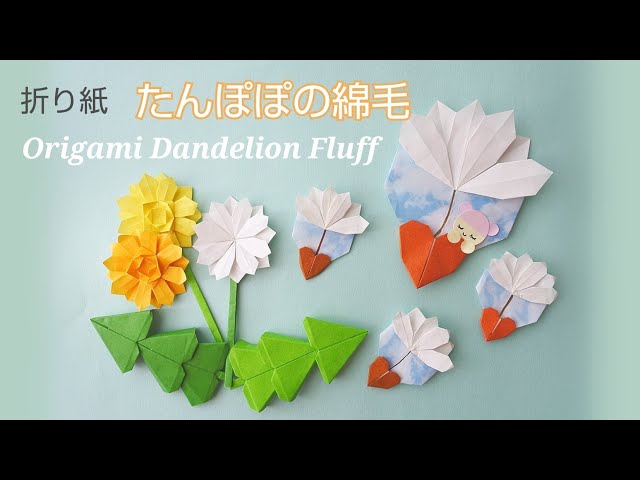
When you see dandelions in bloom, you can’t help but think, “Spring has come,” right? Older adults may also feel the arrival of spring.
In spring, you might make dandelion crafts as part of recreation activities.
It’s also a great idea to make dandelion fluff and display it together with the dandelion pieces.
If you use them as a wall decoration, they’ll create a lovely atmosphere indoors.
Seeing the displayed dandelions and fluff may bring back memories for some seniors—of their childhood or moments with family.
Be sure to enjoy a pleasant time together while sharing those memories.
[For seniors] March origami: Ideas to brighten your room with seasonal flowers and events (11–20)
Mini Wreath of Red and White Plum Blossoms

The miniature red-and-white plum wreath is an origami piece characterized by a cohesive finish that makes the most of color contrast.
Placing the two colors—red and white—side by side makes the ring shape stand out clearly, conveying both elegance and calm.
While each individual flower is simple, arranging them into a circle gives the piece a refined presence.
The neatly balanced layout is reassuring to look at and lends a crisp, traditional Japanese atmosphere to the space where it’s displayed.
Despite its modest size, it effectively conveys the seasonal spirit of festive occasions.
Japanese bush warbler

The bush warbler’s distinctive “hoo-hokekyo” call is one of the sounds of spring, isn’t it? As it sings beautifully with the arrival of spring, the bush warbler is also called “harutsugedori,” the bird that announces spring.
How about incorporating this bird into a March origami activity? Fold green origami paper into a triangle, then continue folding along the creases.
For the eyes, either stick on small black round stickers or draw them with a pen.
Use both light and dark green paper to make lots of bush warblers.
If you display them together with peach blossoms, the piece will evoke an even stronger sense of spring.
Authentic Hina dolls

How about making a hina doll that beautifully captures the look of a twelve-layered kimono using six sheets of origami paper? Because you’ll be folding six layers together, it will require a fair amount of finger strength.
It’s good finger training, so take your time as you make it.
Use white origami for the innermost layer, black for the next, red for the third, and choose any papers you like for the remaining three.
If you pick a patterned paper like chiyogami for the outermost layer, it will look luxurious.
The white paper becomes the face, the black paper the hair, and the red paper the undergarment.
It’s fun to play with different color combinations.
A hina doll with a three-dimensional kimono

How about three-dimensional Hina dolls you can stand up for display? The kimono is made by layering three sheets of origami paper.
Using a patterned sheet on top makes it look more festive.
The charm is that you can enjoy your favorite color combinations.
Fold the paper in half twice, matching the edges each time, then cut out one square section.
Stack the three cut pieces slightly offset from each other to create a beautifully layered kimono.
After folding the body and face parts, attach them together to form a cone-like shape, dress it in the kimono, and draw the face to finish.
Add optional decorations like a crown or a fan to your liking.