[For Seniors] March Origami: Ideas to Brighten Your Room with Seasonal Flowers and Events

March, when the warmth grows little by little, is the season that makes you happy to feel the breath of spring.We’ve gathered origami ideas perfect for this time of year.Folding spring-themed motifs like Hina Matsuri decorations, bush warblers, and tulips will instantly brighten up your room.You can enjoy them in many ways—use them as wall decorations or stand them on a desk.They’re also recommended as gifts for your grandchildren.These are all projects that let seniors enjoy the season while moving their fingers, so please try whichever ones catch your eye.
- For Seniors: Recommended Wall Decoration Ideas for March
- [For Seniors] Crafts to Make in March! Recommended Project Ideas
- For Seniors: Come, Spring! Recommended March Craft Ideas for Daycare Services
- [For Seniors] Perfect Finger Exercises! Seasonal Flower Origami
- [For Seniors] Spring Wall Decorations: A Collection of Ideas to Brighten Up Your Room
- [For Seniors] Origami Crafts to Brighten Hinamatsuri: A Collection of Decorative, Festive Ideas
- [For Seniors] Enjoy Something New Every Day! Today’s Origami
- [For Seniors] Making a March Calendar: Introducing Spring-Themed Motifs and Arrangements
- [For Seniors] Enjoy Cherry Blossoms Indoors: Wall Decoration Ideas
- For seniors: Heartwarming and cozy. Recommended handmade Hina dolls
- Easy origami that delights the elderly. Enjoy a heart-lifting time with seasonal origami.
- [For Seniors] Introducing Fun Crafts Made with Plastic Bottle Caps
- [For Seniors] Recommended September Origami to Feel the Autumn Season
[For Seniors] March Origami: Ideas to Brighten Your Room with Seasonal Flowers and Events (21–30)
Mount Fuji and cherry blossoms

Cherry blossoms are an indispensable motif of spring in Japan; their pink appearance alone evokes the excitement of the season.
This decoration places cherry blossom and Mount Fuji motifs side by side to express Japanese spring.
It’s a simple composition—arranging an origami Mount Fuji and cherry blossoms on a backing—but by giving each a three-dimensional finish, their beauty is enhanced.
Adding deliberate wrinkles to create a natural look and other subtle touches may be key points for achieving a beautiful result.
Hanami dango
@sachimama_asobi I tried making hanami dango using that thing 🍡🌸 It was so warm today that it really felt like spring had arrived! Yesterday my boys said they wanted to make dango out of origami, so I thought, why not make them into three-colored hanami dango? 🥰 Have you ever made an origami balloon? If you make the balloon and stick it onto a chopstick, it’s done 👏 It’s super easy, so be sure to save this and give it a try!! +——————————————+ I’m Sachi-mama, raising three rambunctious boys aged 8, 6, and 2 ❀ I share play ideas and simple crafts with kids using 100-yen items, nature finds, and recycled materials. Feel free to like, follow, or DM me! +——————————————+#AtHomePlay #AtHomePlaywork Play with children#I love crafts Handmade #origami#papercraft#Hinamatsuri The Doll FestivalHinamatsuri #Hinamatsuri Hina Dolls#Hinamatsuri Dolls #HinaDolls origamiOrigami Hina Dolls TranslationDango Cherry blossom viewing #CherryBlossomViewingDango
♬ Cute – Audiolist Productions
Let’s make the essential three-color dango for Hinamatsuri out of origami.
Prepare three sheets of origami paper in green, white, and pink, plus a pair of chopsticks.
Fold the origami paper in half into a square twice, then puff it up as you fold it into a triangle.
Next, fold the left and right pointed tips up toward the center to form a balloon shape.
Blow into the small hole to inflate and complete the balloon.
After making three balloons from the three sheets of origami, gently skewer all three onto the chopsticks so they don’t tear, and you’re done.
Place them beside the Empress and Emperor dolls to make a lovely decoration.
Accordion-fold Hina doll display
https://www.tiktok.com/@mii_no_seisak/video/7602914620805745941Here’s an idea for representing the bodies of Hina dolls using accordion-folded origami.
Use two sheets of origami paper per doll.
First, accordion-fold a plain sheet, overlap the sides, and fold it in half.
Fold the second sheet the same way, then insert it into the first sheet and glue them together.
It’s recommended to use patterned paper for the second sheet.
Once the body is complete, attach a face and decorations made from construction paper, and hang it from a display stand made with a thick straw and kite string to finish.
For an even more festive look, you can also make and hang bonbori lanterns and hishi-mochi rice cakes.
Hinamatsuri wreath decoration

Introducing an idea for a Hina Matsuri wreath made entirely from origami parts! The parts you’ll make are the Emperor doll and Empress doll, lanterns, hishi-mochi rice cakes, cherry blossoms, a folding screen, a fan, a ritual baton (shaku), a stand, and a circular base to which all these parts are attached.
The base is made by combining 12 identical pieces.
Each individual part is created through simple steps, so although there are many pieces, it’s a project you can likely finish in a day.
For the Emperor and Empress kimonos, use washi-patterned origami paper—choose your favorite designs while imagining the final look.
Hina dolls made with round origami

Let’s make Hinamatsuri dolls out of chiyogami with a cute, gently rounded shape.
Fold a circular sheet of origami in half twice, then cut a slit at the center to form the neck.
Fold the left and right edges inward to align with the collar area, shaping the kimono.
Fold the Odairi-sama in the same way, then attach the fan, ladle, and crown, draw the faces, and you’re done.
Using round origami enhances the warm feel of the Ohina-sama and Odairi-sama.
Prepare patterned origami and try making your own original Hinamatsuri dolls.
Cone-shaped hina dolls
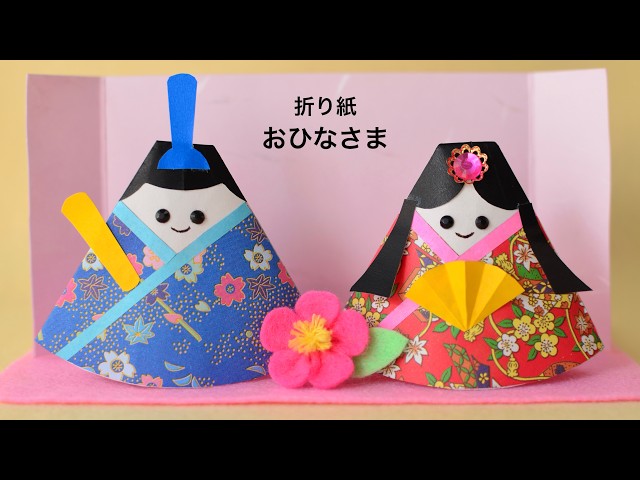
Perfect for Doll’s Day displays! Let’s make cute triangular hina dolls.
First, cut white paper into a half-circle and roll it into a cone.
Then wrap washi-patterned origami around it to represent the kimono.
Use the pointed tip of the cone as the face: add hair with black origami, and use rhinestones for the eyes and hair ornaments.
For the base, glue a U-shaped piece of thick paper upright onto a felt rectangle you’ve cut as the platform.
The look will vary depending on the origami and rhinestones you use, so prepare materials that match your image.
Hina dolls with distinctive kimonos

Let’s make a perfect set of the imperial couple (the emperor and empress) for Hinamatsuri.
First, mark the origami by folding it in half, then into quarters, in order.
Create creases at the corners and around the edges to form the shape of the kimono.
For the hair, take a small square of black origami paper, fold it into a triangle, then fold both sides toward the center to shape the hairstyle.
Attach the empress’s body and hair, then add the fan to finish.
For the emperor, the key is to make a crisp fold at the collar and fold the sleeves of the kimono upward to create the right angle.
Fold a crown from black origami paper to complete the emperor.
Feel free to draw the facial expressions in your own original style.