[For Seniors] March Origami: Ideas to Brighten Your Room with Seasonal Flowers and Events

March, when the warmth grows little by little, is the season that makes you happy to feel the breath of spring.We’ve gathered origami ideas perfect for this time of year.Folding spring-themed motifs like Hina Matsuri decorations, bush warblers, and tulips will instantly brighten up your room.You can enjoy them in many ways—use them as wall decorations or stand them on a desk.They’re also recommended as gifts for your grandchildren.These are all projects that let seniors enjoy the season while moving their fingers, so please try whichever ones catch your eye.
- For Seniors: Recommended Wall Decoration Ideas for March
- [For Seniors] Crafts to Make in March! Recommended Project Ideas
- For Seniors: Come, Spring! Recommended March Craft Ideas for Daycare Services
- [For Seniors] Perfect Finger Exercises! Seasonal Flower Origami
- [For Seniors] Spring Wall Decorations: A Collection of Ideas to Brighten Up Your Room
- [For Seniors] Origami Crafts to Brighten Hinamatsuri: A Collection of Decorative, Festive Ideas
- [For Seniors] Enjoy Something New Every Day! Today’s Origami
- [For Seniors] Making a March Calendar: Introducing Spring-Themed Motifs and Arrangements
- [For Seniors] Enjoy Cherry Blossoms Indoors: Wall Decoration Ideas
- For seniors: Heartwarming and cozy. Recommended handmade Hina dolls
- Easy origami that delights the elderly. Enjoy a heart-lifting time with seasonal origami.
- [For Seniors] Introducing Fun Crafts Made with Plastic Bottle Caps
- [For Seniors] Recommended September Origami to Feel the Autumn Season
[For Seniors] March Origami: Ideas to Brighten Your Room with Seasonal Flowers and Events (31–40)
Kusudama hanging decoration

This is a kusudama hanging ornament that gives a vivid and festive impression.
Cut five circular pieces from 7.5 cm origami sheets and fold each in half with the colored side facing inward.
Stack and glue them all together to form a half-sphere kusudama.
Attach a tassel with a ribbon—also made from origami—beneath the kusudama, and glue a band around the center.
Finish by adding a hanging string.
If you want a more glamorous look, it’s recommended to use two types of origami: solid color and traditional Japanese patterns.
Hinamatsuri decoration – rabbit

In this idea, first cut 2 cm off the top of the origami paper, then align the left and right edges and fold it in half three times to make creases only on the upper half.
Once you’ve made the creases, open the paper and fold the bottom edge up at a position 7 cm from the bottom.
For the top, fold it down 1.5 cm from the top to make a crease that will serve as a glue flap.
Next, along the creases, make cuts from the top down to the level of the bottom edge you folded up.
Then turn the paper over, make mountain folds so that the cut sections form loops, and glue the glue flap to the front side of the bottom edge.
Once you’ve done the same for all the remaining sections, glue the two ends together to form a ring.
This will be the body of the Hina doll.
Finally, make a rabbit face out of construction paper, create a head ornament and a fan, let the rabbit hold the fan, and you’re done.
By giving the rabbit whatever expression you like, you can add a touch of individuality!
Three-dimensional wall-mounted Hina doll display

The three-dimensional wall-hanging Hina doll decoration is an origami piece that, while adorably stylized, still conveys the essence of traditional Hina dolls.
You cut and glue the origami paper for each part to create the faces and kimonos.
A key point is shaping the sleeves into rings to give them a soft, voluminous finish.
By mounting the pieces on construction paper, you can hang the work directly on the wall, adding festive depth and color to the space as a seasonal decoration.
With thoughtful choices of expressions and colors, the impression changes, making it a subtle yet striking origami idea you can enjoy as a work with presence.
three-dimensional bonbori (paper lantern)

Let me show you how to make a three-dimensional bonbori lantern that you can display in your room as a Hinamatsuri decoration.
Use 15 cm origami for the lantern light, 15 × 7.5 cm for the pillar, and 7.5 cm for the boxes.
You’ll make three boxes, so prepare three sheets in the same color.
First, use the origami for the light to make a balloon.
Then trim about 1 cm off the bottom where the air hole is.
Next, use the 15 cm × 7.5 cm sheet to make the pillar.
Fold it in half several times to create crease lines so it becomes long and narrow, then fold about 1 cm along one side with the white side facing out, and use the creases to roll it into a square column.
Make the boxes in the standard square shape.
Place a 10-yen coin as a weight in one of the boxes, then stack on top of it another box whose base has a slit cut in it, inserting the pillar through the slit.
Insert the balloon onto the top of the pillar, then stack the remaining box on top and glue it in place to finish!
Hina doll chopstick rest
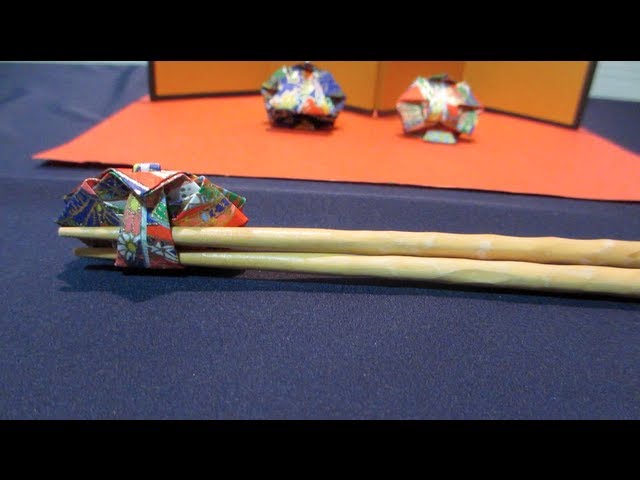
These are chopstick rests made from origami Hina dolls that can also serve as indoor decorations.
Using washi-patterned origami paper brings out even more of the Hina-doll atmosphere.
Origami crafts can be done while sitting in a chair and chatting with those around you.
It’s nice to fold them while talking with seniors about past Hina Matsuri festivals—it might really get the conversation going.
How about using them as chopstick rests for a Hina Matsuri party held at a facility? You can make both the Emperor and Empress dolls and enjoy displaying them as decorations on a small table or shelf.
[For Seniors] March Origami: Ideas to Brighten Your Room with Seasonal Flowers and Events (41–50)
Washi-Modern Hina Dolls with Lace Paper

This is a perfect idea for Hinamatsuri! First, cut a sheet of patterned origami paper and a doily in half, then fold both sides inward like a kimono.
Slip the folded doily inside the origami so the lace peeks out from the kimono for extra cuteness.
Once you decide on the placement, glue it down firmly and add the face parts and accessories.
Next, color the backing paper, and stamp around the border with a dauber or a balloon to make it festive.
Finally, attach the hina dolls, and your handmade, modern-Japanese Hinamatsuri decoration is complete.
Its vibrant colors will instantly bring a spring feel to your room, and the making process is fun, too.
Sakura wreath

This is a cute, three-dimensional cherry blossom wreath made by connecting origami cherry blossom flowers and leaf parts into a ring.
The key is how to make the cherry blossoms: first create each petal, then assemble them into a three-dimensional, fully bloomed flower.
Fold the paper into a triangle, lift both ends, trim off the excess, then open it into a tube to complete a petal.
Arrange several petals together to form the flower.
Finally, attach the cherry blossoms and leaf pieces to a ring-shaped base, and the wreath is complete.
Adding a string so it can be hung is also recommended.