[Childcare] Recommended crafts and activities for March, such as Hina Matsuri (Doll’s Festival) and cherry blossoms


March, when you can feel spring arriving.
The warm, sunny spring weather naturally lifts the spirits, doesn’t it?
This time, we’ve gathered recommended craft ideas perfect for March.
From events like Hinamatsuri (Girls’ Day) and graduation ceremonies to seasonal themes such as cherry blossoms, butterflies, and strawberries, there are plenty of ideas that capture the feeling of spring!
Before you start making things, we recommend going on a walk with the children to see and touch the charming spring plants and insects unique to the season.
It will surely expand their image of spring and help them create wonderful works!
Display what you make around the room and fully enjoy the spring atmosphere.
Because items made by children are treated as “works,” we refer to them as “seisaku (制作)” in the text.
- [Childcare] Fun to Make! Recommended Craft Ideas for Spring
- [Childcare] Fun Craft Ideas for Hinamatsuri (Girls' Day)
- Perfect for spring: Wall display ideas with a horsetail motif you’ll want to make in March!
- [Childcare] Enjoy March! A collection of ideas for event-related activities and nature play
- [Childcare] Wall decoration craft ideas featuring a cherry blossom motif
- [Childcare] Ideas for March wall decorations
- For three-year-olds: A collection of craft ideas featuring spring events and creatures that you’ll want to make with your three-year-old
- [Childcare] Let’s make things with various materials! A collection of recommended craft ideas for April
- [Kindergarten (older class)] What kind of season is March? Let’s make events and natural objects with origami!
- Nursery/Childcare: Creative Ideas for Making Rape Blossoms (Nanohana) Crafts
- [For 4-Year-Olds] Feel the Spring Up Close! Fun and Easy Craft Ideas You’ll Love
- [For 4–5 year olds] A collection of recommended origami ideas for March—featuring seasonal events and natural motifs
- [Childcare] Simple origami ideas for kids, perfect for spring
[Childcare] Recommended crafts and activities for March, such as Hinamatsuri and cherry blossoms (1–10)
Spin and Swap! Dress-Up Hina Dolls

This spinning, mix-and-match Hina doll craft is an idea you’ll want to include in March childcare activities.
Use colored construction paper to make the emperor and empress’s faces, hair, and head ornaments.
Combine the parts and draw in the faces.
Cut a paper cup into a cone shape and paint it to color the kimono, then attach an obi piece made from origami paper.
Attach the faces and place them over another paper cup decorated with masking tape to finish.
Stick on various patterns of masking tape and enjoy swapping outfits!
Hina dolls made from toilet paper rolls
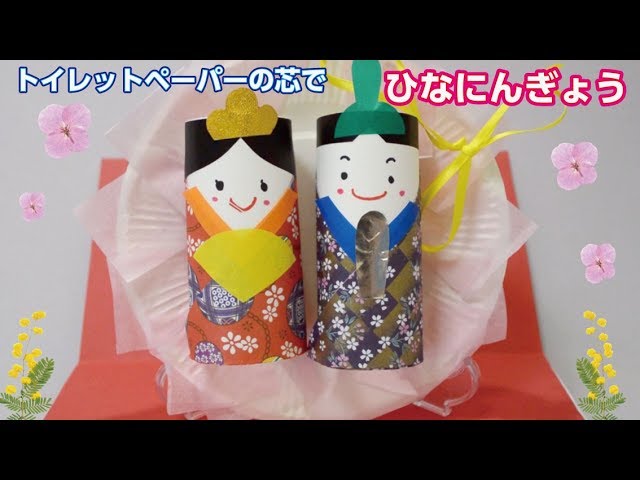
You can even make hina dolls using toilet paper rolls.
First, prepare two toilet paper rolls.
Wrap them diagonally with washi-patterned origami to make them look like kimonos.
Then create and attach accessories and hair pieces, and draw the faces—now you have the Emperor and Empress.
If you have more toilet paper rolls, you could probably make the three court ladies and the five musicians, too.
It would be fun to draw cheerful expressions, or make the faces resemble yourself or your family.
Hinamatsuri coffee filter blot painting

Draw on a coffee filter with water-based markers, then float it on water to wet it.
Once the ink has bled, take it out and let the filter dry.
When it’s dry, fold it to make the body of the Hina doll.
Finally, attach the face you made from construction paper, and it’s done! Imagine the filter as a kimono: fold the left and right sides to overlap at the center, then fold the bottom up to the back to finish.
The impression of the bleeding pattern changes depending on which colors of markers you use, so you’ll end up with wonderfully unique creations.
[Childcare] Recommended craft activities for March, such as Hinamatsuri and cherry blossoms (11–20)
Drawing is fun! A mobile of little birds
This is an easy paper-dyeing technique.
Draw patterns on aluminum foil with water-based pens, then mist it with water and place a lace paper doily on top.
Once it’s thoroughly dry, cut the lace paper in half and accordion-fold it.
Next, cut a circle from construction paper and fold it in half.
Attach the lace paper wings and a face, and you’re done! The blurred colors are beautiful, creating a soft, gentle butterfly.
If you thread it and make a mobile, it sways cutely and is lovely as a decoration—highly recommended!
Stamps are fun! Cherry blossom tree
This craft is perfect for spring: making a cherry blossom tree.
Inflate a plastic bag with air, dab it with paint, and stamp it onto drawing paper.
Because the shape changes a little with each stamp, kids can enjoy the excitement of wondering, “What kind of cherry blossoms will bloom?” It requires no complicated prep and easily captivates children.
Use each child’s handprint to create the tree trunk.
While feeling the arrival of spring, why not have everyone joyfully make cherry blossoms together? It also makes a lovely seasonal wall decoration.
It will spread that happy “I did it!” feeling among the children.
Let’s draw cherry blossoms using only a straw!

Make five evenly spaced cuts on one side of a straw, then spread that section out into a flower shape.
After that, just dip it in pink paint and stamp it to create a cherry blossom tree.
Beforehand, stick a trunk made from construction paper onto the backing sheet, and have the children stamp over it.
You can stamp to clearly show the flower shape, or layer the stamps to express a tree in full bloom.
After pressing the stamp onto the backing sheet, move the handle in a circular motion as it is.
That will create a clean flower shape!
Various kinds of rapeseed flowers
Rape blossoms are cute with their small yellow flowers.
How about incorporating them into your crafts in various ways? Prepare fluffy yellow construction paper shaped like the whole flower, and try different techniques for the little blossoms: stamp them with a stamper, use finger stamping, apply round stickers, make torn-paper collages, or crumple tissue paper and glue it on—there are many ways to express the look.
Crumpled tissue paper adds a three-dimensional feel, and with finger stamping you can try using various warm colors, too.
They’re perfect for wall decorations.