Irresistibly fun to make! Simple mushroom origami ideas you can enjoy with kids


Autumn is the season for mushrooms, isn’t it? In this article, we’ll introduce mushroom crafts you can make with origami that you can enjoy together with your kids.
From simple designs to 3D creations and all kinds of mushroom varieties, there’s a wide selection to choose from! We’ve also gathered pieces you can use as practical items, like chopstick rests and frames.
They’re perfect for seasonal decorations or gifts.
These are all ideas you can have fun trying, so be sure to include them in your autumn craft time!
- Easy origami acorn folding method
- [Autumn Crafts] Easy and Fun! Mushroom Craft Ideas
- Easy to make! A collection of origami grape craft ideas
- Easy Cute Christmas Origami
- Simple Origami Ideas to Enjoy in Autumn (For 4-Year-Olds)
- [Origami] Have fun with kids! A collection of easy snowman origami ideas
- Enjoy the sights of autumn using just scissors! A collection of easy paper-cutting ideas
- Simple origami for kids: cute, playable origami ideas
- Preschool: Autumn-Themed Craft Ideas Recommended for November
- October origami kids will love! Easy ideas from Halloween to autumn flavors
- Let's Make and Display! Origami Perfect for Halloween
- [Easy] Origami of fruits that are in season in autumn. Designs and decorations also introduced!
- Kids will love it! Easy origami ideas—great as gifts too!
So fun you’ll want to make them right away! Easy mushroom origami ideas you can enjoy with kids (11–20)
Kinoko no Yama
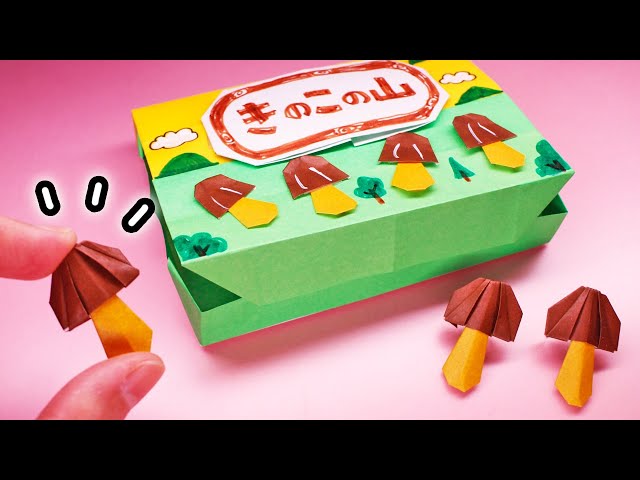
Let’s try making an origami craft that looks just like the snack “Kinoko no Yama.” Fold a small piece of origami paper to make the mushroom cap.
Since this would be the chocolate part of the snack, brown origami paper is recommended.
Next, using a piece of origami paper the same size as the cap, fold the stipe (stem).
Since this would be the cracker part of the snack, ocher-colored paper might be a good choice.
There are some fine folds involved, but that’s what makes the finished mushroom look very polished.
Use yellow and yellow-green origami paper to make the Kinoko no Yama box, and try placing your folded mushrooms inside.
Kids are sure to be delighted by how closely it resembles the real thing.
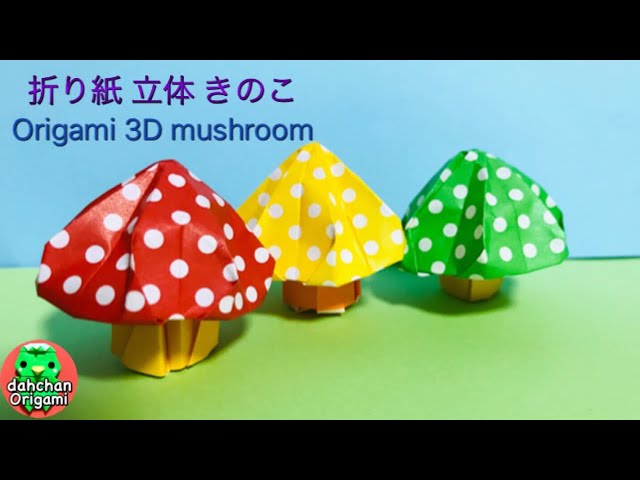
A large-capped mushroom made from a single sheet of origami paper
There are many ways to fold origami mushrooms.
Here, we’ll introduce a design with a large, hat-like cap on top.
By folding a single sheet of origami paper, you can make a big cap and a sturdy stem.
Since the cap is large, it’s a good idea to use patterned paper or draw polka dots with a pen.
You could also write a little message on the cap and give it to friends or family.
Try using it as a part for indoor decorations like mobiles or hanging ornaments.
A mushroom whose cap and stem are the same color
When looking for ways to fold an origami mushroom, I’ve noticed that many methods make the cap from the front side of the paper and the stem from the back side.
But with a slight change to the steps, you can make both the cap and the stem the same color.
The second half of the folding process is the same, so if you already know a method where the cap and stem end up different colors, just check the first half here.
Imagine where and how you’ll display your finished origami mushroom—if you think a single color would look better, use this method!
Mushroom chopstick rest

When you invite friends over and cook for them, or when you have a family gathering, having seasonally themed chopstick rests is a lovely touch.
So let’s make a mushroom-shaped chopstick rest perfect for autumn using origami! All you need is a 9 cm square sheet of origami paper.
Because the paper is small and the work involves fine details, and there are quite a few steps, the difficulty level is a bit high.
Still, a handmade, seasonally appropriate chopstick rest will make your table setting look thoughtful and stylish, so please give it a try.
pointy mushroom
This is a method that uses only a single square sheet of origami paper and doesn’t require fine creases or complicated steps.
First, crease the square paper in a tic-tac-toe (hash) pattern, then fold along those lines to make a triangle.
This forms the base for the cap.
Next, open up the overlapping part of the triangle and make creases to create the base for the stem.
Finally, fold the corners to refine the shape, and you’re done.
You’ll end up with a mushroom that has a slightly cute look, characterized by its pointed tip on the cap.
Finger puppet mushroom
If you want to make a three-dimensional mushroom, this finger puppet mushroom is recommended.
It can also be used as a finger puppet and uses two sheets of origami paper.
You start by folding it similarly to a paper crane, but the latter half involves many complex folds, so it might be difficult for a child to do alone.
Also, there is only one adhesive contact point in this art piece.
When joining the cap and the stem of the mushroom, we recommend using a strong liquid glue to ensure good adhesion.
The piece is somewhat fragile and may not last long, but once you learn it, it’s easy to make, so give it a try.
Irresistibly fun to make! Easy mushroom origami ideas (21–30) you can enjoy with kids
Cool way to fold a mushroom

Let me introduce a cool mushroom with a softly rounded, plump look.
Prepare one sheet of origami and fold it along the center line as you go.
Fold the fluttery tip to match the crease, and flip the paper over for the stem section to change the color.
For the mushroom cap, fit neighboring pockets together to complete the shape.
Finally, fold the tip of the stem up once, tuck it inside, and you’re done.
Adjust the overall balance to refine the final shape and volume.
Using different colors of origami paper will give you a colorful and cool-looking mushroom.