Irresistibly fun to make! Simple mushroom origami ideas you can enjoy with kids


Autumn is the season for mushrooms, isn’t it? In this article, we’ll introduce mushroom crafts you can make with origami that you can enjoy together with your kids.
From simple designs to 3D creations and all kinds of mushroom varieties, there’s a wide selection to choose from! We’ve also gathered pieces you can use as practical items, like chopstick rests and frames.
They’re perfect for seasonal decorations or gifts.
These are all ideas you can have fun trying, so be sure to include them in your autumn craft time!
- Easy origami acorn folding method
- [Autumn Crafts] Easy and Fun! Mushroom Craft Ideas
- Easy to make! A collection of origami grape craft ideas
- Easy Cute Christmas Origami
- Simple Origami Ideas to Enjoy in Autumn (For 4-Year-Olds)
- [Origami] Have fun with kids! A collection of easy snowman origami ideas
- Enjoy the sights of autumn using just scissors! A collection of easy paper-cutting ideas
- Simple origami for kids: cute, playable origami ideas
- Preschool: Autumn-Themed Craft Ideas Recommended for November
- October origami kids will love! Easy ideas from Halloween to autumn flavors
- Let's Make and Display! Origami Perfect for Halloween
- [Easy] Origami of fruits that are in season in autumn. Designs and decorations also introduced!
- Kids will love it! Easy origami ideas—great as gifts too!
Irresistibly fun to make! Easy mushroom origami ideas (21–30) you can enjoy with kids
Mushroom wreath
Let me introduce an autumn-themed mushroom wreath.
Prepare 8 sheets of origami paper and let’s get started.
On each sheet, crease it twice diagonally (into triangles) and twice horizontally/vertically (into squares).
Using the creases as guides, puff it up into a triangle and fold it down flat.
Align the top layer with the center line, make a crease toward the center, open it up, and fold along the crease to form the mushroom’s stem.
The remaining two corners will become the mushroom cap: fold the left and right sides inward to shape the cap.
Make 8 identical pieces, then glue them together in a circle to complete your mushroom wreath.
Mushroom House
Let me introduce a mushroom house made of origami that’s perfect for autumn.
For the cap, use patterned origami paper.
The key is to make clear creases as you fold.
For the mushroom’s stem, add diagonal creases to create angles and give it a more three-dimensional look.
Once you attach the cap and the stem, the main mushroom is complete.
For the window, use a sheet of origami paper that’s half the size of the cap and fold it to one-third of the width.
Fold along the crease lines to finish the window.
It’s also fun to draw your favorite animals or people inside the window.
Give it a try!
Mushroom Frame

Let me introduce a mushroom frame made with origami—perfect for wrapping small autumn gifts.
Prepare two sheets of origami paper.
Fold the paper in half and make creases along the center line.
Rotate it, then make diagonal creases aligned with the center line to form the mushroom cap.
For the mushroom stem, continue making creases while aligning with the center line.
Lightly marking the folds will make it easier to create the pocket part of the stem.
Finally, join the two sheets of origami and fold along the edges to finish.
If you tape the seam, it will stay together more securely.
It might look cute if you place a photo of a child inside and display it.
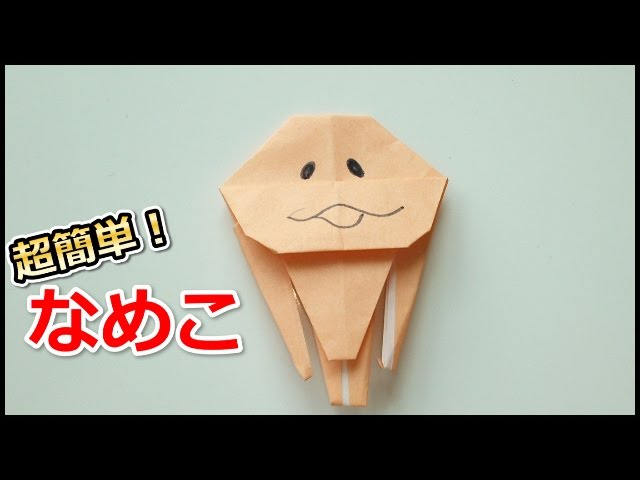
Nameko (a type of Japanese mushroom, also called Pholiota nameko)

Here’s an origami tutorial for making a nameko mushroom with a round, glossy cap and a small, compact body.
Prepare two small brown sheets of origami paper and make the cap and the body separately.
For the cap, fold the paper in half and then fold the corners inward.
For the body, crease it into a triangle, then fold both sides toward the center line.
Fold both sides toward the center line once more to continue shaping it.
As the paper gets thicker, it may start to shift, so the key is to use the back of your thumbnail to press firm creases as you fold.
Draw a face with a felt-tip pen to finish your cute nameko mushroom.
Nameko Cultivation Kit: Nameko
Let’s make the nameko mushroom from the game “Nameko Cultivation Kit” with origami.
First, prepare one sheet of origami paper and make firm creases.
Fold along the creases, but be careful not to overlap the legs; adjust the balance as you go.
If you fold the stem a bit thicker, it will give the nameko a nice round look.
Once you’ve shaped the whole figure, draw the eyes and mouth with a felt-tip pen to finish.
Try making this distinctive nameko—and have fun creating different varieties by adjusting the shapes!
Mushrooms decorated with round stickers

When you think of mushroom cap patterns, do round spots come to mind? The mushrooms that appear in games and anime often have round spots, too.
Let’s try making a mushroom with classic round spots by sticking circular stickers onto the cap of an origami mushroom you’ve folded.
If you want a larger mushroom, try making the cap and the stem with separate sheets of origami paper.
For a palm-sized mushroom, you can make it with just one sheet.
Mushrooms come in many shapes, so fold whichever shape you like.
Sticking on the round stickers is a step that kids are likely to enjoy as well.
Mushroom-kun with arms and legs

Let me introduce Mushroom-kun with arms and legs, whose cap can be removed.
Prepare one sheet of patterned origami and one sheet of plain origami, and let’s make it.
For the body, create crease lines with your fingertips, fold the left and right sides toward the center, then fold the top and bottom edges to meet at the center.
Unfold the top section, then open it from the middle and fold along diagonal creases.
The key is to fold firmly all the way to the corners, aligning with the center so nothing shifts.
Fold the bottom section the same way.
For the arms and legs, fold evenly while checking the left-right balance.
For the cap that becomes the hat, take the plain origami, fold it in half, then fold the left and right edges in half at right angles.
Once the cap is complete, place it on the body as the mushroom’s hat—it looks super cute!