Preschool: Easy and cute Santa craft ideas

When it comes to what kids look forward to most at Christmas, it’s got to be the presents, right?
And who brings those presents? Santa, of course!
Dressed in a red suit and hat, with a fluffy white beard, he’s a beloved figure all around the world.
How about making Santa as a fun Christmas craft activity using everyday materials?
In this article, we’ll share Santa craft ideas that are easy enough for children to make.
They’re all things that will make Christmas even more fun, so give them a try!
- Cute Santa Claus wall decorations! A collection of perfect ideas for December childcare
- [Childcare] December Wall Decoration Ideas: Festive Crafts for Christmas and Winter
- [For Toddlers] A Big Collection of Craft Ideas to Enjoy at Christmas [Part 3]
- For older kindergarteners: December crafts that 5-year-olds will love — ideas from flat to three-dimensional projects
- Handmade Christmas present ideas! A collection of fun ideas for nurseries and kindergartens
- [Christmas Goods] A curated selection of easy and cute handmade items!
- Christmas crafts for 2-year-olds! A collection of fun ideas using stamps and handprints
- [For Toddlers] A Big Roundup of Craft Ideas to Enjoy at Christmas
- [For Seniors] Recommended for December Wall Decorations! Santa Craft Ideas
- [Childcare] Perfect for December wall displays! A collection of Christmas tree ideas
- [December Wall Displays] Cute Winter Craft Ideas You Can Use Beyond Christmas!
- Helpful for childcare! Let's make Christmas decorations using familiar materials.
- December craft ideas! A collection of childcare activities to enjoy with Christmas and winter themes
[Childcare] Easy-to-make cute Santa craft ideas (11–20)
Egg-shaped Santa
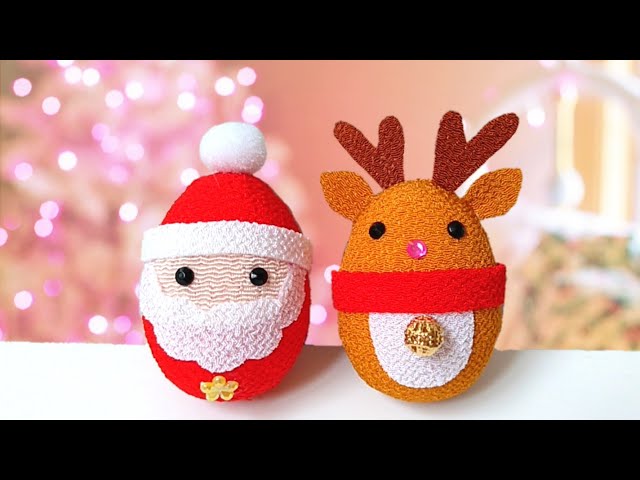
Fabric mascots have a unique texture and are adorable, but do you find yourself thinking, “You have to sew them, so there’s no way little kids can make them…”? Actually, by using egg-shaped Styrofoam balls, you can make a fabric Santa without any sewing at all! It’s easy: use double-sided tape to attach chirimen fabric to the Styrofoam ball.
Then attach the face, beard, and hat pieces with double-sided tape or glue, and you’ve got a cute, round fabric Santa.
If an adult helps with cutting out the pieces and gluing the small parts, the rest of the steps are manageable even for young children.
Santa with wobbly legs
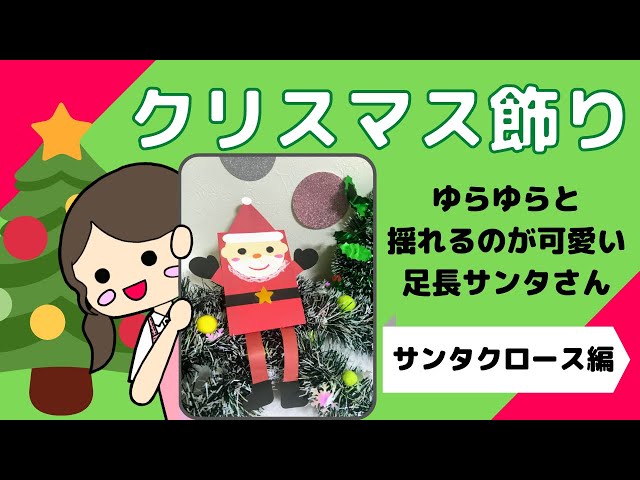
Let’s make a unique Santa using pieces of construction paper pasted together.
If an adult cuts out all the parts in advance, the kids just have to glue them on.
That way, even young children trying crafts for the first time can give it a go! Prepare Santa’s face, arms, gloves, hat, belt, body, and the key feature of this craft: long, fluttery legs.
The legs are made from paper strips, so when you sit Santa on the edge of a desk or hang him on the tree, his legs dangle and flutter—so fun! Once all the parts are ready, have the children glue each piece together.
After assembling all the parts to complete Santa, finish by drawing Santa’s face with colored pencils or crayons.
A Santa with a handprint beard

When it comes to Santa craft ideas, you sometimes see the same ones overlapping in magazines, books, and online media.
A great way to break out of that rut is a handprint-beard Santa.
As the name suggests, it’s an idea where you make Santa’s beard using handprints, and it’s perfect for making together with little kids.
It’s simple: first, cut and combine pieces of construction paper to form Santa, then add a separate piece of paper with a handprint for the beard.
If you make one every few years, it also becomes a lovely keepsake that shows your child’s growth.
Santa hanging ornament

The hanging Santa decoration is a bit challenging, but that makes it a rewarding Santa Claus craft idea.
Use a compass to draw curves on construction paper, then cut along the lines.
You’ll trace circles of various sizes with a compass on multiple sheets, so if you’re used to handling a compass, this will be easy to tackle! Glue the cut circles together, then finish by adding Santa’s face, a cotton beard, and a string for hanging.
If you measure carefully, it will have a professional look—give it a try!
Milk Carton Santa

Let’s make a Santa that can also be enjoyed as building blocks using milk cartons! In addition to milk cartons, you’ll need red construction paper and origami.
First, cut the milk carton to create two cubes.
Once you cover the cubes with red construction paper, you’ll have the bases for Santa’s head and body.
Attach the facial parts and clothing parts you made from origami to these bases, and your Santa is complete.
Since the basics are just cutting with scissors and gluing, let children take charge of each step according to their developmental stage.
Origami: Santa Hat

Let’s try making the hat that Santa wears using origami.
With a clever folding method, you can create space inside and give it a three-dimensional feel like a real hat.
Red origami paper is the standard choice, and the key is to make use of the white reverse side to form the hat’s details.
The steps are intricate, but a major advantage is that you can easily make it using just a single sheet of origami paper.
It looks cute on its own, but it would also be fun to add it to other decorations or even put it on a small mascot.
[Childcare] Easy-to-make cute Santa craft ideas (21–30)
Make it with toilet paper rolls! Nordic-style Santa Claus
@hapibacrafts [Make It with a Toilet Paper Roll! How to Craft a Scandinavian-Style Santa Figurine] You can make this cute Scandinavian-style Santa figurine using construction paper and a toilet paper roll! Here’s how. <What you need> ・1 toilet paper roll ・Construction paper (B5 red x1, B6 gold x1, B6 white x1) ・Santa figurine template (available on minne) → https://minne.com/items/38394007 ・1 red pom-pom, 2.5 cm (available at Daiso) ・Ruler, craft knife, scissors ・Wood glue, glue stick, rubber bands ・Black pen <Instructions> 1. Print the template and roughly cut it out. 2. Glue the template onto construction paper in the specified colors and cut out the pieces. 3. Arrange the cut pieces in the same orientation as shown in the images. 4. Apply glue to the skin-colored circular piece. 5. Stick it onto the white circular piece. 6. Apply glue to the white beard piece and attach it as shown in the image. 7. Glue the small white circle to the top of the red piece. 8. Glue the toilet paper roll in place. 9. Roll it up, apply glue to the edge, and secure. 10. Now you have Santa’s body and face pieces as shown. 11. Apply glue to the back of the face piece and attach it to the body. 12. Hold it in place with a rubber band until the glue dries. 13. Use wood glue to attach the red pom-pom to Santa’s face. 14. Secure with a rubber band and wait until it is fully bonded. 15. Meanwhile, draw Santa’s eyes with the black pen. 16. Once Santa’s nose is fully attached, you’re done! ⬇️ For a detailed walkthrough, watch the video here.https://youtu.be/NUt3fq8KLoI⬇️ Reindeer version is herehttps://youtu.be/uhwaT-iGaNQChristmas decorationsSanta ClausSimple craftSimple HandmadeChristmas craftsToilet paper roll core#SantaSanta Claus#Christmas decorationsSimple Santa dollSanta dollChristmas DollChristmas decorationsHandmade ChristmasPapercraftPapercraft makingChildcare#ConstructionPaperArtPoster Board CraftChildren's crafts#xmascraft#handmadexmas#Nabechin
♬ Rockin’ Around The Christmas Tree – Brenda Lee
Crafts made using familiar materials and scrap are a great experience for both children and adults.
Instead of buying something new, using items that would otherwise be thrown away can also contribute to the SDGs.
The items you’ll need are: a toilet paper roll, construction paper cut into parts, glue, double-sided tape or paste, red pom-poms, a black pen, and rubber bands.
When attaching the pom-poms, it’s a good idea to secure them with rubber bands while they dry.