Elementary School Students: Simple One-Day Science Project and Craft Ideas


For elementary school summer break projects and crafts, we recommend starting with something your child is already interested in.
When it’s something they like, they can enjoy working on it.
Here, we introduce simple ideas for elementary school students! These are experiments and crafts you can do in a single day.
The materials are things you already have at home or can get quickly, so even if you’re short on time, no worries.
Perfect for those who are “stuck on a theme” or “looking for an easy and fun project”! Find your favorite and give it a try.
- Simple yet amazing crafts: craft ideas that elementary school students will want to make
- For summer vacation homework! Simple and amazing crafts for elementary school students that you’ll want to make after seeing them
- Recommended for elementary school students! Science fair topics & craft ideas
- For upper-grade boys! Simple yet awesome craft project [Don’t call it lazy]
- Simple but awesome! Craft ideas for upper-grade girls
- DIY science projects that elementary school boys will love: ideas you can make with everyday materials
- Simple and cute summer project crafts! A collection of ideas for girls that will make you want to create
- Fun crafts using straws
- [Middle School Students] Easy One-Day Science Projects and Crafts Ideas
- Recommended Independent Research Projects for 5th Graders [Elementary School Students]
- Recommended for lower elementary school students! A collection of plastic bottle craft ideas made with everyday materials.
- Paper cup crafts that elementary school kids will love! A collection of fun project ideas
- Toys you can make from cardboard crafts! Authentic ideas you can build and play with
[Elementary School] Easy One-Day Science Projects and Crafts Ideas (141–150)
Easy Spinning Top Made from a Milk Carton
@silk_haru3mama Simple spinning top made from a milk cartonSummer Vacation CraftSummer Vacation Craft#HandmadeToys#HandmadeEducationalToy#Milk Carton Crafts#Milk carton#AtHomePlayworkSimple craftEducational toy#Summer Vacation
Fuzzy Navel – Conton Candy
Here’s an idea for making a spinning top you blow on using a milk carton.
First, cut the carton about 1.5 cm up from the bottom, then make slits at the four corners and open it up.
Next, rotating the carton in a consistent direction from each corner, cut along the edges of the bottom.
Leave about 1 cm uncut at the ends.
Bend the sections you just cut inward so they gather toward the center, and decorate with masking tape or stickers to finish.
If you blow straight down from above, it will spin around and around.
Picnic bag made from a box
@sayacky_be.child Materials and tips are here 👇🏻 Open it up—too cute♡ ▫️Materials▫️ ・Magnetic paper box (mine is from Seria) ・Rattan-pattern remake sheet (mine is from Seria) ・Bamboo-style bag handles (mine are from Seria) ・Ribbon or cord, etc. ・Fabric of your choice, 28×33 cm ▫️Tools, etc.▫️ ・Scissors ・Utility knife and cutting mat ・Ruler ・Pencil or pen (for marking) ・Ice pick (mine is from DAISO) ・Extra-strong double-sided tape for fabric (mine is from DAISO) ▫️Tips▫️ ・It’s quite hard, so you might need adult strength to cut or make holes. ・You don’t have to buy bag handles—feel free to substitute with something else ◎ ・The food that appears at the end of the video is introduced in one of my past videos♪ ⋆┈┈┈┈┈┈┈┈┈┈┈┈┈┈┈┈⋆ Nice to meet you! “Let’s be kids together♪” I’m Sayacky, a nursery teacher and mom of two♡ I share activities that get both kids and former kids excited! Please follow me☆ @sayacky_be.child ▲ Check out my other posts here ໒꒱ ⋆┈┈┈┈┈┈┈┈┈┈┈┈┈┈┈┈⋆#Sayakki-World#HandmadeToys#Childcare CraftingCraft Play#Childcare topic#AtHomePlay#StayHomeTime#100-yen shop DIYSimple craftKids' craftsHandmade#BasketBag
♪ Original Song – Sayakki's Atelier – Sayakki's Play Atelier
We’ll show you how to make an adorable picnic bag that’s a joy to open.
Prepare a one-piece box with an attached lid as the base.
Cut the box into your preferred picnic bag shape, then cover the entire surface with a makeover sheet that gives it a woven basket look.
Attach a handle and adhere fabric to the inside of the box to finish.
Any handle you like is fine.
As for fabric, a classic check pattern is always a good choice, but use your favorite.
Make some sandwiches and pop them in to complete a realistic-looking picnic bag!
Simple salt sand art
@watako.hoiku Also great for summer projects 🌻 | Salt Sand Art |Simple craftIndependent Researchtranslation
♬ เสียงต้นฉบับ – น้องมิแมวว♡ – ⋅˚₊‧ ୨ 𝒎𝒎𝒊𝒊 ୧ ‧₊˚ ⋅
This is about layering different colors of salt in a glass to create a picture-like, beautiful look.
Start by making colors that match what you want to create: mix paint into the salt to prepare it.
Once your colored salt is ready, simply layer it into the glass.
It’s best to pay attention to the boundaries between colors and avoid overmixing.
After filling the glass, press the layers to compact them—you can aim for more complex shapes this way.
Try various patterns to see what you can achieve.
[Elementary School Students] Simple One-Day Independent Research and Craft Ideas (151–160)
Metal craft
@utatan_simple_crafts ← Fun original craft recipe Good evening, this is Utatan 🐰 We’re halfway through summer vacation… so this time I’m sharing a satisfying craft that even elementary schoolers will enjoy ✨ It’s an arrangement of a copper wire craft I tried at a neighborhood summer festival when I was in second grade, updated with transparent origami paper ✂️ That was the first time in my life I worked with metal, and it was a valuable experience where I learned: “Metal is a fascinating material—hard and durable, yet flexible enough to deform when bent or hammered with force.” Trying, touching, and using all kinds of materials really expands your world, doesn’t it? ♪ My daughter used a hammer and needle-nose pliers for the first time, and it became a special experience for her! (Tip: If you want to make fine curves or angles, use needle-nose pliers 👍) Metal isn’t often used in kids’ crafts, but this summer vacation, I’d love for you to try this project that lets you fully feel the properties of metal ☺️ Materials: • 2 mm aluminum craft wire (purchased at Daiso) • Transparent origami, aurora sheet • (Optional) Faux leather cord Tools: • Wire cutters, needle-nose pliers • Hammer • Work gloves • A brick or flat stone • Multi-purpose glue • Toothpicks • Scissors • Pen Caution: Please take great care to avoid injuries from wire ends and the hammer. Important: Because this is an original recipe, we prohibit the following: ▪ Unauthorized reposting of images/videos ▪ Commercial use of the work/recipe ▪ Publishing the instructions as videos/images ▪ Unauthorized use in paid craft/art classes or production workshops When posting reference works, please mention @utatan_simple_crafts ✨ We’re also looking forward to your “made it!” posts ☺️ ****************************************** Creating daily with my 5-year-old ♪ Original craft recipes for parents and kids to enjoy (We also sell craft kits and digital files 🌸) Utatan’s Simple Crafts → @utatan_simple_crafts ONLINE STORE →https://utatan-crafts.stores.jpThank you in advance 🐰✨work#I love craftsStained glassWire CraftSummer Vacation Craft#Summer vacation homework#HandmadeToysHow to Spend Summer VacationLife with childrenLife with children#HandmadeToys#diy#AtHomePlay#StayHomeTime
♪ Original Song – Utatan’s Simple Crafts | Exciting DIY for Kids and Adults – Utatan’s Simple Crafts | Exciting DIY for Kids and Adults
Let’s try a metal craft project using soft wire you can find at 100-yen shops and similar stores.
First, come up with a few patterns that can be drawn in a single stroke.
After cutting the wire to an appropriate length, shape it to match the pattern.
If bending it by hand is difficult, it’s a good idea to use tools like pliers.
Once the shape is made, hammer it to flatten the joints.
Then cut transparent origami paper to fit the pattern, and attach it from the back with glue to finish.
Cute paper cup finger puppets
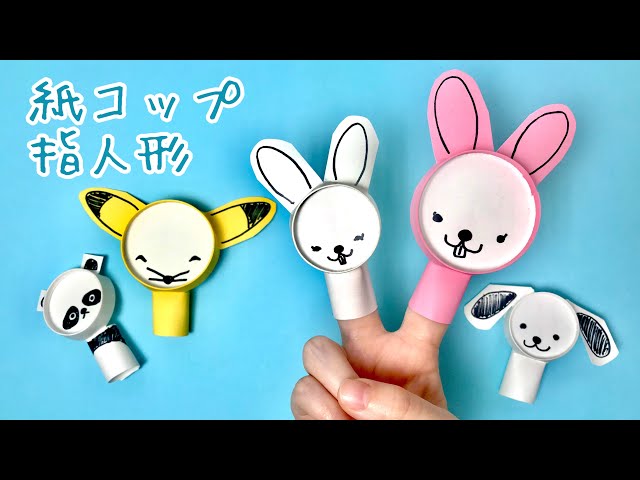
Here’s an idea for making finger puppets using paper cups.
The example shown here is a dog finger puppet, but with a little creativity you can make all kinds of animals.
Once you have a paper cup, cut four vertical slits along the side and remove the excess parts while shaping the dog’s ears and the rings that go around your fingers.
The bottom of the cup will be the face, so draw any expression you like with a pen.
Paper cups come in various colors, so using different colors might expand your range of expression.
Plastic bottle wind chime

Here’s an idea for an easy wind chime you can make with a plastic bottle.
Cut the bottle in half across the middle and make a hole in the center of the bottom piece.
Thread a string through the hole, attaching a strip of paper (tanzaku) and a bell to it.
Decorate the bottle, and you’re done.
Pens, nail polish, and decorative parts work well for embellishment.
To keep the string from slipping out, tie a short piece of a toothpick along the string as a stopper.
By taking advantage of the bottle’s translucence, you’ll get a cool, refreshing look.
If you’re looking for a summery craft idea, give this a try.
Cute glasses with moles

Let’s make cute glasses using pipe cleaners and straws.
First, think about the shape of the glasses you want to make—try sketching it out.
Round, square, star-shaped—anything you like is fine.
Once you’ve decided on the shape, form it with the pipe cleaners.
A single pipe cleaner isn’t very sturdy, so twist two together into one before shaping.
After the frame is done, thread straws onto the parts that go over your ears, and you’re finished.
If you use the accordion section of the straw over your ears, the glasses are less likely to slip off.