[For Elementary School Kids] Handmade Toy Craft Ideas

There are plenty of opportunities to make handmade toys, like indoor play items or independent research projects.
Some of you might be thinking, “Isn’t there a toy I can make with things I already have at home?”
In this article, we’ve compiled a bunch of handmade toy ideas for elementary school children.
These are not only fun to make, but also fun to play with once they’re finished.
It’s also great to incorporate your favorite characters or designs when making them.
Be sure to check out these handmade toy ideas that you can enjoy with family and friends.
- Simple yet amazing crafts: craft ideas that elementary school students will want to make
- Handmade games: DIY craft ideas you can make and play
- Paper cup crafts that elementary school kids will love! A collection of fun project ideas
- [Indoor Activities] A Collection of Craft Ideas Recommended for Elementary School Students
- [Let’s Make and Play!] Handmade Toy Ideas You Can Create Yourself
- DIY science projects that elementary school boys will love: ideas you can make with everyday materials
- Made of paper! A fun collection of DIY toy ideas you can play with
- Let's make toys with paper cups! Simple and fun handmade toys
- Let's make toys with straws! Easy and fun DIY toys
- For summer vacation homework! Simple and amazing crafts for elementary school students that you’ll want to make after seeing them
- Make It with Pipe Cleaners! A Collection of Simple, Fun, and Playable Toy Ideas
- Fun for Kids! A Collection of DIY Musical Instrument Ideas Using Everyday Materials
- [For Kids] Today’s Handmade Craft Ideas
[For Elementary School Students] Handmade Toy Making Ideas (101–110)
Well-spinning paper cup top
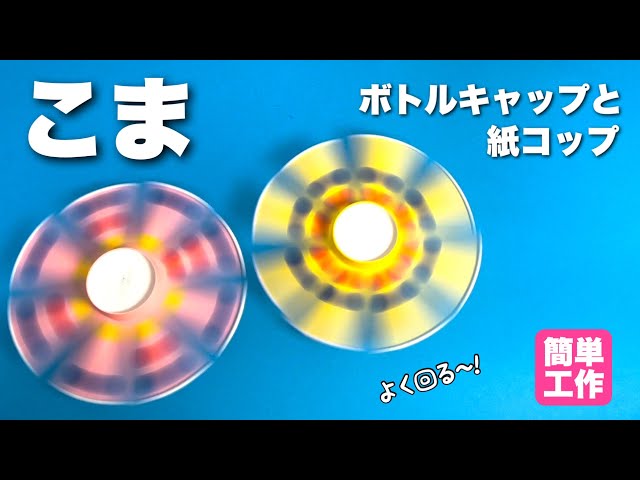
This is a spinning top made with a paper cup that spins well and is fun to watch because of its colorful look.
All you need are a paper cup and two plastic bottle caps.
First, cut slits into the paper cup and spread them out like propeller blades, then attach an axle made by combining the two caps.
That’s enough to complete the basic shape, but it’s recommended to decorate the “propellers” with an eye toward how it will look while spinning.
The impression changes depending on whether you spread the propellers before decorating or decorate first and then cut the slits, so try out various patterns.
Nigi-Nigi Cube

Crush it and it springs back into shape! Here’s an idea for a squishy squeeze cube.
Not only is it fun to touch and play with, but you can also stack it like building blocks.
Let’s make a squeeze cube! All you need are clear tape, a permanent marker, and scissors.
Create six square panels by layering clear tape, then simply stick them together to finish.
It’s an easy project to try.
If you design it with characters or colors your child likes, it might capture their interest even more.
Paper Cup UFO Catcher

The “Paper Cup UFO Catcher” is a popular DIY recreation idea you can enjoy with elementary school kids.
Cut eight slits into a paper cup to make tentacle-like arms, then insert a straw through the center to move it.
Place another paper cup over the top and move it up and down—this opens and closes the arms.
The moment it grabs the target is super exciting! It’s easy to make with everyday materials, yet the movement feels authentic and makes it really fun to play.
Figuring out the controls is part of the charm, and it gets even more exciting when friends compete.
It’s a recommended activity that combines the joy of crafting with the sense of achievement from a game.
Paper Plate Balance Game

Let me introduce a guaranteed crowd-pleasing, handmade recreation activity you can make and play with elementary school kids: the Paper Plate Balance Game.
Paint a paper plate in four colors—red, yellow, blue, and green—and attach capsule toy containers or paper cups underneath to create an unstable balancing base.
The rules use two kinds of dice: one regular number die and a special die with “colors” and faces like “x2” and “x3.” Players take turns placing small counters (like marbles or flat game pieces) according to the color and number rolled.
If you upset the balance and make pieces fall, you lose.
It’s easy to make, and a fun idea game that nurtures dexterity, concentration, and creativity.
Flower fidget spinner
@n.annlee321 A festive plum blossom hand spinner ☺️✨#2022#tiktok classroomLife with children#VideoYouCan'tHelpButWatch
♬ Relaxing cute everyday BGM – Hiraoka
How about making your own hand spinner that twirls between your fingers or on a desk, finished in a cute flower shape? Use two circles cut from cardboard for the finger pads, connect them with a toothpick to form the axle, and attach the spinning flower piece between them, leaving a slight gap as you assemble the axle.
The way it spins will change depending on the gap between your fingers and the rotating part, as well as the size of the hole the toothpick passes through, so try building it while experimenting with ways to make it spin longer.
[For Elementary School Students] Handmade Toy Craft Ideas (111–120)
Flower Hand-cranked Spinning Top
@n.annlee321 A hand-spun top that you spin with your palm ☺️✨Summer Vacation Craft#tiktok classroomLife with children#HandmadeToys
♬ Monkeys Spinning Monkeys – Kevin MacLeod & Kevin The Monkey
Let’s make a hand-spun top that you spin vigorously with your hand, designed with a cute, flower-inspired look.
We’ll use a disposable chopstick as the top’s axle, and wrap long, folded strips of paper around it to form the shape of the top.
Everyone should clearly imagine their favorite flower and think about which colors of paper will best match that flower.
Wrapping the paper tightly is the key to making the whole piece sturdy and ensuring it spins well.
Rice made from yarn
@n.annlee321 What kind of rice do you like? 🙂#tiktok classroomLife with children#HandmadeToys#AtHomePlay
Good music – neguse.
Let’s make a rice mascot that conveys warmth by making the most of yarn’s soft look.
The steps are to bundle yarn wound around a fork and then cut it; the key is shaping it so it ends up looking like rice.
Place it in a bowl or lunchbox-style container you made separately, and aim for an even more appetizing look with additional decorations.
Plain white rice can look too simple, so try mixing in other colors as you wind the yarn, or add side dishes you’ve crafted separately—both are great options.