For summer vacation homework! Simple and amazing crafts for elementary school students that you’ll want to make after seeing them


A fun summer vacation homework project for kids: crafts! But as children move into the upper grades, they can run out of ideas and worry about making something that doesn’t end up being the same as their friends’.
So here, we’re introducing craft ideas recommended for elementary school students from lower to upper grades.
Many use materials you already have at home or can buy at a 100-yen shop, so they’re easy to try.
The ideas are designed to help kids discover their own unique projects and express their creativity.
Use these as a reference and make some wonderful summer vacation memories!
- Simple yet amazing crafts: craft ideas that elementary school students will want to make
- Elementary School Students: Simple One-Day Science Project and Craft Ideas
- Simple but awesome! Craft ideas for upper-grade girls
- Recommended for elementary school students! Science fair topics & craft ideas
- DIY science projects that elementary school boys will love: ideas you can make with everyday materials
- For upper-grade boys! Simple yet awesome craft project [Don’t call it lazy]
- Paper cup crafts that elementary school kids will love! A collection of fun project ideas
- Fun crafts using straws
- Toys you can make from cardboard crafts! Authentic ideas you can build and play with
- Simple and cute summer project crafts! A collection of ideas for girls that will make you want to create
- Crafts parents and kids can enjoy together. Recommended craft ideas to keep children entertained.
- [For Adults] Simple yet Impressive Crafts: A Stylish, Eye-Catching Collection
- Craft ideas using plastic bottle caps [for boys]
[For Summer Vacation Homework!] Easy and Amazing Crafts for Elementary School Kids That You’ll Want to Make When You See Them (91–100)
Even grade-schoolers can make it! Triple-shot chopstick rubber band gun
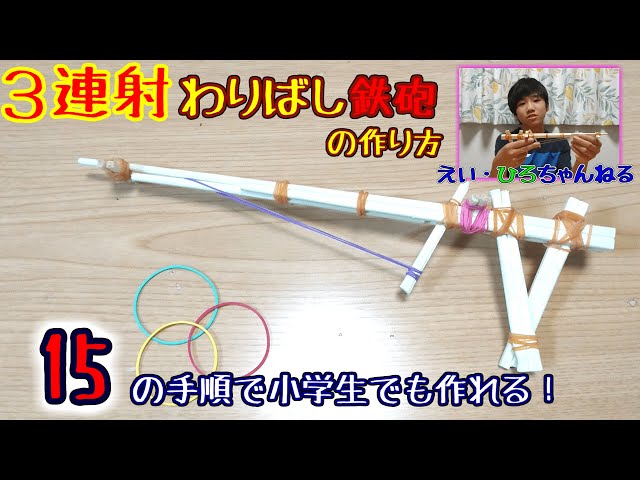
You might think it’s just a simple chopstick rubber band gun, but it actually has a feature that lets you fire three rubber bands.
The building process is straightforward: attach a handle to a bundle of chopsticks that serves as the base, then install a movable trigger so that it’s sandwiched in place.
What’s crucial here are the trigger shape and the positions where the rubber bands are hooked.
By attaching three rubber bands at different positions, they will fire in sequence.
The hooking method for each band is also intricate, so doing that accurately is a key point.
Powerful! Chopstick Gun
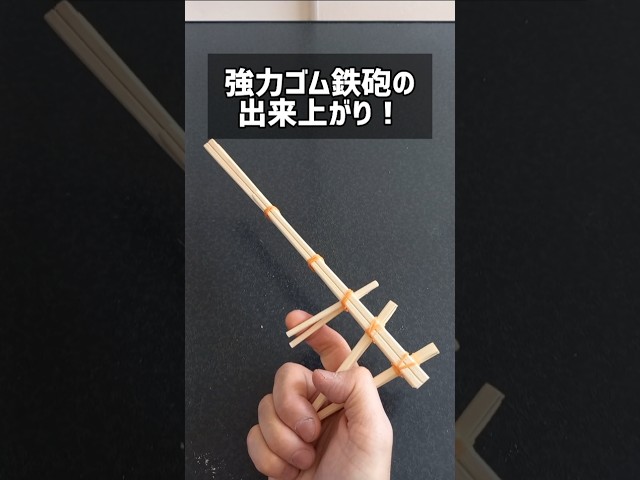
Prepare seven pairs of disposable chopsticks and plenty of rubber bands as materials.
First, use five pairs of chopsticks to make the main body.
Stack the chopsticks for the body alternately left and right so that about two-thirds overlap.
Secure them firmly at two points with rubber bands, then cut a notch at the front end to hook a rubber band.
Attach a short, cut chopstick to the rear of the body as the trigger, and glue another chopstick fixed in a V-shape behind that as the grip.
Your powerful chopstick gun is complete!
A rapid-fire chopstick rubber-band gun

This is a rubber band gun made from chopsticks, finished with a mechanism that allows rapid fire by combining small pieces cut from disposable chopsticks with rubber bands.
The base is essentially a bundle of chopsticks tied together with rubber bands, to which you attach parts such as the rubber band hook (which serves as the ammunition), the grip, and the trigger components.
Although the structure is complex, the only tools you need are chopsticks, rubber bands, and scissors, so once you get used to the steps, it feels fairly simple.
It’s also important to firmly secure each part so it can withstand the tension of the loaded rubber bands.
A capsule toy machine made from a candy box

Let’s make a capsule toy machine that makes use of candy boxes as packaging! The cool thing about this machine is that you can change what comes out depending on whether you turn the dial to the right or to the left.
Press in the bottom part of the box so it forms a slope.
If you use an empty cylindrical candy container for the turning dial, you’ll have an adorable candy-themed capsule machine! Of course, you can fill it with the candies that came in the box, and you could even put in one different candy or a special “winner” prize inside!
Making cotton ball lights

The cotton balls that make everyone go, “How do they make those?” are real show-stoppers.
Let’s make charming cotton ball lights by placing lights inside cotton balls.
The trick to making the cotton balls is to wrap yarn, dampened with glue, around a small polka-dot balloon.
Once the glue dries, pop the balloon and only the cotton sphere remains.
String together a bunch of them, add lights, and you’re done.
You can even use the same method to make chocolate balls.
If you enjoy home economics/crafts, give that a try too!
Easy Cotton Candy Maker

Cotton candy is a classic at summer festival stalls.
This project lets you make a cotton candy machine at home.
The materials are an empty canned coffee bottle, a battery-powered milk frother from a 100-yen shop, some tools like an awl for making holes, and a candle for heating—that’s all you need.
Making holes in the can is tricky, so it’s suitable for older elementary students.
Since you’ll be using fire, be sure to make it with an adult.
Insect interior

This is an idea for turning insect specimens into stylish interior decor.
When you think of specimens, you might picture them in a box, but what we’re introducing here uses a jar.
You’ll need a jar with a cork lid, an acrylic sheet, and an insect specimen.
The process is simple: first, cut the acrylic sheet to a size that fits inside the jar.
Next, make a slit in the cork lid, insert the cut acrylic sheet, and secure it with adhesive.
Finally, attach the insect specimen to the acrylic sheet and close the lid to finish.
Using a clear acrylic sheet makes it look as if the insect is floating inside the jar, creating a very chic look.