For summer vacation homework! Simple and amazing crafts for elementary school students that you’ll want to make after seeing them


A fun summer vacation homework project for kids: crafts! But as children move into the upper grades, they can run out of ideas and worry about making something that doesn’t end up being the same as their friends’.
So here, we’re introducing craft ideas recommended for elementary school students from lower to upper grades.
Many use materials you already have at home or can buy at a 100-yen shop, so they’re easy to try.
The ideas are designed to help kids discover their own unique projects and express their creativity.
Use these as a reference and make some wonderful summer vacation memories!
- Simple yet amazing crafts: craft ideas that elementary school students will want to make
- Elementary School Students: Simple One-Day Science Project and Craft Ideas
- Simple but awesome! Craft ideas for upper-grade girls
- Recommended for elementary school students! Science fair topics & craft ideas
- DIY science projects that elementary school boys will love: ideas you can make with everyday materials
- For upper-grade boys! Simple yet awesome craft project [Don’t call it lazy]
- Paper cup crafts that elementary school kids will love! A collection of fun project ideas
- Fun crafts using straws
- Toys you can make from cardboard crafts! Authentic ideas you can build and play with
- Simple and cute summer project crafts! A collection of ideas for girls that will make you want to create
- Crafts parents and kids can enjoy together. Recommended craft ideas to keep children entertained.
- [For Adults] Simple yet Impressive Crafts: A Stylish, Eye-Catching Collection
- Craft ideas using plastic bottle caps [for boys]
Perfect for Summer Break Homework! Simple and Awesome Crafts for Elementary Schoolers That Make You Want to Create (31–40)
Disposable Chopstick Ferris Wheel

A Ferris wheel that truly stands out, even in an amusement park.
How about making a working Ferris wheel that actually spins using wooden chopsticks? It’s a perfect idea for winter or summer break crafts and independent projects! First, start by making the central axle of the Ferris wheel, then move on to the wheel-shaped frame and the gondolas.
Chopsticks can be easily cut with scissors, so you can freely adjust their length—that’s a key point.
Feel free to change the length of each part as you like! If you have time, adding color could make it an even more beautiful piece.
The opening straw flower

It’s amazing that you can create such beautiful crafts using just straws! The flowers, opening like umbrellas, overlap intricately and transform gracefully.
I can’t help but be captivated by the sight.
Since straws come in many colors and patterns and are inexpensive, this seems easy to make.
With adult supervision, even lower-grade elementary school children can give this craft a try.
Be sure to work carefully to avoid injuries.
Remaking a 100-yen shop clock
https://www.tiktok.com/@nantomokuzai/video/7265645972984827143The part you can see from the back of a table clock or wall clock—the section with the battery compartment and the knob for setting the time—is called the movement.
You could say it’s the heart of the clock.
In fact, clock movements are sold on their own at 100-yen shops and home improvement stores, and you can use them to make your own original clock! If you’re good at woodworking, try starting from scratch by buying a wooden board and cutting a groove to fit the movement.
If that’s not your strong suit, there are also assembly kits with pre-cut grooves available, so you can use those instead.
bowling toy

This is a craft project to make a miniature bowling game where you throw a ball to knock down pins.
All you need is cardboard and marbles, plus a utility knife, glue, and pens or construction paper for decoration.
You’ll build everything—the pins, the lane, and the mechanism to launch the marble—by combining pieces of cardboard.
Aiming for a realistic miniature bowling alley involves more complicated steps, but as long as you make a lane and a launcher, it’s a playable project.
You can also adjust the complexity to suit the students’ grade level.
Automatic Sorting Piggy Bank

Piggy banks are also popular for elementary school summer crafts.
There are all kinds of ideas, from eye-catching ones where you make your favorite anime character out of paper clay, to material-focused ones made with toothpicks or plastic bottles.
So why not try making an “automatic sorting piggy bank” that’s sure to draw attention? It’s a clever piggy bank that automatically sorts and saves coins like 10-yen and 500-yen pieces—and the amazing part is that it’s made only from cardboard, which feels a bit mysterious.
The secret is holes cut to the exact size of each coin; as the coins pass through, they get sorted automatically! Be careful when using cutters or knives during the build.
Summer Homework Project! Easy and Amazing Crafts for Elementary School Students That You’ll Want to Make (41–50)
Straw Omikuji
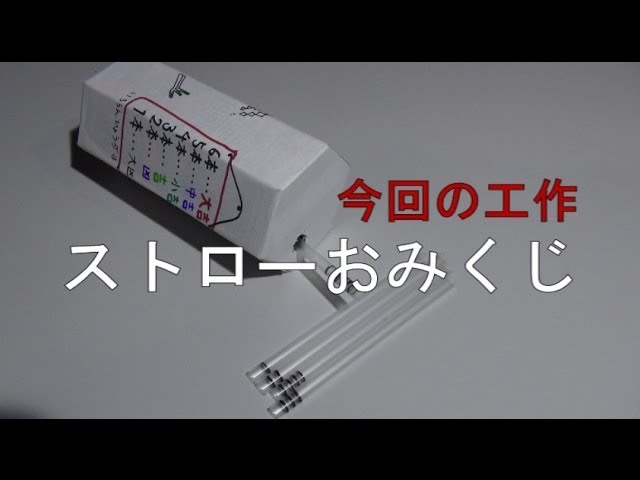
Lotte’s Koala’s March is delicious, isn’t it? The simple chocolate flavor is great, but the limited seasonal flavors are also intriguing.
If you have an empty Koala’s March box, you can make a “straw omikuji” fortune-drawing game.
All you need are decorative paper and straws.
First, make a hole in the top of the empty Koala’s March box large enough for a straw to fit through.
This will be the opening where the fortunes come out.
After making the hole, tape the box closed.
Next, attach the decorative paper—any color you like is fine.
If you have wood-grain printed paper, it might make it feel even more like a traditional omikuji box.
Cut straws to a suitable length and write characters like “Daikichi” (Great Luck) or “Kyo” (Bad Luck) on the ends, then put them into the Koala’s March box and you’re done.
As long as a parent helps with making the hole, even a third-grader should be able to make it.
It takes about 2–3 hours, so it’s great for people short on time!
Ping-Pong Basketball

This is a craft project to make a toy that lets you shoot baskets with a ping-pong ball.
The materials you need include a ping-pong ball, a plastic cup, and wire.
You can get everything at a 100-yen shop, so it’s inexpensive to make.
The mechanism is simple, so you can finish it in half a day, and it’s recommended even for lower-elementary school children.
Once it’s done, try enjoying a free-throw showdown with your new toy!