Simple origami that can be folded from a single sheet

Origami is a type of recreation that people of all ages—from young children to seniors—can enjoy together, and it’s fun whether you’re in a group or on your own.
You may not remember the very first origami you folded as a child, but in this article we’ll introduce ideas that are easy to fold and can be made with just one sheet of paper.
No cutting or gluing needed—these are all simple designs that you can complete with a single sheet of origami paper.
They’re perfect for kids trying origami for the first time, and also great as a warm-up for anyone who hasn’t folded in a while!
- Children’s Origami: Easy Single-Sheet Flower Ideas
- Kids will love it! Easy origami ideas—great as gifts too!
- [Origami] She’ll love it if you fold these! Simple ideas for girls
- Cool origami that boys will love and want to fold
- Popular characters that are easy to make with origami. A collection of creations you can enjoy with children.
- Origami ideas boys will want to make!
- Cute Origami Ideas for Girls
- [For Kids] Let's Fold! Today's Origami Idea Collection
- Easy flower craft ideas you can make with a single sheet of origami paper
- Cute origami ideas
- Let's make it with origami! Ideas for simple 3D creations
- [Origami] Have fun with kids! A collection of easy snowman origami ideas
- [Recreation] Summary of Recommended Origami Ideas for Seniors
Simple origami you can fold with a single sheet (31–40)
Origami ribbon with a heart

This is an adorable ribbon featuring a heart in the center.
It’s amazing that it’s made from just a single sheet of origami, isn’t it? Pick your favorite color or patterned paper and let’s get started! After cutting the origami paper in half, fold it lengthwise.
Unfold it and fold the sides along the crease.
Fold it in half vertically to start forming the ribbon shape.
Along the way, you’ll be able to create a heart in the center.
Some steps are a bit intricate, but you’ll feel a great sense of accomplishment once it’s finished.
It also makes a wonderful gift for children or for women.
poop

For some reason, kids love poop…
While it can be a bit awkward when they keep saying the word, if they find out they can easily make one with origami, they’ll probably be thrilled, right? Here’s how: after folding into a triangle, fold the two sides along the crease, then fold the white triangular part and tuck it inside.
Next, keep folding so it looks layered, and finish by folding the corners slightly to round it out.
Done! It looks pretty realistic, doesn’t it? (lol) If you make them in different colors and line them up, they turn out surprisingly cute—give it a try!
randoseru (Japanese elementary school backpack)

With just one sheet of origami paper, you can make a three-dimensional randoseru (Japanese school backpack)! First, crease the paper to divide it vertically into four equal sections, then cut off the outermost quarter.
Fold this cut-off piece to make the backpack flap.
Next, cut a portion from the remaining three-quarters to create the shoulder straps.
Attach the straps and the flap to the rectangular bag-shaped body made from the remaining section, and your tiny randoseru is complete.
Pair it with a backpack cover made from a different origami sheet for an even cuter finish.
Give it a try!
cherry blossom

When it gets warmer, cherry blossoms color the city in a cute way.
The fluttering petals that fall are beautiful, too.
This time, I’ll show you how to fold a cherry blossom petal.
Please prepare origami paper and scissors.
First, fold the paper in half twice, then open it once to make a rectangle.
There will be a crease in the center; using that as a guide, add a diagonal cross crease on the right side.
Align the lower left corner with the center of the cross crease on the right, then fold it back to the left.
Fold the right side along the left layer of paper, and finally fold it back to the rear.
After that, use scissors to cut the bottom in a rounded curve, and you’re done.
They look adorable if you make them in various sizes and decorate your wall!
gun
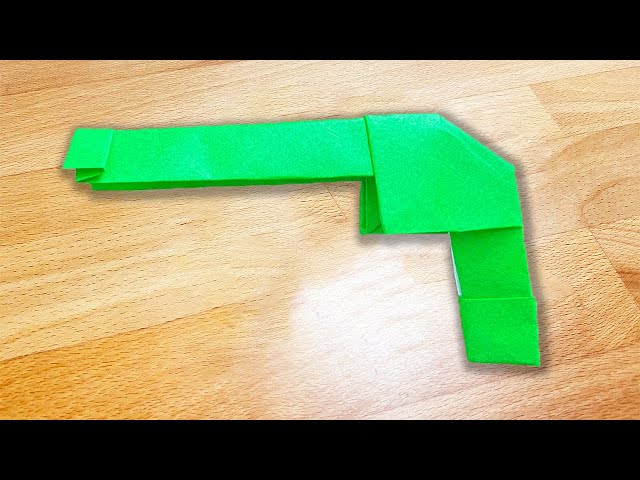
Let’s try making a cool gun out of a single sheet of origami paper! First, fold it into a triangle twice to make crease lines.
Open it up, then fold the top and bottom toward the center.
Fold upward toward the center once more.
Bring the right and left sides together and fold to make it half.
Open it slightly and return it, then fold toward the center line.
From here, you’ll be flipping it over and doing some detailed steps, but as it gradually takes the shape of a gun, it’s exciting to make! It also looks cool to make them in different sizes and line them up for display!
Simple Origami You Can Fold with a Single Sheet (41–50)
box

It’s an idea for a simple origami square box.
Many of you may have made this before.
It’s handy when you want a small trash bin or a little dish.
There are steps at the beginning and in the middle where you create crease lines, but anyone old enough to fold straight along creases and do the “zabuton” fold should have no trouble.
If you make two using different sizes of origami paper, you can stack them to create a lidded box.
Once you learn how to fold it, it’s a useful idea in many situations, so give it a try!
shaved ice

Would you like to make a summer classic—shaved ice—out of origami? First, crease the origami paper along the diagonal and place it so a corner is pointing toward you.
Fold the bottom corner up to the center.
Next, fold the upper-left edge along the diagonal that’s parallel to you, then flip the paper over.
Fold the left and right edges to meet the center line, and turn the model upside down.
From there, keep folding while shaping it with a shaved-ice silhouette in mind until it’s complete.
If you add a straw-spoon made from another sheet of origami paper, it will look even more like shaved ice!