[For 4-Year-Olds] Feel the Spring Up Close! Fun and Easy Craft Ideas You’ll Love


Spring is when colorful flowers bloom and insects begin to move about energetically.
Many teachers may be thinking, “I want children to feel the charms of spring!”
So this time, we’ve gathered spring-themed craft ideas recommended for four-year-olds.
Packed with fun projects that incorporate spring motifs familiar to children—like cherry blossoms, dandelions, butterflies, and ladybugs!
These ideas focus on enjoying self-expression while expanding their imaginations, as well as experiencing a variety of techniques and materials, so be sure to check them out.
Because the children’s creations are treated as artworks, the term used in the text is “制作” (seisaku), meaning “art/craft production.”
- [For 4-year-olds] A collection of April craft ideas that capture spring, such as Easter and cherry blossoms
- [Origami] Easy spring-themed origami ideas to enjoy with 4-year-olds
- [Childcare] Recommended crafts and activities for March, such as Hina Matsuri (Doll’s Festival) and cherry blossoms
- [Childcare] Recommended for nurseries and kindergartens! Cherry blossom craft ideas
- [For Age 3] Let’s make it in April! A collection of craft ideas to feel spring events and nature
- [Childcare] Spring craft ideas to enjoy with 2-year-olds! Techniques and materials included
- [For 5-year-olds] Let's make it in April! A collection of craft ideas using recycled and natural materials
- [Childcare] Fun Spring Activities: Ideas for Nature, Movement, and Crafts
- [April Crafts] Useful for childcare! Spring craft ideas for 1-year-olds
- May: Craft Ideas That Excite 4-Year-Olds!
- [Childcare] Simple origami ideas for kids, perfect for spring
- [For 4-5-year-olds] Folding is fun! A collection of January origami ideas to enjoy with preschoolers
- [Childcare] Recommended for March! A Collection of Craft Ideas to Enjoy with 4-Year-Olds
[For 4-year-olds] Feel the spring around you! Fun and recommended craft ideas (41–50)
Easter egg maracas

April has Easter, right? Here’s a perfect craft for April festivities: making egg-shaped maracas that make a rattling sound.
Prepare two bottle caps, beads, newspaper, aluminum foil, a permanent marker, and vinyl tape.
Put beads into one cap, place the other cap on top, and secure them tightly with vinyl tape so the beads don’t spill.
If you add too many beads, the sound can become muffled, so a moderate amount is recommended.
Wrap the capped beads with newspaper to create volume and shape it into an egg.
Finally, color the aluminum foil with a permanent marker in any colors you like, carefully smooth it into an egg shape, wrap it around, and your maracas are complete!
[For 4-year-olds] Feel the spring around you! Fun and recommended craft ideas to make (51–60)
Sensory Bottle Made with Cherry Blossom Petals

When you think of spring, many of you probably picture cherry blossoms.
Cherry trees in full bloom are incredibly gorgeous, yet they fall quickly, giving them a fleeting, delicate beauty.
This time, we’ll show you how to make a sensory bottle that lets you enjoy the beauty of cherry blossoms for a longer period.
The method is very simple: put liquid starch (laundry glue) and cherry blossoms into an empty bottle, then secure the lid with glue—that’s it.
Adding cotton balls or beads is also recommended.
As you gaze at the cherry blossoms gently drifting and swaying, take your time to relax and feel soothed.
A flower blooming on the water

Flowers blooming on water make for a very spring-like craft.
The method is very simple: take origami cut into petal shapes and fold each petal inward toward the center.
Gently place it on the surface of water, and the petals will slowly open! It’s exciting to see how they unfold.
It’s also recommended to draw flowers on white drawing paper and use those.
Since many flowers bloom in spring, try making them while observing real flowers.
If using scissors is difficult, make them together with a teacher.
Pill Bug Made with Paper Plates

Pill bugs are one of the insects that children love.
Their trait of curling up into a little ball when touched is part of what fascinates kids.
Let’s try making a pill bug out of a paper plate.
First, draw patterns on the paper plate with crayons, then paint over it with black paint.
Enjoy the way the paint resists the crayon.
Next, cut the paper plate into six equal sections, stack all the small triangles together, poke a hole at the tip, and insert a split pin (brad).
Finally, add the face and legs to finish.
It even reproduces the pill bug’s unique movement, so kids are sure to be captivated.
Give it a try!
Make it with paper cutting! Dandelion fluff

Here’s a gentle, paper-cutting idea that captures the soft, airy spread of dandelion fluff.
Prepare origami paper, scissors, and a pencil.
Fold the origami paper in half twice, then fold it again into a triangle.
Open and align the layers so they fan outward, sketch the dandelion seed design, and cut carefully.
The key to a neat finish is to take your time with the fine details.
When you gently unfold it, a radiating pattern appears, revealing delicate fluff.
It’s a project that’s fun to open and see, recommended for both kids and adults.
Display it by a window to let the light shine through and make it even more beautiful.
Fun to roll! Dandelion origami
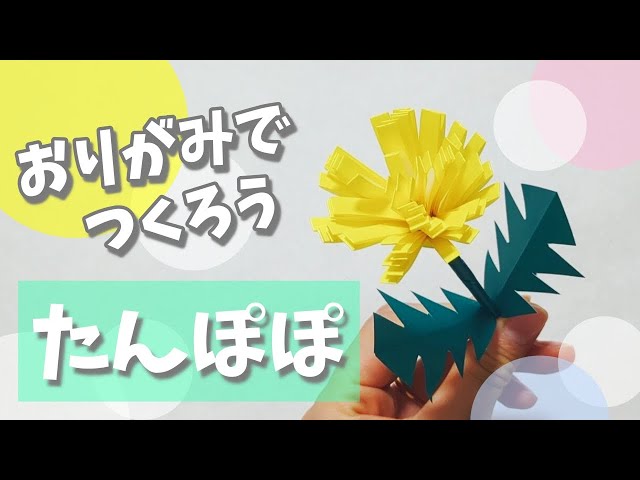
This is a voluminous dandelion origami made by rolling strips.
The petals spread out radially, giving a glamorous look.
Fold the origami paper in half and cut it, then fold each piece in half again.
Apply glue to the edge, join to form a ring, and make fine 5 mm cuts to create the petals.
Roll another piece of paper to make the stem, and fold and snip it to finish the leaves.
Wrap the petals around the stem and fluff them out for added dimension—it also works well as interior decor.
Combining yellow and orange will make it even more vibrant.
Cherry blossoms made by sputtering
@hoikushi_bank Sputtering cherry blossom drawing 🌸#Nursery school #Kindergarten Production Nursery School Practicum #Indoor Play Nursery teacher / Childcare worker Childcare student#Childcare Crafting#CherryBlossomSpringTranslation#Drawing
♬ Dance The Night Away – TWICE
Let’s paint using the delicate motion of watercolor! Here are some ideas for creating cherry blossoms with the spattering technique.
You’ll need drawing paper, a paper stencil cut into a cherry blossom shape, a blending mesh (screen), a toothbrush, and paint thinned with water.
Spattering is great because you can depict your motif without using pens or crayons.
No two large or small paint splashes are ever the same, so each person’s individuality will shine! Give the spattering technique a try and paint beautiful cherry blossoms.