[Childcare] Simple origami ideas for kids, perfect for spring


Why not enjoy spring-themed origami with the children in your childcare setting?
Making spring motifs like cherry blossoms and butterflies will help everyone feel the season.
Prepare colorful origami paper and let the children choose their favorite colors to make it even more fun.
Origami is a great opportunity to nurture creativity and concentration, so try making a variety of creations.
Start with simple projects and gradually take on more challenging ones so the children can experience a sense of accomplishment.
Display their creations and enjoy spring together!
- [Origami] Easy spring-themed origami ideas to enjoy with 4-year-olds
- [Childcare] Ideas for March wall decorations
- [For 4–5 year olds] A collection of recommended origami ideas for March—featuring seasonal events and natural motifs
- [Origami] Simple Origami Folding Ideas to Savor Spring with 5-Year-Olds
- [For 3-year-olds] Let’s make strawberries with origami! A collection of easy strawberry folding ideas
- [Childcare] Fun to Make! Recommended Craft Ideas for Spring
- [Childcare] Recommended crafts and activities for March, such as Hina Matsuri (Doll’s Festival) and cherry blossoms
- [Childcare] Let’s make things with various materials! A collection of recommended craft ideas for April
- [Kindergarten (older class)] What kind of season is March? Let’s make events and natural objects with origami!
- Simple origami for kids: cute, playable origami ideas
- For older kindergarteners: Let’s make it! A collection of recommended origami ideas for February
- [For preschoolers] A collection of origami ideas to enjoy February, including Setsubun and Valentine’s Day
- [Origami] Simple Origami Ideas to Feel the Spring with 3-Year-Olds
[Childcare] Simple spring-themed origami ideas for kids (11–20)
strawberry

Let’s make sweet and tasty strawberries out of origami.
Fold the origami paper into a triangle, then fold the corners to create a rounded strawberry shape.
Attach a calyx made from green origami paper and draw the seeds, and you’ll have a delicious-looking strawberry! If the calyx part is a bit tricky because the folding is somewhat complex, the teacher can step in to help, or you can cut a calyx shape out of construction paper and glue it on.
Displaying tiny mini strawberries made from small origami paper alongside larger strawberries made from regular origami paper also looks adorable.
dandelion

This is an origami dandelion that evokes the arrival of spring.
Take a sheet of origami paper cut in half, accordion-fold it finely, and round off the corners.
Make two identical pieces, fold each in half, glue them, then attach the two pieces together and fan them out into a radial shape to complete the flower.
Finally, attach the paper leaves and stem to the flower piece to finish your dandelion.
The flower may look intricate, but it’s actually very simple—just repeated accordion folds! Let children fold at a width that’s comfortable for them, and they’ll create a beautiful result.
four-leaf clover

A four-leaf clover that brings happiness can be hard to find on a walk.
So let’s make one with origami! Cut a sheet of origami paper in half, crease it, then fold the two short edges back to meet the crease line.
Flip it over and fold the corners into triangles, flip it again, and fold the triangular parts toward the center.
Keep shaping the folds to create the clover’s rounded look, and finally combine two identical pieces in a cross to complete a beautiful clover! Making them in different sizes and displaying them together is super cute, too.
Honey and Clover

Here’s a wall decoration idea featuring clovers that start blooming around March and ladybugs that herald the arrival of spring.
Most clovers you see are three-leafed, but it’s said that finding a four-leaf clover brings good luck.
If you’re making a clover-themed wall, it could be fun to include one or two four-leaf clovers as a surprise! Ladybugs in red or yellow would go well with the green clovers.
If you’re creating this for childcare settings, it might be cute to have the children make themselves as ladybugs!
Origami Poppy You Can Make from a Single Sheet!
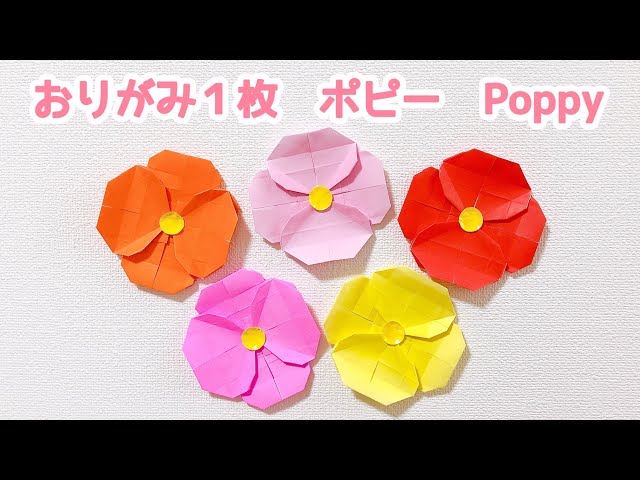
Poppies, which bloom in vivid shades of orange, yellow, and pink, are flowers you often see in parks in spring.
Their delicate, windswept beauty makes them popular with children, and they’re a perfect motif for an April origami craft.
Take origami paper in your favorite color, fold it in half horizontally, then fold both ends to the center.
Rotate it, fold it in half again, and fold both ends to the center.
Make diagonal creases in the middle square to form triangles, open it up, and flatten along the creases.
Continue shaping the flower by folding along the crease lines.
For the yellow center, stick on a round sticker.
Since there are many detailed steps, this craft is recommended for older kindergarteners who enjoy origami.
Easy! How to fold cherry blossom petals

When you see cherry blossoms in the yards of day care centers and kindergartens, in parks near your home, or along the river, it really feels like spring has arrived, doesn’t it? Many families go flower viewing or eat packed lunches under the cherry trees.
Cherry blossom origami that lets you enjoy spring is perfect for April crafts.
Take a sheet of origami paper cut to one-quarter size and fold it into a triangle with a slight offset.
To bring out the jagged look characteristic of cherry blossom petals, fold the left and right corners slightly out of alignment.
Flip it over, fold the two end corners, and one petal is complete.
Make five of these and glue them together to form a cherry blossom.
Why not make lots and enjoy cherry blossoms indoors as well?
[Childcare] Easy Origami Ideas for Kids Perfect for Spring (21–30)
Cute mini basket

Let’s make a mini basket for small items using construction paper.
Prepare a 15 cm × 21 cm sheet, then fold it in half to make a small rectangle.
Open it after creasing, and fold the left and right edges to meet the center crease.
Next, fold all four corners into triangles.
The key is to fold them slightly away from the center line.
Aligning with the inner edges of the triangles, fold the left and right sides to make creases, then fold the top and bottom edges you first folded outward by about 1 cm.
Once folded, open it up from there to form a box shape.
Attach a handle and decorations, and it’s complete!