[Childcare] Simple origami ideas for kids, perfect for spring


Why not enjoy spring-themed origami with the children in your childcare setting?
Making spring motifs like cherry blossoms and butterflies will help everyone feel the season.
Prepare colorful origami paper and let the children choose their favorite colors to make it even more fun.
Origami is a great opportunity to nurture creativity and concentration, so try making a variety of creations.
Start with simple projects and gradually take on more challenging ones so the children can experience a sense of accomplishment.
Display their creations and enjoy spring together!
- [Origami] Easy spring-themed origami ideas to enjoy with 4-year-olds
- [Childcare] Ideas for March wall decorations
- [For 4–5 year olds] A collection of recommended origami ideas for March—featuring seasonal events and natural motifs
- [Origami] Simple Origami Folding Ideas to Savor Spring with 5-Year-Olds
- [For 3-year-olds] Let’s make strawberries with origami! A collection of easy strawberry folding ideas
- [Childcare] Fun to Make! Recommended Craft Ideas for Spring
- [Childcare] Recommended crafts and activities for March, such as Hina Matsuri (Doll’s Festival) and cherry blossoms
- [Childcare] Let’s make things with various materials! A collection of recommended craft ideas for April
- [Kindergarten (older class)] What kind of season is March? Let’s make events and natural objects with origami!
- Simple origami for kids: cute, playable origami ideas
- For older kindergarteners: Let’s make it! A collection of recommended origami ideas for February
- [For preschoolers] A collection of origami ideas to enjoy February, including Setsubun and Valentine’s Day
- [Origami] Simple Origami Ideas to Feel the Spring with 3-Year-Olds
[Childcare] Simple Origami Ideas for Children Perfect for Spring (41–50)
A three-dimensional cherry blossom made from a single sheet of origami
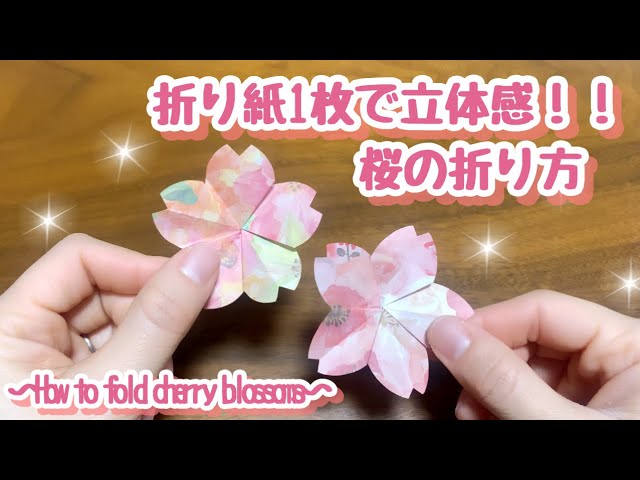
Let’s make a three-dimensional cherry blossom using just one sheet of origami paper.
First, fold the paper in half and crease an X on one side.
From the side without creases, fold toward the center of the X, then fold that side in half.
From the side with the creases, fold up to the edge of the section you just folded, then fold it outward in half from there.
When you have a shape like an irregular triangle, draw a petal-like outline of a cherry blossom, cut along that line, and unfold.
Following the creases on the flower, refold it into an accordion shape, then on both the front and back, make narrow creases from the left and right edges.
Using these creases as axes, unfold the flower again to complete a three-dimensional cherry blossom!
spring origami

Here are five easy origami designs with spring-themed motifs.
First is the Hina doll for Hinamatsuri, a festival kids love.
Then come a bush warbler, a strawberry, a tulip, and a butterfly.
They range from very simple to a bit more challenging, so choose according to the child’s age.
Among them, the Hina doll looks very festive yet is surprisingly easy: just fold toward the center three times and draw the face with a pen.
If you prepare chiyogami or other patterned paper that suits the doll’s outfit, even small children can give it a try.
A three-dimensional cherry blossom made from a single sheet
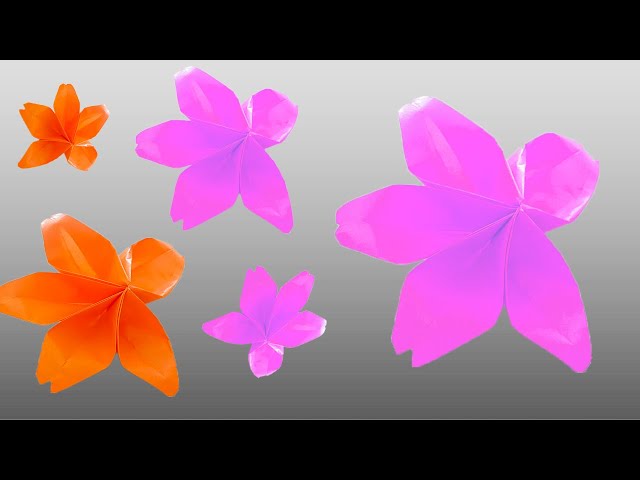
Let’s make a three-dimensional cherry blossom using a single square sheet of origami paper.
Fold the paper into a triangle, and create crease lines as you shape it into a cherry blossom.
When cutting with scissors, be careful not to make mistakes—cut along the fold lines.
Once you open it up, fold along the creases so it forms a three-dimensional flower shape.
Using a toothpick to lift and shape the petals may help the process go more smoothly.
Changing the color of the origami to make colorful cherry blossoms could make it brighter and more fun.
Easy! Origami Cherry Blossoms

Let’s decorate for graduation and entrance ceremonies with lots of easy-to-make cherry blossoms! Prepare smaller origami paper and first fold it in half to make a triangle.
Fold it into a triangle once more, then open that triangle into a pocket shape to form a square on both sides.
Fold along the crease back into a triangle, then make a slit on one of the long, narrow corners and open it up one step.
From the area where the origami layers are thickest, make a slight crease toward the slit, and use this crease as the axis to open the whole piece.
If you open it top and bottom first, then left and right, your cherry blossom will be complete.
Cute cherry blossom paper cutout

Recommended when you want to mass-produce cherry blossoms with ease! First, fold the origami paper in half vertically.
Then fold it lengthwise again to make it narrow and unfold; also fold it into a square from the opposite direction and unfold to create crease lines.
From one end, fold up toward the crease, then fold the folded section in half and open it.
Next, fold one end toward the part you just folded, then flip the whole piece over and fold it in half.
Finally, make cuts shaped like cherry blossom petals and unfold to finish.
Make cherry blossoms in various colors and sizes and use them as decorations for a variety of spring events.
Also for Hinamatsuri! Cherry Blossom Papercut

Let’s cut origami paper and make lots of cherry blossoms! Fold the origami into a triangle twice, then open it once.
With the widest angle at the top, crease it in half from the top.
Fold both ends toward the far edge to form a shape like a triangle with three spiky points at the top.
Next, cut it into the shape of a single cherry blossom petal and unfold—done! If you want a papercut-style design, use the same folding method, but while cutting the petal shape, also cut out the center.
When you unfold it, each petal will look slightly hollowed out.
Make them in various colors and sizes, and decorate with plenty of them!
Easy, relaxed cherry blossom origami

By changing how you make the cuts, you can create two types of cherry blossoms! First, fold the origami paper in half vertically and make an X-shaped crease on one side.
Fold the paper from the uncreased side toward that X crease, open it halfway, then fold up from the creased edge toward the part you just folded.
Fold the whole thing in half again, and you’re ready! For the first type, cut along a shape like cherry blossom petals and open it up as is.
For the second type, after making the petal cuts, add a cut in the center shaped like cherry blossom pistils.
When you open it, you’ll have a cherry blossom with pistils in the middle!