[Childcare] Simple origami ideas for kids, perfect for spring


Why not enjoy spring-themed origami with the children in your childcare setting?
Making spring motifs like cherry blossoms and butterflies will help everyone feel the season.
Prepare colorful origami paper and let the children choose their favorite colors to make it even more fun.
Origami is a great opportunity to nurture creativity and concentration, so try making a variety of creations.
Start with simple projects and gradually take on more challenging ones so the children can experience a sense of accomplishment.
Display their creations and enjoy spring together!
- [Origami] Easy spring-themed origami ideas to enjoy with 4-year-olds
- [Childcare] Ideas for March wall decorations
- [For 4–5 year olds] A collection of recommended origami ideas for March—featuring seasonal events and natural motifs
- [Origami] Simple Origami Folding Ideas to Savor Spring with 5-Year-Olds
- [For 3-year-olds] Let’s make strawberries with origami! A collection of easy strawberry folding ideas
- [Childcare] Fun to Make! Recommended Craft Ideas for Spring
- [Childcare] Recommended crafts and activities for March, such as Hina Matsuri (Doll’s Festival) and cherry blossoms
- [Childcare] Let’s make things with various materials! A collection of recommended craft ideas for April
- [Kindergarten (older class)] What kind of season is March? Let’s make events and natural objects with origami!
- Simple origami for kids: cute, playable origami ideas
- For older kindergarteners: Let’s make it! A collection of recommended origami ideas for February
- [For preschoolers] A collection of origami ideas to enjoy February, including Setsubun and Valentine’s Day
- [Origami] Simple Origami Ideas to Feel the Spring with 3-Year-Olds
[Childcare] Simple Origami Ideas for Kids Perfect for Spring (61–70)
Framed origami dandelion wall decoration

The framed origami dandelion wall decoration is a vibrant interior piece that can be displayed as is.
First, fold the origami paper little by little from the top and bottom to make firm creases, then trim the top, bottom, left, and right to refine the shape.
By folding the edges inward, you create a frame-like border.
Next, take a rectangular piece of origami paper, make fine slits in it, roll it up tightly, and gently open the petals.
Finally, arrange the leaves in a balanced way to complete a dimensional dandelion.
It’s a satisfying project and an idea that kids and adults can enjoy together.
Make it with paper cutting! Dandelion fluff

Here’s a gentle, paper-cutting idea that captures the soft, airy spread of dandelion fluff.
Prepare origami paper, scissors, and a pencil.
Fold the origami paper in half twice, then fold it again into a triangle.
Open and align the layers so they fan outward, sketch the dandelion seed design, and cut carefully.
The key to a neat finish is to take your time with the fine details.
When you gently unfold it, a radiating pattern appears, revealing delicate fluff.
It’s a project that’s fun to open and see, recommended for both kids and adults.
Display it by a window to let the light shine through and make it even more beautiful.
If you make it larger, it can go on the wall too! Dandelion origami
Make it larger and you’ll have a showy dandelion that works as a wall decoration.
Cut origami paper to create petals and glue them in place while shaping them.
Increasing the number of petals adds more volume.
Draw patterns on a rectangular piece of origami paper, cut it out, and use it to represent grass.
By layering and connecting additional petals, you’ll achieve a three-dimensional finish.
Varying the colors and sizes will instantly brighten up a space—an idea enjoyable for both kids and adults.
It can also be used as a seasonal display.
Great for kids too! Easy 3D Dandelion

This dandelion origami features a charmingly round, fluffy three-dimensional look.
By combining many parts, you can create a piece with a strong presence.
Fold a quarter-sized sheet of paper in half, then into a triangle, fold it back behind, and align the corners diagonally.
Shape it during the tucking step, flip it over, and fold the corners inward to complete one unit.
Make 13 of these, then insert and glue them together to form a 3D dandelion.
Give it a gentle shake and the flower will softly spread, making it a delight to display.
Authentic dandelions that even children can make

This is a full-fledged dandelion origami that lets you carefully craft the flower, leaves, and even the stem.
It may look like there are many steps, but if you proceed carefully one by one, you’ll get a beautiful result.
Start by folding a sheet cut in half; fold about one-fifth while aligning the edges with the creases to shape it, then create step folds and glue them together to complete the flower.
For the leaves, use a separate sheet: fold diagonally along the creases and open the pockets to squash-fold, adding a three-dimensional effect.
For the stem, fold a quarter-size piece and assemble it; then insert and glue the flower and leaves to finish.
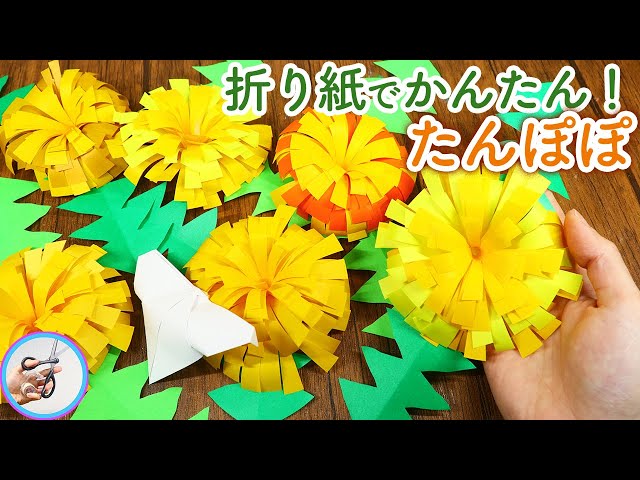
Fun to roll! Dandelion origami

This is a voluminous dandelion origami made by rolling strips.
The petals spread out radially, giving a glamorous look.
Fold the origami paper in half and cut it, then fold each piece in half again.
Apply glue to the edge, join to form a ring, and make fine 5 mm cuts to create the petals.
Roll another piece of paper to make the stem, and fold and snip it to finish the leaves.
Wrap the petals around the stem and fluff them out for added dimension—it also works well as interior decor.
Combining yellow and orange will make it even more vibrant.
How to make a 3D dandelion

Here’s an idea for a softly rounded, three-dimensional dandelion finished by curling it up.
One of its charms is that it can be made with simple materials.
Fold a sheet of origami paper in half, make fine cuts, then roll it up tightly.
Fold another piece of origami into a diamond shape and open it outward to create the base for the petals.
Apply glue to attach them, and gently spread the petals to complete a three-dimensional flower.
Using different shades of yellow makes it even more vibrant.
The instructions are easy to follow, making it a project that people of all ages can enjoy together.