[Summer Vacation Crafts] Not just make-and-done! A collection of practical ideas you can use every day


We often hear things like, “I don’t know what to make for my summer break project,” or “I want to create something practical!” But don’t worry.
With simple, everyday materials, you can make wonderful projects that are useful in daily life.
Here, we introduce crafts that grow more endearing the more you use them: a sturdy pen holder made from a milk carton, a cute felt humidifier, a metal door plate made from an aluminum sheet, and more.
They’re all simple to make, yet durable enough to use long after they’re finished.
This summer break, try your hand at practical projects the whole family will love!
- For summer vacation homework! Simple and amazing crafts for elementary school students that you’ll want to make after seeing them
- [Middle School Students] Easy One-Day Science Projects and Crafts Ideas
- For upper-grade boys! Simple yet awesome craft project [Don’t call it lazy]
- Recommended for elementary school students! Science fair topics & craft ideas
- [For Adults] Simple yet Impressive Crafts: A Stylish, Eye-Catching Collection
- Kids get hooked on crafts with toilet paper rolls! Idea collection for elementary school students
- A collection of summer vacation craft ideas made with 100-yen shop materials
- [For Upper Elementary Students] Simple but Awesome! A Collection of Summer Vacation Craft Ideas
- [Summer Vacation Crafts] Stylish Ideas for Girls
- DIY science projects that elementary school boys will love: ideas you can make with everyday materials
- Recommended performance ideas for elementary school (middle grades) cultural festivals and learning presentations
- Make it with everyday materials! A collection of fun summer vacation craft ideas
- [Milk Carton Crafts] Fun ideas for elementary school kids. Perfect for summer vacation homework!
[Summer Vacation Crafts] Not just for making and forgetting! A collection of practical ideas you can use every day (41–50)
small accessory case
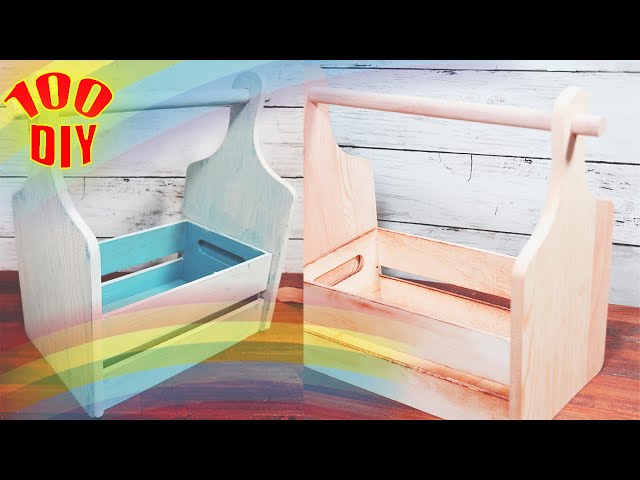
Let me introduce a cute and handy little storage container.
Get a wooden box, a cutting board, a round dowel, a hot glue gun, and a saw, and let’s get started.
Use the hot glue gun to attach the cutting board to the left and right sides of the wooden box.
Cut the round dowel to the appropriate length, sand the ends smooth, thread it through the holes, and secure it with the hot glue gun.
The process is simple and easy to make, so definitely give it a try.
It’s also recommended to paint it to add a personal touch.
Handmade shaker coaster

Introducing original handmade “shaker” coasters that capture the feel of the seasons.
Gather styrofoam board, background design paper, a clear file, plastic sheet, double-sided tape, beads or seashells, and sand, and let’s get started.
First, decide what kind of coaster you want to make.
Cut the styrofoam board to create the coaster base.
Attach the base pieces together for the bottom section.
Apply masking tape around the edges, add seashells and sand inside, then seal it with the lid using double-sided tape—and you’re done! Give it a try!
Insect interior

This is an idea for turning insect specimens into stylish interior decor.
When you think of specimens, you might picture them in a box, but what we’re introducing here uses a jar.
You’ll need a jar with a cork lid, an acrylic sheet, and an insect specimen.
The process is simple: first, cut the acrylic sheet to a size that fits inside the jar.
Next, make a slit in the cork lid, insert the cut acrylic sheet, and secure it with adhesive.
Finally, attach the insect specimen to the acrylic sheet and close the lid to finish.
Using a clear acrylic sheet makes it look as if the insect is floating inside the jar, creating a very chic look.
Eyeball Tile Coaster

Here’s an idea where you use cork coasters sold at 100-yen shops as a base and decorate them with stickers and more.
Lately, tile stickers that were popular in the Heisei era have been making a comeback, and you can find a variety of patterns at 100-yen shops as well.
Decorations using remake sheets—those you stick on furniture or walls—are also recommended.
With a bit of creativity, the possibilities are endless, so go ahead and make coasters full of originality!
Let’s make a bamboo lantern

Here’s how to make a bamboo lantern that looks beautiful when it glows at night.
Use a saw to cut the bamboo.
Make slits in the cut bamboo, then gently tap from above with a hammer to create openings where the light will shine through.
The key is to tap with the hammer without using too much force.
Drill holes to create several small windows for the light to leak out.
Wrap yarn around the top and bottom of the bamboo tube, using double-sided tape to secure it.
Place an LED light inside, switch it on, and let it shine.
It emits a soft glow that gives off a traditional Japanese ambiance.
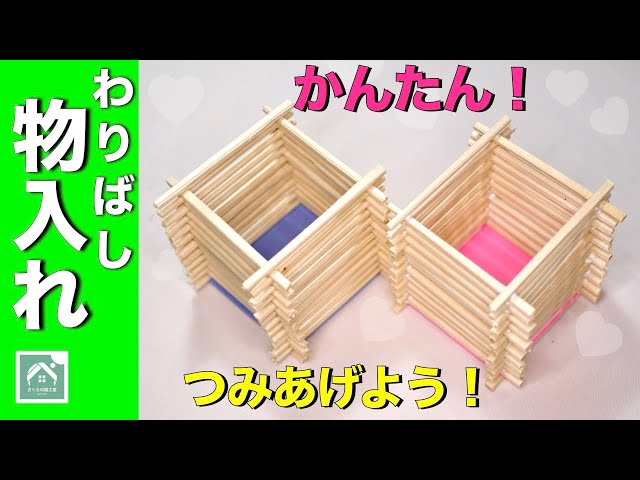
Cute lantern made with disposable chopsticks
https://www.tiktok.com/@mami_toys/video/7141827992879172866Let me introduce a cute lantern you can make with disposable chopsticks—fun to display and enjoy.
Prepare chopsticks, glue, and washi paper.
Cut the chopsticks and build the lantern’s frame.
The key is to keep an eye on the balance so the frame doesn’t shift out of place.
Attach washi paper from the back to create the lantern’s window sections.
Finally, glue the frames together to finish.
It’s also recommended to use your favorite colors for the window sections.
The light that leaks through the gaps between the chopsticks looks absolutely beautiful.
Disposable chopstick holder
Here’s a chopstick accessory holder that’s perfect for a summer vacation craft.
Prepare 12 pairs of disposable chopsticks, glue, and colored construction paper.
Split the chopsticks in half, then use scissors to cut all the way around the midpoint to make them half-length pieces.
With 12 pairs, you’ll get 48 sticks.
Cut the colored paper into a square, apply glue to the left and right sides, and attach chopsticks; then flip it over, rotate it, and glue chopsticks onto the sides that don’t have them yet.
Apply glue where the chopsticks overlap and stack the sticks one by one.
Make sure they stack up straight.
Let it dry thoroughly, and it’s done!