Ideas for Winter-Themed Crafts and Bulletin Board Projects for 5-Year-Olds

By the time children are five, they handle scissors and glue more smoothly, and the range of craft activities expands dramatically.
Why not enjoy some winter-themed crafts together with your five-year-olds?
We’ve gathered plenty of ideas inspired by events like Christmas, New Year’s, and Setsubun, as well as winter-specific items like snowmen and mittens.
Encourage projects that let children freely express the worlds they imagine and experience a sense of accomplishment and satisfaction.
Since we treat what the children make as works (art pieces), we refer to them as “seisaku” (creations) in the main text.
- [For 5-year-olds] Let’s Make It! A Collection of Recommended Craft Ideas for February
- For older kindergarteners: December crafts that 5-year-olds will love — ideas from flat to three-dimensional projects
- Easy Winter-Themed Origami Ideas for 5-Year-Olds
- Fun January Crafts! A Collection of Ideas You Can Make and Play With for 5-Year-Olds
- [Childcare] Winter Projects You’ll Want to Try! Recommended Craft Ideas
- [For 5-year-olds] Recommended for Christmas! A collection of fun crafts to make
- December craft ideas! A collection of childcare activities to enjoy with Christmas and winter themes
- [For 4-year-olds] Winter craft ideas to enjoy at daycare and kindergarten
- [For 3-year-olds] Winter craft activities and bulletin board decoration ideas for use in childcare
- [Kindergartners (Older Group)] Folding is Fun! Recommended January Origami Idea Collection for Senior Kindergarteners
- For older kindergarteners: Let’s make it! A collection of recommended origami ideas for February
- For 4-Year-Olds: January Crafts! A Collection of Fun Ideas with Winter and New Year Themes
- [For 1-year-olds] Fun to make! A collection of winter craft activity ideas for use in childcare
[For 5-year-olds] Ideas for winter-themed crafts and wall displays (71–80)
Fluffy tissue paper Christmas tree

When making crafts with tissue paper, you sometimes end up with leftover scraps, right? This time, here’s an idea for making a Christmas tree using those leftover pieces.
The key is to put some liquid glue on your palm and roll the tissue paper into little balls! Try adjusting the amount of glue as you go.
When creating the base with construction paper, it’s best to cut it to fit the size of the place where you want to display it.
Using holographic tape or sparkly materials will give it a bright, festive finish!
Cute yarn paper plate decoration

Here’s an idea for an easy, seasonal decoration.
First, prepare a paper plate and paint it navy blue to create the base.
Wrap some clear tape around the tip of green yarn, then punch holes in the plate in the shape of a Christmas tree.
Thread the yarn through the holes, and the outline of the tree will gradually appear.
Once the shape looks right, attach decorative stickers and a star ornament to complete the tree.
You can add white round stickers around it to create a snowy atmosphere.
Finally, punch a hole at the top and tie a ribbon, and your cute decoration is finished.
With color and decoration tweaks, it’s a fun winter craft to enjoy with children.
A Christmas tree made of chenille stems and decorative stickers

Let’s make a sparkling Christmas tree that will make you even more excited for the holiday! You’ll need construction paper cut into a triangle, tissue paper in green and light green cut into small pieces, glue, brown construction paper, glitter pipe cleaners, decorative materials, a stapler, adhesive, and so on.
The key is that the glitter pipe cleaners shine, so the tree looks bright from any angle.
Just like decorating a Christmas tree with ornaments, finish by sticking on your favorite stickers and parts!
White Christmas tree made with paper doilies
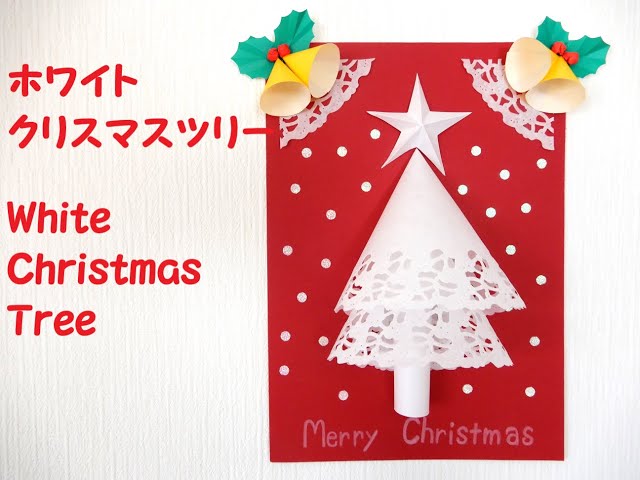
Set a red construction paper as the background and decorate it with a Christmas tree made from white paper doilies for a festive, seasonal wall display.
Shape the tree into a cone and stack two cones to add depth.
Roll a small tube to represent the trunk.
Attach a bell and holly ornament to the top corner, and scatter white round stickers to create a snowy effect.
The contrast of white and red stands out, resulting in a finish that feels both vibrant and warm even with simple materials.
It’s an easy, cute Christmas craft you can enjoy decorating together with children.
Construction paper Christmas wreath

It would be wonderful if we could make a three-dimensional Christmas wreath using construction paper.
Let’s create a gorgeous, eye-catching wall display that makes you look forward to the Christmas season! You’ll need construction paper in various colors, scissors, a craft knife, glue, paste, tape, and so on.
One of the great things is that you can customize the method, size, and design.
How about making it together with the kids—perhaps a colorful tree, or a tree that looks snow-covered by using cotton? Wishing you a fun and festive Christmas!
Three-dimensional Christmas tree wall
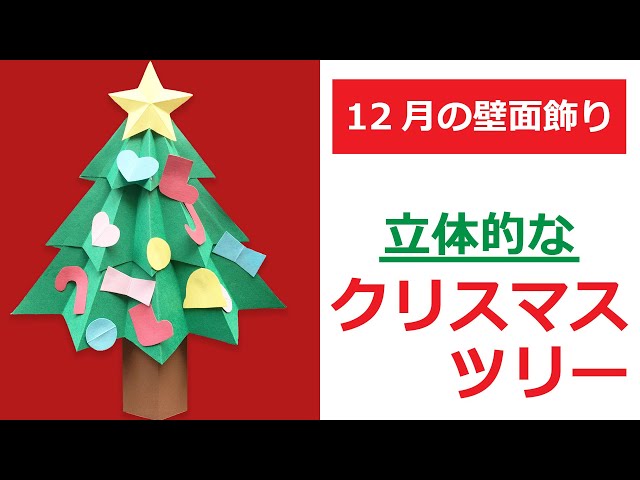
Even if you can’t display a real Christmas tree, this is a lovely idea to brighten up your room.
When you think of Christmas, many people probably picture a tree, right? This time, let’s make a three-dimensional, charming Christmas tree using construction paper.
The materials you’ll need are green construction paper, red construction paper (and other colors if you like), a template, scissors, a stapler, glue, and a ruler.
It’s also fine to choose any colors you like for the construction paper besides green.
Since some steps in making the tree involve small, detailed work, it’s best for children to do this together with a teacher or guardian.
Easy paper-plate Christmas tree

First, fold a paper plate and cut along the crease to divide it into four equal parts.
Tear green origami paper into small pieces, as you would for a collage, and paste them on to represent the leaves of a Christmas tree.
If you layer and attach the paper plate pieces with double-sided tape, you’ll create bumps and add a three-dimensional effect.
Stick on stickers in your favorite colors to light up the tree, then add a star ornament at the top.
Finally, make a trunk with orange origami paper and attach it, and your Christmas tree is complete.
It’s a Christmas craft that uses simple materials but can be made festive with a bit of creativity.