
By the time children are five, they handle scissors and glue more smoothly, and the range of craft activities expands dramatically.
Why not enjoy some winter-themed crafts together with your five-year-olds?
We’ve gathered plenty of ideas inspired by events like Christmas, New Year’s, and Setsubun, as well as winter-specific items like snowmen and mittens.
Encourage projects that let children freely express the worlds they imagine and experience a sense of accomplishment and satisfaction.
Since we treat what the children make as works (art pieces), we refer to them as “seisaku” (creations) in the main text.
- [For 5-year-olds] Let’s Make It! A Collection of Recommended Craft Ideas for February
- For older kindergarteners: December crafts that 5-year-olds will love — ideas from flat to three-dimensional projects
- Easy Winter-Themed Origami Ideas for 5-Year-Olds
- Fun January Crafts! A Collection of Ideas You Can Make and Play With for 5-Year-Olds
- [Childcare] Winter Projects You’ll Want to Try! Recommended Craft Ideas
- [For 5-year-olds] Recommended for Christmas! A collection of fun crafts to make
- December craft ideas! A collection of childcare activities to enjoy with Christmas and winter themes
- [For 4-year-olds] Winter craft ideas to enjoy at daycare and kindergarten
- [For 3-year-olds] Winter craft activities and bulletin board decoration ideas for use in childcare
- [Kindergartners (Older Group)] Folding is Fun! Recommended January Origami Idea Collection for Senior Kindergarteners
- For older kindergarteners: Let’s make it! A collection of recommended origami ideas for February
- For 4-Year-Olds: January Crafts! A Collection of Fun Ideas with Winter and New Year Themes
- [For 1-year-olds] Fun to make! A collection of winter craft activity ideas for use in childcare
[For 5-year-olds] A collection of craft play and wall display ideas that capture the feeling of winter (1–10)
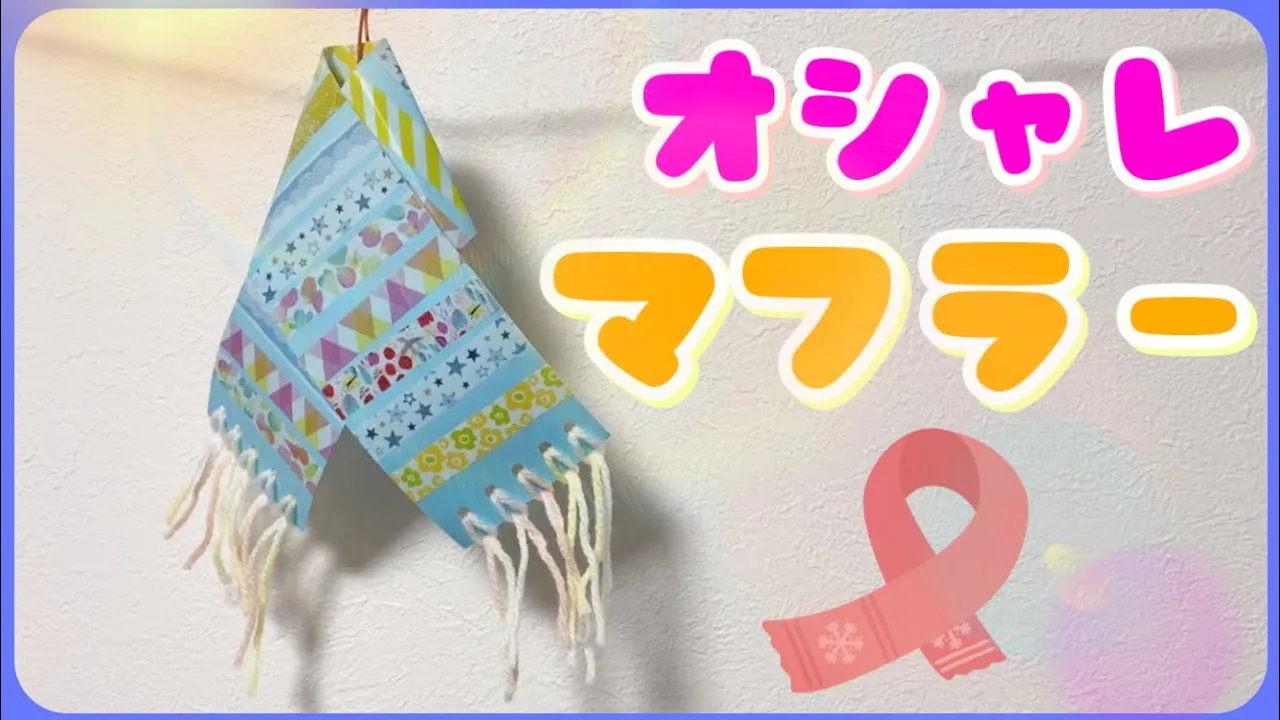
stylish scarf

Here’s a recommended winter craft for five-year-olds! It’s a very cute paper scarf made with construction paper.
You’ll need A3 construction paper in your favorite color, yarn, and masking tape.
First, cut the paper lengthwise into four equal strips.
Punch five holes along both ends of each strip.
Next, cut pieces of yarn—20 cm each—for the number of holes, and attach them from the edge using masking tape.
Using various colors will make it extra cute.
Flip it over and place a long strip of masking tape horizontally.
Finally, fold each piece of yarn in half and thread the loop through the holes.
Shape it like a scarf, and you’re done!
Oni’s Den-den Daiko (Demon’s Pellet Drum)

Here’s a craft perfect for Setsubun and recommended for five-year-olds: making an ogre-themed den-den daiko (hand drum).
You will need colored construction paper, cardboard, buttons, stickers, a pencil, chopsticks, thread, glue, crayons or pens, and clear tape.
For prep, cut the cardboard and construction paper into matching circles.
Attach thread to the buttons and stick them onto the cardboard.
Also attach a chopstick handle and the horns made from construction paper.
Prepare facial parts in advance too, such as round stickers and eyebrows.
Let the children add hair using their favorite yarn and stick on the facial parts.
Drawing with crayons, etc., also looks cute.
That’s it—finished! Any prep steps that five-year-olds can handle are great opportunities to have them do the making themselves!
Easy! Origami Snowman

This is an origami snowman you can make with simple steps.
Choose the color of your origami paper based on the hat you want the snowman to wear.
Once you’ve decided, place the paper with the colored side facing up and fold it in half by bringing the left and right edges together.
Next, fold it again by matching the top and bottom edges.
Then, using the second crease, make a step fold (accordion fold), and fold the two ends of the stepped section inward, opening them into triangles.
This creates a waist, giving you a two-tiered snowman.
Finally, tuck the remaining corners at the top and bottom inward to round the shape, and you’re done.
One corner will become the hat, so fold only one layer inward so that a triangle of the colored side appears on the snowman’s surface.
Snowflakes made with salt painting

Let me introduce an idea for expressing snowflakes with salt painting! You’ll need wood glue, salt, paint, construction paper, and a shallow container that fits the paper.
Place the paper in the container and draw snowflakes with the wood glue.
If freehand is tricky, sketch them first and trace over the lines with glue.
Sprinkle salt evenly over the glue, then color using slightly thinned paint.
Watching the paint seep into the salt and blend into new colors is fascinating, and kids are sure to be engaged by the process!
Skeleton Shishimai (Lion Dance)
@haruharo_made TikTok document New Year’s Craft / [Skeleton Shishimai (Lion Dance)] Sparkly, colorful, and cute with a skeleton look ♡ [Materials] • Construction paper • Color film • Scissors • Glue • Crayons • Transparent filmCrafts for 4-year-olds Crafts for 5-year-olds#3-year-old crafts#2-year-old's craftCrafts for 1-year-oldsCrafts for 0-year-oldsProduction#Nursery schoolWall decoration#StayHomeTime#AtHomePlayProduction ideas#Nursery School CraftWinter Craft#KindergartenKindergarten craftNursery teacher / Childcare workerKindergarten Teacherwall surface #ChristmasTreeProduction for children under age (infants and toddlers) Simple craftMade in December # January productionMade in February New Year’s craft #Daruma making Tatsu Production#Mask making Mask#paint Sticker application Round stickerSticker-pasting craft Hanging ornamentdrawing paper #ConstructionPaperArt Paint making #Shishimai Shishimai (lion dance) Zodiac (Chinese zodiac) Dragon
♬ Gingerbread Lover – Ivoris & Chevy
Let’s make a skeleton shishimai (lion dance) that looks like stained glass.
First, cut construction paper to create the lion’s body.
Cut out the inside so it becomes just a frame.
Stick small pieces of color film onto a clear sheet, attach it to the frame, and trim any excess.
Finish by adding a lion dance face made from construction paper! Prepare several colors of film.
You could also provide just a base for the lion’s face and let the children draw their own—it might look really cute!
Fluffy Snow Bunny Wall Decoration

When you think of winter, you think of snow bunnies! You roll the snow into a rice-bale shape to make the body, use red berries for the eyes, and leaves for the ears.
Here’s an idea for a wall decoration featuring those snow bunnies.
Make the bunnies by crumpling tissues into balls, use round stickers for the eyes, and cut colored paper for the ears.
For the flowers, create them by slightly offsetting round stickers as you place them, and make the snowflakes using a craft punch and construction paper.
After that, simply stick the bunnies, flowers, and snowflakes onto the base however you like, and you’re done! If you want leaves for the flowers, cut them out of construction paper.
Sparkling 3D Snow Dome Suncatcher

Let’s make a 3D snow globe that you’ll want to peek into when it’s displayed by the window.
Prepare two slightly deep paper plates, draw a large circle on the inside of each, and cut them both out.
Keep the cut-out circles neat, as you’ll use them for the base.
Attach a piece of clear plastic bag cut into a circle to the inside of the first paper plate.
On the second paper plate, stick on a clear protective sheet and use its adhesive side to attach colored film or cotton to create a snowy landscape.
Then, add paper parts like trees made from construction paper on top.
Fold one of the cut-out circular pieces in half, trim it into a base shape, and glue it to the bottom.
Decorate the base with ribbon, and place the first paper plate over it to finish.
Using rhinestones to represent snow also looks adorable!