[Preschool] Recommended for 3-year-olds! Easy-to-make fall origami craft ideas

Autumn brings many foods at their peak, and there are fun events like moon-viewing and Halloween.
Children in daycare and kindergarten are also eagerly looking forward to the fall festivities.
So this time, we’re introducing origami ideas with an autumn theme that are perfect for 3-year-olds! Many of them are easy to make with simple steps, and we feature a variety of types—like foods and animals—so children can broaden their interests as they fold.
Find your favorite origami and enjoy the feeling of autumn indoors!
- A collection of fall origami ideas recommended for 2-year-olds! Make them easily and enjoy autumn!
- Easy! Let's make an acorn with origami. How to fold an acorn for 3-year-olds.
- [Autumn] Easy Origami Ideas for November
- [November] Enjoy with 3-year-olds! Craft activity ideas recommended for autumn
- [Childcare] Simple fall origami ideas
- [Childcare] Perfect for 3-year-olds! October craft ideas
- [For Preschoolers] Let’s Make It Together with the Kids! Origami Ideas for February
- Recommended for Halloween! How to make an easy origami ghost with a 3-year-old
- Preschool: Autumn-Themed Craft Ideas Recommended for November
- [October] Craft ideas for fall you can use in childcare
- Easy origami acorn folding method
- Simple Origami Ideas to Enjoy in Autumn (For 4-Year-Olds)
- [Childcare] Recommended for 3-year-olds! Origami ideas with a winter theme
[Childcare] Recommended for 3-year-olds! Easy-to-make autumn origami craft ideas (31–40)
Cute Halloween bat

Fold the paper into a triangle by matching the top and bottom corners.
Crease well, then open it.
This time, overlap the left and right corners slightly out of alignment and fold.
Fold up the base, leaving a little of the top corner of the triangle visible, then fold that remaining corner down—this will be the bat’s head.
Fold the paper in half along the vertical center line, and fold in the left and right sides of the head, aligning edges to edges, creasing as you go to shape the bat’s wings.
Once all the creases are made, open the paper and make wavy cuts along the lower part of the wings to finish.
Super easy! Fox face

This is a way to fold a fox face in just five folds.
First, fold the paper in half along the diagonal to make a triangle.
Next, fold so that the two 45-degree corners meet, creating a crease.
Then, fold so that the 90-degree corner aligns with the point where the crease intersects the base.
Finally, fold each of the 45-degree corners upward, and you’re done.
Turn it face up and draw the fox’s face.
With no complicated steps and only a few folds, this is an easy origami project to try.
Easy way to make grapes
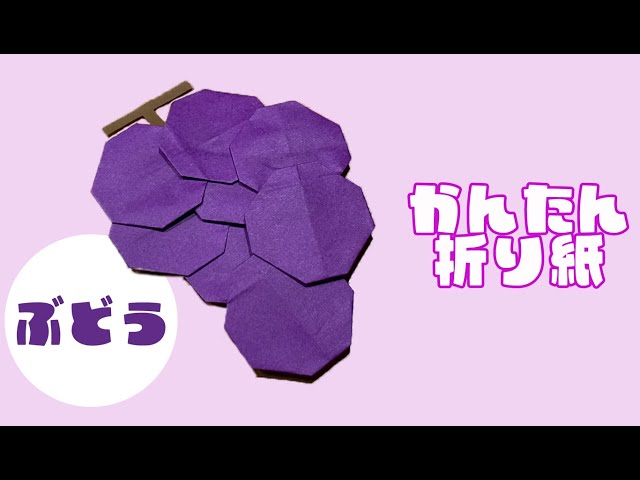
We’ll make this using sheets of origami paper cut in half.
First, fold the origami paper in half vertically, then fold all four corners in toward the crease.
Next, fold it in half so the fold is perpendicular to the first crease.
This will create two 90-degree corners; fold those corners inward toward the center to make creases.
Open it back up, then tuck along the creases to form a square.
Next, take the corner on the closed side of the square and make two small folds; when you open the square, it will look like two quadrilaterals connected together.
Finally, fold the corners to make an octagon, and you’re done.
Make four of these and glue them together to create a bunch of grapes.
Some steps may be a bit hard to understand, so please watch the video carefully as you work.
Since you’ll be making several of the same piece, the children will likely get better at it as they go!
Perfect for Halloween! Halloween pumpkin

You can make an essential Halloween pumpkin with simple steps.
Fold the origami paper in half twice to make a square, then squash the pocketed sections to form two triangles.
Fold both side edges of the triangles toward the center line, flip the paper over, and fold the protruding corners inward.
Next, fold the left and right corners of the triangle toward the center line, then fold the newly created corners into small triangles to round the shape.
Finally, fold down the top corner, and fold it back so a little tip sticks up—your pumpkin is complete!
Grape craft for ages 1 and up
@hoikushisatomi From around age 1: Just roll and pop it in! Simple fine-motor play craftNursery teacher / Childcare workerKids will love it#NurseryTeacherDailyLifework#OuchiMonteTranslation#grapes
♬ Whistling you want to go for a walk – Ken Nakagawa
A cute bunch of grapes that’s finished by crumpling tissue paper, putting it into a bag, and shaping it.
Change the color and you’ve got muscat grapes, too.
Cut grape leaves out of construction paper and stick them on.
Using tissue paper in the same color family with different shades will make it look even more vibrant.
Once it’s done, you can display it as is to enjoy an autumn mood, or stick it on the wall and have a grape-picking game.
Since the tissue paper gets packed into the bag, it doesn’t need to be perfectly crumpled.
Let the kids enjoy the feel of the tissue paper while they work on it.
[Childcare] Recommended for 3-year-olds! Easy-to-make autumn origami craft ideas (41–50)
Grapes made with original stickers
Draw swirling lines with a purple water-based marker on aluminum foil, then rub a sheet of round stickers over the drawing.
Once the marker color has transferred to the stickers, cut the base construction paper into the shape of a bunch of grapes.
Stick on the round stickers to represent the grapes, add a stem and leaves made from other pieces of construction paper, and you’re done.
You can use store-bought stickers as-is, but adding this extra step lets you create original stickers, which I highly recommend.
Using several shades from the same color family for the markers will give the colors more depth and character.
Be sure to use the stickers after the ink has dried.
3D grapes made from toilet paper
Glue purple origami paper onto a toilet paper roll and cut it into 1 cm-wide rings.
On the base, arrange and glue them in four tiers of 4, 3, 2, and 1.
Paint the insides with purple paint.
Attach a stem and leaves cut from construction paper, and your grape cluster is complete.
When attaching the origami paper to the toilet paper roll, be sure to apply glue across the entire sheet so it adheres firmly.
If it’s not well attached, it may peel off when you cut it.
Grapes are typically purple, but it’s fine for children to paint them in whatever color they imagine grapes to be.