[Preschool] Recommended for 3-year-olds! Easy-to-make fall origami craft ideas

Autumn brings many foods at their peak, and there are fun events like moon-viewing and Halloween.
Children in daycare and kindergarten are also eagerly looking forward to the fall festivities.
So this time, we’re introducing origami ideas with an autumn theme that are perfect for 3-year-olds! Many of them are easy to make with simple steps, and we feature a variety of types—like foods and animals—so children can broaden their interests as they fold.
Find your favorite origami and enjoy the feeling of autumn indoors!
- A collection of fall origami ideas recommended for 2-year-olds! Make them easily and enjoy autumn!
- Easy! Let's make an acorn with origami. How to fold an acorn for 3-year-olds.
- [Autumn] Easy Origami Ideas for November
- [November] Enjoy with 3-year-olds! Craft activity ideas recommended for autumn
- [Childcare] Simple fall origami ideas
- [Childcare] Perfect for 3-year-olds! October craft ideas
- [For Preschoolers] Let’s Make It Together with the Kids! Origami Ideas for February
- Recommended for Halloween! How to make an easy origami ghost with a 3-year-old
- Preschool: Autumn-Themed Craft Ideas Recommended for November
- [October] Craft ideas for fall you can use in childcare
- Easy origami acorn folding method
- Simple Origami Ideas to Enjoy in Autumn (For 4-Year-Olds)
- [Childcare] Recommended for 3-year-olds! Origami ideas with a winter theme
[Childcare] Recommended for 3-year-olds! Easy-to-make autumn origami craft ideas (41–50)
[Ages 4 and up] Colorful and cute hedgehog
![[Ages 4 and up] Colorful and cute hedgehog](https://i.ytimg.com/vi/UAUdDZ3Hd_g/sddefault.jpg)
Three-dimensional, colorful hedgehogs are a craft that even four-year-olds can enjoy making while exploring colors.
Sketch the shape of a hedgehog and cut along the traced lines.
Cut colored construction paper, fold it in half, and use glue to attach it to the body.
Incorporating the act of folding in half helps children become more aware of creating symmetrical folds.
Apply glue to one side of the halved paper and stick it onto the hedgehog.
You’ll end up with an adorable, colorful, three-dimensional hedgehog.
[Childcare] Recommended for 3-year-olds! Easy-to-make autumn origami craft ideas (51–60)
Swirly Grapes
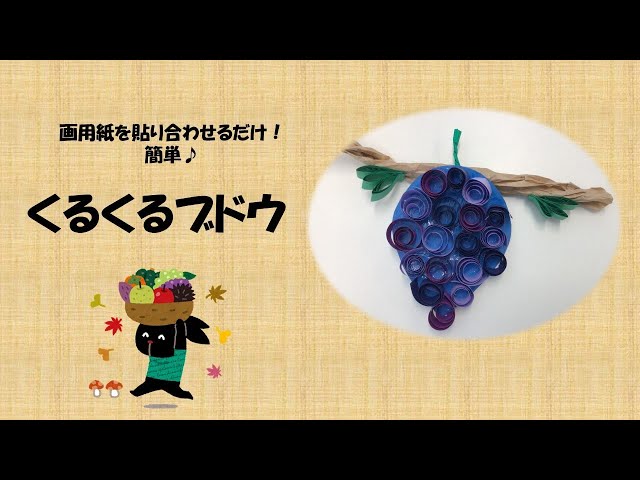
When it comes to the king of autumn flavors, grapes surely take the crown.
Let’s make a seasonal craft by rolling construction paper.
Prepare construction paper, scissors, and glue.
Cut the construction paper into a teardrop shape to create the base for the grapes.
Cut long, thin strips of construction paper and roll them tightly with your fingertips to form grape shapes.
Glue the rolled “grapes” onto the base in a three-dimensional way, making sure there are no gaps.
Finally, cut and roll green construction paper to make the stem and cluster top, then glue it on to finish.
Try making it while paying attention to finger dexterity, size, and overall balance.
Grapes wreath
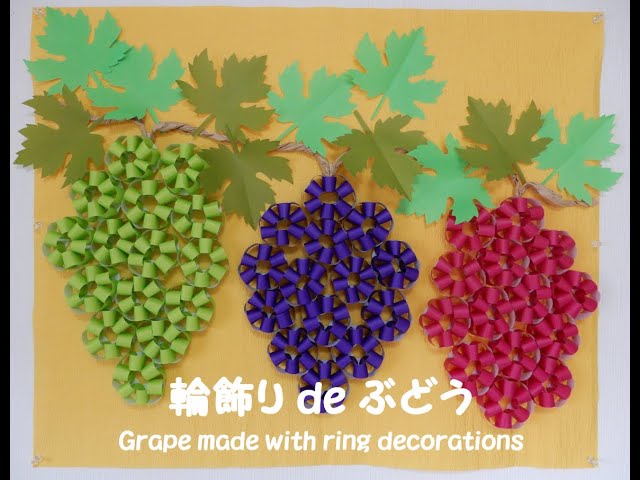
Using origami to make delicious-looking grapes is also perfect as a craft that stimulates fine motor development.
Prepare origami paper, glue, and scissors, and let’s get started.
Cut the origami into strips with scissors and glue the ends to make loops.
Make a total of 12 loops.
Glue the loops together to form a bunch of grapes.
If you use light green origami, you can make Shine Muscat grapes.
You can also make leaves and the stem, which might be fun for wall displays and other decorations.
Apple

Bright red apples make a cute motif, so you’ll definitely want to include them in your origami activities.
First, fold the paper in half into a triangle and unfold it.
Place it so the corners are at the top, bottom, left, and right, then fold the left and right corners toward the center.
At this point, don’t fold exactly to the center—fold them slightly past it.
Next, make a small downward fold on the top corner.
Then fold the bottom corner up in a large fold so it sticks out above the top.
Fold the part that sticks out diagonally, make small folds on the left and right corners to shape it, and you’re done!
Witch hat for Halloween

Here’s an idea for making a chestnut in just seven folds.
First, to create the creases, fold the origami paper in half into a square twice.
Once folded, open it with the colored side facing up.
Fold the bottom edge up to meet the center crease, then flip the paper over and fold both top corners in toward the center.
Finally, fold both bottom corners toward the center to finish.
Turn the origami to the front, and if you draw small black dots on the white part with a pen, it will look even more like a chestnut—highly recommended.
If you want a rounder shape, lightly fold the corners to the back.
Cute and easy! How to fold a persimmon (origami)

The king of nutrient-packed fruits, the persimmon, makes for origami that feels seasonal and is perfect for autumn crafts.
Prepare orange and green origami paper and let’s start folding.
On the orange paper, make creases and fold the corners toward the center.
Fold further toward the center to create the base of the persimmon.
For the last section, fold it up toward the top edge to give the persimmon a three-dimensional shape.
For the leaf part, fold it first, then make small cuts at the edges—be careful not to cut too far.
It could also be fun to turn all the persimmons everyone folded into a persimmon tree display on the wall to make it together with the children.
Two ways to fold an acorn

Even when we say “acorns” as a catch-all, there are many kinds—apparently more than 20 species native to Japan alone.
In this idea, we introduce two styles: a long acorn and a round acorn.
That said, the folding method is the same for both.
With the colored side of the origami facing up, fold down the top edge.
This part becomes the acorn’s cap, so make this section narrower for a long acorn and wider for a round acorn.
After folding the cap, flip the paper over and fold the left and right edges toward the center line.
A key point here is to align only the brown section with the center line.
You want the white section to suggest the cap’s flare, so fold it while slightly opening it outward and flattening it.
After that, just fold the top and bottom corners inward to refine the shape.
Adding patterns to the cap makes it extra cute.