[Childcare] Recommended for 3-year-olds! Craft activity ideas


Around the age of three, children develop a sense of self, their imaginative world expands, their vocabulary increases, and their fine motor skills improve—there are so many signs of growth.
We hope they continue to grow significantly as they receive plenty of stimulation in their daily lives.
In this article, we’ll introduce craft activity ideas recommended for three-year-olds.
We’ve gathered fun ideas that will spark the curiosity of three-year-olds: perfect for wall displays, toys they can make and play with, projects that use unique techniques, and activities that can be used for pretend play!
There are also ideas ideal for practicing with scissors and glue, so choose activities that match the children’s developmental stage and give them a try!
- Let’s make it with 3-year-olds! Fun handmade toy ideas
- [For 3-year-olds] Winter craft activities and bulletin board decoration ideas for use in childcare
- [Childcare] Perfect for 3-year-olds! October craft ideas
- [For 3-year-olds] Perfect for September! A Collection of Craft Ideas to Enjoy Autumn Nature
- [November] Enjoy with 3-year-olds! Craft activity ideas recommended for autumn
- [Crafts for 3-Year-Olds] A Collection of Fun Ideas for Autumn! Let's Incorporate Seasonal Motifs
- [Nursery/Kindergarten] Crafts you can play with after making them
- [Childcare] Recommended for toddlers! Toy ideas you can make and play with
- Toddler-approved fun! DIY toy ideas for 2-year-olds
- Craft activity ideas for 4-year-olds
- [For 3-year-olds] A roundup of craft ideas to enjoy in summer! Introducing various motifs and techniques
- Irresistible for 3-year-olds! A collection of fun Halloween craft ideas to make
- [Childcare] Fun craft ideas and craft activities perfect for summer
[Childcare] Recommended for 3-year-olds! Craft activity ideas (1–10)
Connect the loops to make a ring caterpillar

Here’s a craft idea for making a caterpillar using classic loop chains, often used as birthday decorations.
Cut construction paper into long strips, form a loop and glue it; then thread the next strip through that loop, form another loop, and glue it the same way.
Repeat to create the caterpillar’s body.
Draw a face on a circle cut from construction paper, and attach antennae made by wrapping pipe cleaners around a pom-pom.
Once you fix the face to the body with double-sided tape, it’s complete! If you connect a stick with a tied string, you might be able to take it for a little walk around the room.
Let’s play with decalcomania!

Decalcomania, which means transfer, is a technique of expression often used in early childhood education.
Basically, you put paint on one side of a sheet of drawing paper that has a crease down the center, fold it in half, and transfer the paint to the other side to create the image.
The key is to thin the paint with plenty of water! That way, the colors blend and you can enjoy the accidental patterns that emerge.
This introduces two ideas: one is to make a butterfly with decalcomania and then cut it out with scissors, and the other is to use drawing paper pre-cut into a cherry blossom shape to add patterns.
Blow painting with straws! Drawing flower art

Blow painting with a straw is a craft that you can enjoy while seeing how the paint spreads.
It’s perfect for the spring season! Let’s try painting flowers with blow painting.
First, use crayons to draw the stems and leaves on drawing paper.
Next, dilute your favorite paint with water and drop a few drops onto the flower area.
Use a straw to blow and spread the paint to create the flowers.
Mixing colors can look beautiful, too.
Once the paint dries, it’s also recommended to draw insects or other creatures in the blank spaces to complete a spring-like scene!
[Childcare] Recommended for 3-year-olds! Craft play ideas (11–20)
Cute and fun to play with! Flapping butterfly

You can wear it on your finger and play with it! Let me introduce the Flappy Butterfly.
Prepare a sheet of construction paper cut into a rectangle, origami paper or stickers for the wing patterns, and antenna parts.
First, fold the rectangular construction paper in half to make a mountain fold crease.
Then, leaving about 1 cm of space, add valley fold creases on both sides.
After folding along the creases, draw half of a butterfly shape and cut it out with scissors.
Also make two evenly spaced slits along the folded section.
If you reverse the creases at both ends of the fold that’s now divided into three sections by the slits, you’ll create openings for your fingers.
Attach the wing patterns and the antennae, and you’re done!
binoculars
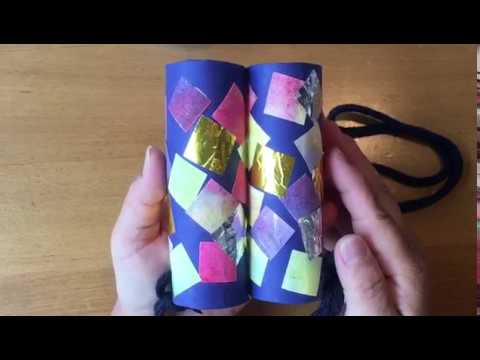
Why not try making binoculars out of toilet paper tubes? Since the process uses scissors and glue, it’s perfect for helping three-year-olds practice their crafting skills.
First, cut a rectangular piece of paper to fit around the toilet paper tube.
Next, put some glue on your hands and stick the paper on in order.
Once you’ve wrapped the paper around both tubes, attach them together and add a string—that’s it! Kids can use them while strolling around the kindergarten or nursery yard, or take them along to the park or on a walk.
It’s a great craft idea to get little hands moving.
Pill bug made from a paper plate

This is a pill bug craft made from a paper plate cut in half that kids love.
First, draw patterns on the paper plate with crayons, then paint over it with black paint.
If you use a white crayon, the patterns will pop out like a resist painting.
After the paint dries, punch evenly spaced holes along the straight edge of the plate, thread short pieces of black chenille stems through, and twist to secure them.
These will be the legs, so attach antennae to the head the same way, then add the facial features to finish.
You can also make a version that curls up and opens out by cutting a round paper plate into six pizza-like slices, punching holes at the corners, and connecting them with split pins.
Let’s decorate with cardboard! Making dandelions that feel like spring
@anko_insta We did an easy spring activity with cardboard! Kids really love dandelions, right? ✨ There were so many in bloom, and they looked super happy! It’s also great for little finger play.work#dandelion#GoldenWeekSpring Play
Seventeen – YOASOBI
Here’s a spring craft idea where you pick real dandelions and arrange them in a cardboard vase.
Cut the cardboard to a size that’s easy for children to hold, and draw a vase on the lower half.
Punch several holes in the upper half.
Take this piece of cardboard on a walk, pick the dandelions blooming along the roadside, and insert the stems into the holes.
Once you’ve filled all the holes with dandelions, secure them from the back so they don’t slip out.
Find lots of dandelions and fill your vase with spring!