[Childcare] Recommended for 3-year-olds! Craft activity ideas


Around the age of three, children develop a sense of self, their imaginative world expands, their vocabulary increases, and their fine motor skills improve—there are so many signs of growth.
We hope they continue to grow significantly as they receive plenty of stimulation in their daily lives.
In this article, we’ll introduce craft activity ideas recommended for three-year-olds.
We’ve gathered fun ideas that will spark the curiosity of three-year-olds: perfect for wall displays, toys they can make and play with, projects that use unique techniques, and activities that can be used for pretend play!
There are also ideas ideal for practicing with scissors and glue, so choose activities that match the children’s developmental stage and give them a try!
- Let’s make it with 3-year-olds! Fun handmade toy ideas
- [For 3-year-olds] Winter craft activities and bulletin board decoration ideas for use in childcare
- [Childcare] Perfect for 3-year-olds! October craft ideas
- [For 3-year-olds] Perfect for September! A Collection of Craft Ideas to Enjoy Autumn Nature
- [November] Enjoy with 3-year-olds! Craft activity ideas recommended for autumn
- [Crafts for 3-Year-Olds] A Collection of Fun Ideas for Autumn! Let's Incorporate Seasonal Motifs
- [Nursery/Kindergarten] Crafts you can play with after making them
- [Childcare] Recommended for toddlers! Toy ideas you can make and play with
- Toddler-approved fun! DIY toy ideas for 2-year-olds
- Craft activity ideas for 4-year-olds
- [For 3-year-olds] A roundup of craft ideas to enjoy in summer! Introducing various motifs and techniques
- Irresistible for 3-year-olds! A collection of fun Halloween craft ideas to make
- [Childcare] Fun craft ideas and craft activities perfect for summer
[Childcare] Recommended for 3-year-olds! Craft play ideas (51–60)
Shishimai (lion dance) made with cardboard stamps
https://www.tiktok.com/@job_it/video/7444488296870284545Roll up a strip of cardboard, dip it in ink, and stamp it! It creates a pattern that looks like a shishimai (lion dance) design.
Stamp several times on green construction paper to make the pattern, and once the ink dries, cut it into the shape of an ema plaque.
Then, glue on facial parts made from construction paper.
After the shishimai is finished, paste it onto a postcard to complete your New Year’s card! When making the face, choose steps that suit the child’s age, like drawing the eyes and teeth with crayons.
If there’s blank space on the postcard, try adding New Year-themed stickers or drawing some pictures.
Origami horse you can make with a single sheet

Perfect for the Year of the Horse! Here’s an idea for making a horse’s face out of origami.
New Year’s cards are often associated with illustrations and drawings, but if you create one by attaching an origami piece, it adds depth and turns it into a very special card.
This design uses a simple series of folds along the creases and can be made with just one sheet of origami paper.
You’ll need a craft knife to make the mane, so have it ready before you start.
Use black round stickers for the eyes and draw the nostrils with a pen.
Cute tissue paper wreath

The step of rolling and sticking is so much fun! Let me share an idea for making a tissue paper wreath.
Before you begin, prepare a paper plate with the center cut out, white and green tissue paper cut into manageable pieces, and decorative parts like Santa and star shapes.
Have the children crumple the tissue paper into little balls and stick them onto the rim-only paper plate where you’ve applied glue.
Once they’ve gone all the way around with the tissue paper, let them place the decorative parts—made into stickers with double-sided tape—wherever they like.
Punch a hole at the top of the paper plate, thread a string through, and your Christmas wreath is complete.
Christmas tree lacing

Here’s a Christmas tree craft idea that kids can enjoy while practicing lacing.
For preparation, cut out a Christmas tree and ornaments from construction paper.
Since you’ll be threading pipe cleaners through both, punch holes in them beforehand.
First, thread one end of a pipe cleaner through the tree and secure it so it won’t slip out.
Then, let the children choose their favorite ornaments and thread them onto the pipe cleaner.
Once several are on, secure the other end of the pipe cleaner to finish.
Prepare ornaments with various motifs to create a lovely Christmas tree!
[Childcare] Recommended for 3-year-olds! Craft activity ideas (61–70)
How to make handprint reindeer and Santa

Here are some craft ideas for making Santa Claus and a reindeer using handprints.
For Santa, use a handprint to create his beard, and for the reindeer, use a handprint to form the face.
Since Santa’s beard uses an upside-down handprint, make sure to pay attention to the direction when stamping.
The faces are made with round stickers, so the children can also enjoy sticking the stickers.
Once Santa and the reindeer are finished, glue them onto a base with a construction paper Christmas tree attached.
Be sure to decorate the tree with round stickers as ornaments, too!
Scissor practice! Friends of the sea

We’d like to introduce a craft activity that lets children enjoy creating while practicing scissor skills.
Cut octopus, squid, and jellyfish shapes out of construction paper, then draw lines on their wavy tentacle sections.
After drawing gentle waves or zigzag waves, have the children cut along the lines with scissors.
Glue the cut waves and the octopus, squid, and jellyfish onto a sheet of construction paper to finish.
Although it’s said that children can start using scissors around age two, please teach them safely by reviewing scissor rules and observing each child’s developmental stage.
decalcomania
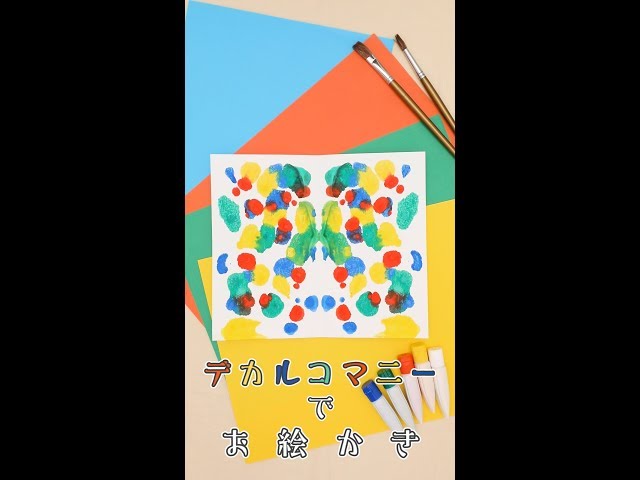
How about trying decalcomania? Decalcomania is a painting technique that originated in Europe, where you drop paint onto a blank sheet of paper and then press it to create symmetrical patterns.
A fun aspect is that the finished pattern changes depending on where you drop the paint, the colors you use, and their balance.
Working while imagining what kind of pattern will emerge can also help nurture creativity.
You can also try changing the color of the paper itself—it will give the piece a livelier impression.