[Childcare] Recommended for 3-year-olds! Origami ideas with a winter theme


In childcare settings for three-year-olds who are beginning to learn finger play and how to use toys, origami is often used.
Some of you may be looking for origami instructions that match the winter season, which brings various events like Christmas and playing in the snow.
In this article, we’ve picked simple, low-step origami ideas with a winter theme.
It’s also a great idea to display the pieces made together with friends at the nursery school.
Prepare colorful origami paper and try winter origami that lets children’s creativity flourish.
- [For 3-year-olds] Easy snowman origami (how to make)
- [For 3-year-olds] Winter craft activities and bulletin board decoration ideas for use in childcare
- [Childcare] Simple winter-themed origami craft ideas
- [For Preschoolers] Let’s Make It Together with the Kids! Origami Ideas for February
- [For Preschoolers] Fold with Fun! January Origami Ideas for Little Ones
- Ideas for Easy Winter Origami Crafts That Even 2-Year-Olds Will Love
- [Preschool] Recommended for 3-year-olds! Easy-to-make fall origami craft ideas
- Origami Fun in Winter for One-Year-Olds! Simple ideas for tearing and sticking, too
- [For 3-year-olds] December Christmas Crafts! A Collection of Fun Handmade Ideas
- [Age 3] Let’s Make It at Nursery or Kindergarten! A Collection of Christmas Craft Ideas
- [Childcare] For 4-year-olds! Easy winter origami ideas
- For older kindergarteners: Let’s make it! A collection of recommended origami ideas for February
- [Childcare] Winter Projects You’ll Want to Try! Recommended Craft Ideas
[Childcare] Recommended for 3-year-olds! Origami ideas with a winter theme (31–40)
Cute mittens origami

Here’s an idea for making mitten gloves out of origami.
First, fold the paper in half twice to create a square and make crease lines.
Place the paper with the colored side up, then fold the bottom edge up to align with the central crease.
Fold the left corner of the folded-up section downward to form a triangle, then unfold the bottom edge once and make a roll fold along the crease.
Turn the paper over, and fold the left and right edges diagonally so they align just outside the center line.
Next, fold the top left and right corners toward the center line.
Finally, fold down the top corner to finish.
When making the second mitten, reverse which corner you fold into a triangle so you get the opposite hand.
Christmas chicken
@origamihanaschannel [Easy Origami] How to fold drumstick fried chicken [Origami] How to make cute fried chicken | Paper folding | Christmas | Rooster | hanaschannel | Fried chicken | Cute | Rooster | Chicken | Zodiac | Animals | KFC | Kentucky | Rooster | Fried chicken | Yangnyeom chicken | Convenience store | FamilyMart | Lawson | 7-Eleven | Christmas | Bone-in | Origami | Easy origami | Easy kirigami | Handmade | Crafts | Mother’s Day | How to make | Toy | One sheet | 24-hour challenge | Funny | Origami | Easy kirigami | Flower | Hana | origami | DIY | Paper crafts | Paper art | Craft | Handmade | Painting | Paper | Easy | Flower | Ninja | Art | Flowers | Star | Ideas | Toys | Boat | Design | Butterfly | Airplane | Paper crafts | Paper art | Gift | Handmade | Easy kirigami | Easy origami | Hana | Origami | Cute | Birthday gift | Valentine’s Day | Origami | How to fold | Handmade | New Year crafts | Mother’s Day | Father’s Day | Year of the Tiger | Crafts | Toys | Creativity | Simple | Paper folding | Pretty | Making | Art play | Flower | Easy art | Fun | Super simple folding | Origami | Recommended playlists
♬ Last Christmas (Pudding Mix) – Wham!
For kids, a Christmas feast means fried chicken! Many families even place orders at KFC so they can enjoy it on Christmas.
Here’s an idea for making fried chicken out of origami.
First, fold the paper in half both ways to make a cross crease, then open it with the colored side facing up.
Fold up the bottom edge by about 1.5 cm, flip the paper over, and fold the left and right edges to meet the center line.
From here, fold more precisely to create the handle (bone) section.
Once the handle is done, tuck the corners of the chicken part inward to finish.
To make it look more chicken-like, draw little pepper specks with a black pen.
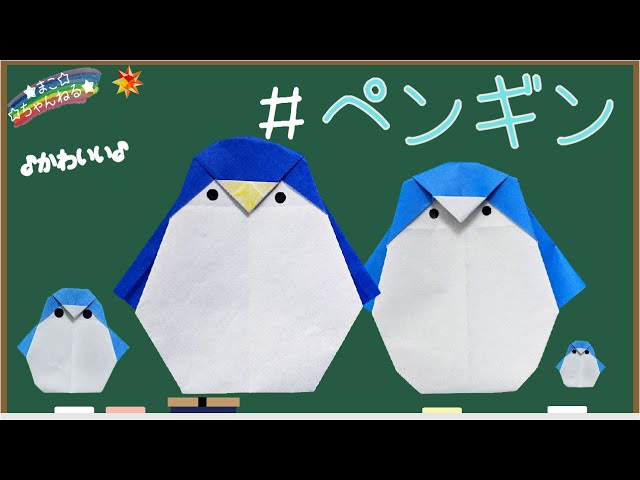
Cozy Penguin

Here’s how to fold an origami penguin that can also wear a hat and scarf.
First, fold it into a triangle twice, then open it once.
With a corner pointing down, fold up the top layer so about 2 centimeters stick out, then fold it down along the edge.
Fold the edge you just made in half to make a crease, then fold the bottom corner up to that crease to set a guideline.
Next, fold the other corner up toward the front crease.
Fold the tip of the corner down just a little.
Fold up along the crease you made earlier, align the edges, and fold the whole piece in half.
Finally, adjust the shape to look like a penguin and draw the eyes with a pen to finish.
Try making a hat and scarf for it, too!
Peekaboo Penguin

Here’s a super cute way to fold a penguin that’s perfect to attach to letters or cards! First, place the origami paper with the back side facing up and fold it into a triangle twice to make crease lines.
Lift one corner up to just slightly before the center line, then fold both edges of the lifted section upward at a slight diagonal.
Fold both corners of that folded section inward.
Turn it over so the white side is facing you, and fold along the center line twice to shape the face.
Next, use a 2.5 cm piece of origami paper to make the hands.
Start with a basic “zabuton” fold, then fold both corners diagonally to shape the hands.
Make two of these.
Finally, glue the hands on, and add eyes and a mouth with round stickers or similar—done!
a round and laid-back penguin
This is an easy and cute origami penguin.
First, turn the paper over and make two creases by folding it in half both ways into a square.
Fold one edge down to align with the center crease.
Flip it over, then fold the left and right edges to the center line.
Open the colored corner and squash-fold it.
Fold the bottom edge up to the center to make a crease, open it once, then fold the bottom tip inward along that crease.
Fold the corners to form the feet.
Fold the protruding colored corner to suggest the hands.
Finally, round off the colored tip to finish! Decorate it cutely with round stickers or a pen.
[Childcare] Recommended for 3-year-olds! Origami ideas with a winter theme (41–50)
Penguin money envelope

This is a cute penguin folding method that’s perfect for New Year’s gift envelopes.
First, place the origami colored side up, fold it into a triangle twice, then open it once.
Fold both layers of the top corner down to meet the bottom edge to make creases.
Make another crease by folding only the top layer of the top corner down so it sticks out slightly past the bottom center.
Fold only the top layer of the top corner down to align with the bottom crease.
Next, fold along the upper crease, then fold the tip upward so it peeks out a little.
Fold back the part sticking out at the top.
Turn it over and fold both corners toward the center so the tips overlap.
Tuck one corner into the other.
Finally, draw the face with a pen, and you’re done!
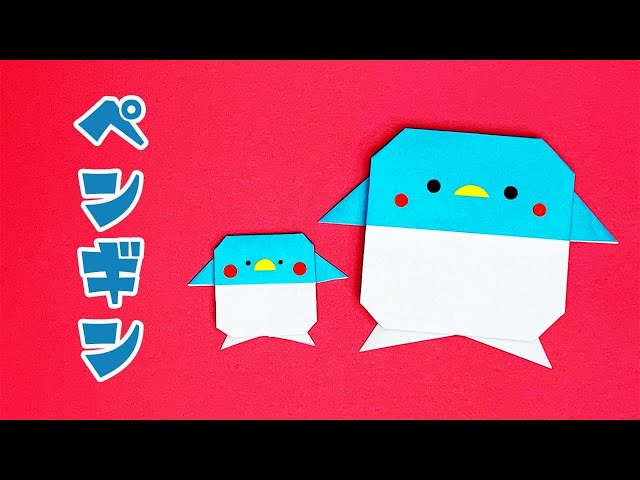
Penguin parent and child
Here’s how to fold cute parent-and-child penguins.
First, turn the origami paper to the back and fold it into a triangle twice to make creases.
Fold one corner to align with the center line, open it, then fold along the creases two more times to set the folds.
Fold the corner up twice.
Next, fold both corners at the folded section toward the center line.
Fold the tip up to the front crease, then flip it over.
After flipping, fold the outer corners diagonally upward toward the center line.
Then, fold both corners outward so they stick out, like in the image of hands.
Finally, adjust the corners to shape them into penguins, and you’re done! If you make them with small origami paper as well, you’ll have a parent and child penguin set.
Decorate the eyes with round stickers or a pen.