[Day Service] Spring Take-Home Crafts: Ideas to Warmly Brighten Your Room


For crafts in day service programs, we recommend incorporating motifs that can only be enjoyed in that season.
Take-home projects using spring-specific motifs—such as cherry blossoms, tulips, carp streamers, and hina dolls—not only offer the fun of working with your hands, but also let people display the finished pieces at home to savor the season.
Even those who find it difficult to go out can feel the arrival of spring indoors.
We’ve included a wide range of items, from practical pieces like wall hangings, bouquets, and message stands to purely decorative creations.
Please make use of these ideas for spring-themed crafts.
- For Seniors: Come, Spring! Recommended March Craft Ideas for Daycare Services
- For Seniors: Simple and Lovely Crafts – A Collection of Take-Home Project Ideas for Day Service
- [For seniors] Enjoy spring: April craft ideas
- [For Seniors] Crafts to Make in March! Recommended Project Ideas
- Craft ideas with plum blossoms for seniors
- [For Seniors] Enjoy Cherry Blossoms Indoors: Wall Decoration Ideas
- [For Seniors] Have Fun Making Things Based on Today’s Mood! Today’s Recommended Craft
- [For Seniors] Making a March Calendar: Introducing Spring-Themed Motifs and Arrangements
- [For Seniors] Introducing Fun Crafts Made with Plastic Bottle Caps
- [For Seniors] Practical Crafts to Make in Day-Service Recreation: Idea Roundup
- Take-Home Craft Ideas for Winter: Perfect for Day Services for Seniors
- [For Senior Daycare Centers] Ideas for Summer Take-Home Crafts
- [For Seniors] Recommended for day-service centers. A collection of craft ideas for April
[Day Service] Spring Take-Home Crafts: Ideas to Warmly Brighten Your Room (251–260)
Tulip Bouquet Card

A bouquet card of tulips—the quintessential flower that colors spring—truly makes you feel the season’s arrival.
It’s easy to make by combining construction paper and origami paper, but since it involves fine work with scissors and the like, please make sure someone is there to assist if older adults are doing the craft.
If you’re making it as a day-service recreation activity, it might be nice to have participants write a message to their families on the card.
Just looking at the finished piece warms the heart—it’s a springtime activity full of gentle feelings.
A basket of daisies

Daisies are striking for the way they bloom in a variety of colors, and their colorful appearance really conveys the exhilaration of spring.
This craft features a basket filled with daisy flowers, appealing for its colorful and playful look.
The key is how to make the daisies: fold a strip of origami paper in half, make slits, then roll it up and finally shape it into a flower.
As you carefully spread out the petals, the daisy becomes three-dimensional.
By varying the size and how much you spread the petals, and arranging a range of colors, you can achieve an even more vibrant result.
pansy

This is a pansy wall decoration that creates a lively spring atmosphere while letting you enjoy colorful flowers.
Cut two kinds of origami paper—such as blue and light blue, or purple and pink—into rectangles, then divide them into eight equal parts to make the petals.
To refine the petal shape, round the edges and add a natural curve.
Using paper divided into six parts, make a heart shape, then curve the petals and glue the two types of origami together.
By attaching paper of varying heights to the back of the petals, you can create depth and a three-dimensional effect.
Cut green origami into a jagged shape to make leaves, and add creases to give them a realistic texture.
Arrange the flowers and leaves in a balanced way to complete the gorgeous spring pansies.
Choosing favorite colors and crafting together also makes this a great idea for fostering interaction among older adults.
randoseru (Japanese elementary school backpack)

Spring, the season of school entrance and advancement, is an exciting time even for older adults with grandchildren.
A school backpack (randoseru) made with origami is perfect both as a spring-themed recreation activity and as a gift for family.
The finished backpack opens and closes, so if you also make textbooks and put them inside, it will look even more realistic.
However, since scissors and fine work are involved, if you make it at a day service or similar setting, staff should provide the necessary support.
Cherry blossom lampshade
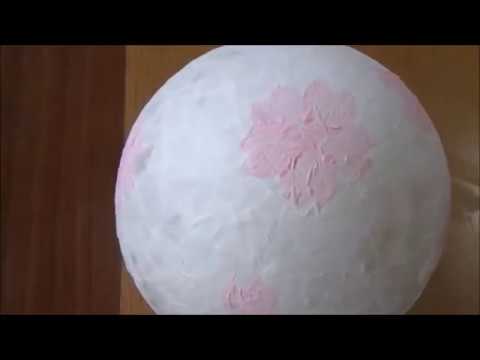
The sight of cherry blossoms shining in warm light makes you feel the arrival of spring and lifts your spirits, doesn’t it? Let’s make a lampshade that creates that same happy atmosphere of blossoms and light.
First, inflate a balloon into a round shape, then paste small torn pieces of paper around it using diluted glue.
The key is layering the paper; these overlaps create softness and a sense of dimension.
Once you’ve covered the whole surface, attach paper cut into cherry blossom petal shapes, and then remove the balloon inside to finish.
It’s important to layer the paper thinly so the light can pass through, and to arrange the cherry blossoms with some open spaces to evoke a delicate, ephemeral feel.
Cherry blossom wall decoration

A wall decoration of cherry blossoms that turns your room into a spring scene can create a seasonal atmosphere without going outside.
By using origami to make cherry blossom petals and layering pieces in different colors and sizes, you can enjoy a three-dimensional craft.
If you’re decorating a room at a day service center, choosing a uniquely original color scheme that differs from others will also brighten up the wall.
However, since there will be times when you need to use craft scissors in addition to simple scissors, please have those around the seniors help with the more difficult parts when they are working on the project.
Full-bloom Sakura Calendar

Let’s make a spring-themed calendar using a design sheet with cherry blossoms.
Attach double-sided tape to the back of a transparent sheet and stick it in the center of a cherry-blossom-patterned letter paper.
Place a small calendar in the upper right, and add more flair by applying design sheets or stickers cut into cherry blossom shapes.
Rounding the four corners of the letter paper with a corner punch will give it a softer look.
A cherry blossom–themed calendar evokes the warm mood of spring and is sure to soothe you every time you look at it.