[For Seniors] Small craft ideas: for yourself and as gifts!


Many people enjoy making small items like sewing, knitting, and felt crafts, don’t they?
Some people find joy in the act of making itself, while others look forward to taking the finished piece home—everyone has their own purpose when creating.
In this article, we’ll introduce small craft ideas for older adults!
Make cute little items to use for yourself, or give them as gifts—they’re sure to be appreciated.
Please consider using these ideas for recreation at senior day services and other elder care facilities as well.
- Handmade Gifts: Ideas That Will Delight Older Adults
- [For Seniors] Handmade gifts they’ll love: a roundup of simple ideas
- [For Seniors] Simple Handicrafts Recommended for Finger Exercise
- For Seniors: Simple and Lovely Crafts – A Collection of Take-Home Project Ideas for Day Service
- [For Seniors] Introducing Fun Crafts Made with Plastic Bottle Caps
- [For Seniors] DIY Strap Craft Ideas. Great as Gifts, Too!
- [For Seniors] Practical Crafts to Make in Day-Service Recreation: Idea Roundup
- [For Seniors] Recommended for day services! Simple and cute small craft ideas
- [For Seniors] Easy Felt Craft: Warm and Cozy Projects
- [For Seniors] Easy and Fun! Tsumami Zaiku Craft Ideas
- Take-Home Craft Ideas for Winter: Perfect for Day Services for Seniors
- [For Seniors] Amazing Scrap Fabric Hacks! Easy Handmade Small Item Ideas
- [For Seniors] Recommended for Craft Activities! Milk Carton Accessory Box
[For Seniors] Small Craft Ideas: For Yourself & As Gifts! (101–110)
Turtle strap with a decorative knot
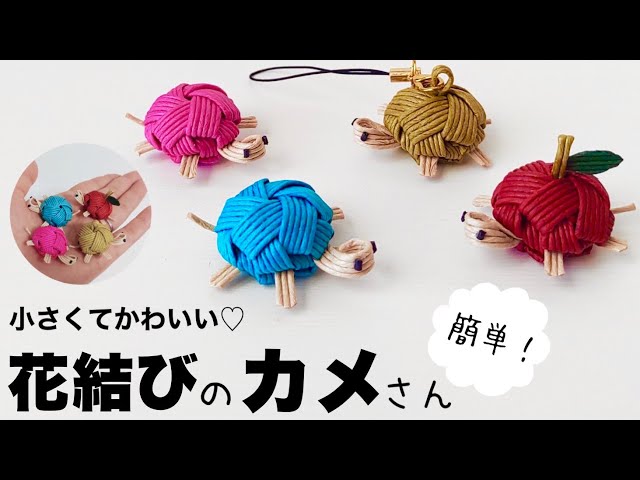
This strap features a turtle motif, with craft bands knotted to recreate the shell’s distinctive bumps.
Fold three bands in half, layer them alternately, then weave; the knots that form are treated as the shell, to which you attach decorative parts.
If you tighten the knots too much, the shell won’t have volume, so be mindful of how firmly you weave as you go.
It’s also fun to customize your own design by changing the color of the craft bands and the size or shape of the parts.
herbarium

Herbariums are currently seeing a surge in popularity among enthusiasts.
A herbarium is made by filling a bottle with a special oil and placing flowers or plants inside.
It was originally devised for preserving plants as specimens, but today it’s enjoyed as a home decor item.
You can buy all the materials at 100-yen shops.
There’s also a wide variety of flowers available, so try coming up with your own original combinations.
By the way, be careful when displaying them—the oil is dangerous if brought near fire.
Accessories
@rum.87_happy Upcycle an egg cartonUpcycle#SustainableHandmade#Accessories
♬ Original song – run 🌻 Lost flower artist – Run 🥀 Someone who likes dried flowers and Disney
Eggs are an everyday food, and wouldn’t it be lovely if you could make accessories from their cartons? In this article, egg cartons that would normally be thrown away are transformed into chic, grown-up-cute accessories.
It’s very simple, so why not give it a try? Cut the egg carton into individual sections, then use a candle flame to shape them.
Add your own touch with beads or dried flowers, attach the findings, and you’re done.
Be careful when handling fire and scissors, and enjoy creating your own one-of-a-kind accessories.
Flower-knot beads made with craft bands

Have you ever seen bags made with craft bands or eco-craft bands? Many bags woven from flat bands have a handmade warmth to them.
Here, we’ll introduce flower-knot beads made with craft bands.
Prepare three long, thinly cut strips of craft band and start weaving.
The technique may look complicated, but once you learn it, it should be easy to make.
Because you use your fingertips a lot while weaving, it can also help stimulate the brain.
Once you’ve finished weaving, trim the ends and sprinkle with water.
When water is applied, the adhesive on the band dissolves and then sets.
You can also make beads in different sizes and colors; thread a cord through them to create charms.
They’re recommended for attaching to keys or bags, especially for older adults.
Shaker bookmark

Shaker bookmarks that are fun to tuck into a book make reading time even more enjoyable.
They’re great for yourself, and would surely delight a grandchild as a gift.
Decorate a piece of cardstock in your preferred size with stickers.
Place the cardstock into an OPP (cellophane) bag that’s larger than the cardstock, then cut it down leaving a margin.
Fold the excess flap over and neatly hide it with washi tape; add sequins inside, and you’ve got a shakety-shake bookmark that’s a joy to use.
If you prepare a selection so people can freely choose which stickers and which sequins to combine, they’ll have even more fun!
[For Seniors] Small Craft Ideas: For Yourself & as Gifts! (111–120)
A bookmark you can customize with stickers

Let’s try making stylish bookmarks using flake stickers! You can find flake stickers at stationery stores, online shops, and even 100-yen shops, so it’s fun to look for designs you like.
If you’re incorporating this into activities at a senior facility, prepare multiple designs and let each person choose their favorite.
Arrange the stickers on a plain card.
Using tweezers makes delicate work easier, so give it a try.
Once you’ve placed the stickers to match your preferred image, trim the shape and tie a ribbon.
These chic bookmarks make perfect gifts!
Bookmark made with marbling

Do you know marbling? Marbling is a painting technique in which patterns created with water and paint are transferred onto paper or other surfaces.
The patterns change depending on the colors you use and how you mix them, so you can create highly unique pieces.
Put the paints you want to use into containers and dilute them with a small amount of water.
Pour about 1–2 cm of water into a tray, add an equal amount of liquid laundry starch (or laundry glue), and mix well.
Drop small amounts of three different paints in spots across the surface.
Gently swirl with your finger to create a pattern, then place the paper on top and lift it off carefully.
Once it’s completely dry, cut it to bookmark size, sandwich it in a laminating film, trim the edges, and you’re done.