[Let’s Make and Play!] Handmade Toy Ideas You Can Create Yourself

Kids love new toys, don’t they?
They figure out how to play, add their own twists, and discover new ways to have fun.
Here are some ideas for making handmade toys that are easy to customize and adapt!
These ideas use materials you already have at home or can pick up at a 100-yen shop, so they’re all things you can start making right away.
It’s great for adults to make them, and there are plenty of ideas kids can make themselves, too.
Original, one-of-a-kind toys become extra special—and even more fun!
- Let's make toys with paper cups! Simple and fun handmade toys
- Handmade games: DIY craft ideas you can make and play
- [For Elementary School Kids] Handmade Toy Craft Ideas
- [DIY] A Collection of Handmade Moving Toy Craft Ideas
- Let's make toys out of cardboard! Easy and fun handmade toys
- [Let’s Make and Play!] Handmade Ideas for a Target Shooting Game
- Easy DIY! Introducing educational toys that can be easily made with 100-yen shop items and things around the house.
- Made of paper! A fun collection of DIY toy ideas you can play with
- It's fun to spin! A collection of DIY toy ideas
- [Handmade Toys] Fun to Make! A Collection of Pull-Along Toy Ideas
- Fun for elementary school kids! A collection of craft ideas using plastic bottle caps!
- [For Kids] Today’s Handmade Craft Ideas
- [For Kids] Spins in the wind! A collection of recommended DIY pinwheel ideas
[Let’s Make and Play!] Handmade Toy Ideas (51–60)
A cute dog plushie made from a towel
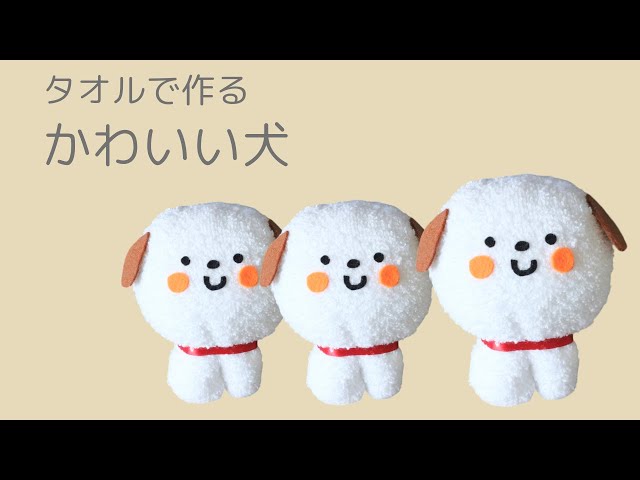
This is about making a cute stuffed dog using an everyday face towel you can find in any household.
First, cut the towel to create two identical pieces layered together.
Make small slits in both pieces, sew them together, turn the piece right-side out, and stuff it with cotton.
Then shape the overall form with thread and attach parts like the face made from felt to finish.
By changing the towel’s color and the facial expression, you can create plushies with a variety of looks.
Quirky Animals Made from Towels

Towels are essential items in daily life for things like wiping your face, and their softness is a big part of their appeal.
Let’s use that softness to make cute animal mascots.
Cut the towel into the shape of the animal you want to create, sew two pieces together, then stuff them with cotton to form the animal’s shape.
After that, attach parts like the face made from felt so it looks like the animal, and you’re done.
It’s also fun to add originality by choosing different towel colors, varying how you stuff the cotton, and designing unique shapes for the parts.
A kalimba that makes a hopping sound

A kalimba is a traditional African instrument consisting of a wooden box fitted with thin metal or bamboo tines.
This time, let’s make a kalimba using an empty candy box and plastic spoons! The method is simple: just use rubber bands to fasten the spoons to the empty box.
To improve stability, you’ll need to create grooves to hold some chopsticks, but don’t worry—the process is as easy as making small cuts with scissors.
Place your handmade kalimba on a desk, hold the body down with your hand, and pluck the spoons to produce interesting sounds.
Try experimenting with how the way you secure the spoons changes the pitch.
Magnet Game
@ritsuki.makas #tokuteginou🇲🇨🇯🇵kenshuseijapan#jbcotobhukie#kaigoindo🇯🇵 @Jb cotobhukie @Raahmaniar #PET bottle capCap magnet game
♬ A fun song with an exciting atmosphere(944577) – yanagamo
Boys go crazy for it! The “Magnet Game” using plastic bottle caps is a quirky and fun craft that flips caps using magnetic repulsion.
Stick a magnet onto a cap, and attach another magnet to the tip of a chopstick that serves as a control wand.
The key is to align the magnets so they repel each other.
Then just bring the chopstick close—if the cap flips with a snap, you’ve succeeded! The thrill when you pull it off is unbeatable.
It’s a great way to naturally learn about the properties of magnets while playing, and it’s especially recommended for elementary school boys.
[Let’s Make and Play!] Handmade Toy Ideas (61–70)
A toy for pulling on various materials

This toy lets children pull on items made from different materials.
It helps develop their sense of touch, so it’s recommended for young kids.
Prepare a basket with holes that you can thread strings through.
Thread the strings through the basket and attach various materials to the ends of the strings—for example, bells, sponges, stretchy keychains, or cardboard toilet paper rolls.
When they pull the bell, it makes a sound; when they pull the sponge, they feel its softness.
They can enjoy a variety of sensations all at once.
Paper Cup UFO Catcher

The “Paper Cup UFO Catcher” is a popular DIY recreation idea you can enjoy with elementary school kids.
Cut eight slits into a paper cup to make tentacle-like arms, then insert a straw through the center to move it.
Place another paper cup over the top and move it up and down—this opens and closes the arms.
The moment it grabs the target is super exciting! It’s easy to make with everyday materials, yet the movement feels authentic and makes it really fun to play.
Figuring out the controls is part of the charm, and it gets even more exciting when friends compete.
It’s a recommended activity that combines the joy of crafting with the sense of achievement from a game.
Paper Plate Balance Game

Let me introduce a guaranteed crowd-pleasing, handmade recreation activity you can make and play with elementary school kids: the Paper Plate Balance Game.
Paint a paper plate in four colors—red, yellow, blue, and green—and attach capsule toy containers or paper cups underneath to create an unstable balancing base.
The rules use two kinds of dice: one regular number die and a special die with “colors” and faces like “x2” and “x3.” Players take turns placing small counters (like marbles or flat game pieces) according to the color and number rolled.
If you upset the balance and make pieces fall, you lose.
It’s easy to make, and a fun idea game that nurtures dexterity, concentration, and creativity.