[Middle School Students] Easy One-Day Science Projects and Crafts Ideas


Have you already decided on your summer vacation independent research project? It’s easy to panic when you feel you have to do it but don’t have much time.
For junior high school students like that, here are some simple research and craft ideas you can complete in a day.
Once you gather the necessary materials, you can start right away! For example, there are experiments using everyday items and fun crafts you can make.
If you enjoy it, you’ll finish in no time.
After the experiment, write up your summary and reflections in a report.
That’s the most important part of the project.
Start thinking about it early so you can enjoy your summer vacation!
- Recommended for high school students! A collection of easy one-day science project ideas
- Stand out with your junior high school independent research! A collection of fun experiment and craft ideas
- DIY science projects that elementary school boys will love: ideas you can make with everyday materials
- [For Adults] Simple yet Impressive Crafts: A Stylish, Eye-Catching Collection
- Recommended for middle school students! A collection of quick science project ideas you can do in a short time.
- For upper-grade boys! Simple yet awesome craft project [Don’t call it lazy]
- Simple and cute summer project crafts! A collection of ideas for girls that will make you want to create
- Simple but awesome! Craft ideas for upper-grade girls
- Plastic bottles transformed! A collection of simple yet amazing craft ideas
- Adults will be hooked! A collection of craft ideas using toilet paper rolls
- [I don't want to be like everyone else!] Recommended independent research topics for high school students
- Simple yet amazing crafts: craft ideas that elementary school students will want to make
- Elementary School Students: Simple One-Day Science Project and Craft Ideas
[Middle School] Easy One-Day Independent Research & Craft Ideas (81–90)
desk lamp
@gakky_07 How about this for your summer vacation project?Summer Vacation Craft#Summer VacationDesk lamp
♬ Fun Isono Family / Sazae-san [Cover] – Sound Works
Here’s an idea for making a desk lamp that uses a magnet-mountable LED light.
The stand is entirely wooden, and the arm is movable so you can adjust the angle.
First, think about what size you want and what kind of structure you’re aiming for, and try drawing a design plan.
Once the plan is ready, figure out the lengths and quantities of wood you’ll need and source the materials.
These days, you can even find small pieces of wood at 100-yen shops, so those might work as well.
One of the joys of woodworking is choosing the finish—whether to go for a natural look with varnish or oil, or paint it your favorite color—so definitely consider a variety of options.
Key rack made from 100-yen shop materials

This is a key rack packed with ideas, made using photo frames.
Prepare three identical photo frames: two will form the body and one will be the lid.
Start by making the body.
First, cut a cork sheet to fit the inside dimensions of a photo frame, apply a decorative remake sheet, and attach it to the first frame.
Next, glue the second frame on top of the first.
That completes the body.
Then, use hinges to connect the third frame to the body as a lid.
Finish by attaching an arch latch.
By inserting aluminum pins into the cork sheet, you can hang your keys on them.
It’s a creative project that turns photo frames into a key rack.
Try painting it or adding your own touches to make it uniquely yours.
small accessory case
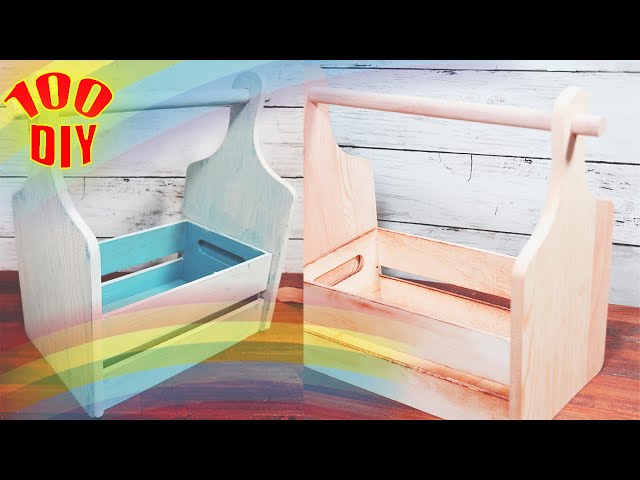
Let me introduce a cute and handy little storage container.
Get a wooden box, a cutting board, a round dowel, a hot glue gun, and a saw, and let’s get started.
Use the hot glue gun to attach the cutting board to the left and right sides of the wooden box.
Cut the round dowel to the appropriate length, sand the ends smooth, thread it through the holes, and secure it with the hot glue gun.
The process is simple and easy to make, so definitely give it a try.
It’s also recommended to paint it to add a personal touch.
Let’s make a bamboo lantern

Here’s how to make a bamboo lantern that looks beautiful when it glows at night.
Use a saw to cut the bamboo.
Make slits in the cut bamboo, then gently tap from above with a hammer to create openings where the light will shine through.
The key is to tap with the hammer without using too much force.
Drill holes to create several small windows for the light to leak out.
Wrap yarn around the top and bottom of the bamboo tube, using double-sided tape to secure it.
Place an LED light inside, switch it on, and let it shine.
It emits a soft glow that gives off a traditional Japanese ambiance.
I tried expressing sound with salt

Have you ever used a tuning fork in a science class? There’s an experiment where you place two tuning forks side by side with a screen between them and strike one of the tuning forks.
The result shows that sound carries vibrations through the air to the other tuning fork, creating resonance.
How about a free research project where you visualize sound vibrations using salt? The patterns in the salt change with pitch, which is quite fascinating, and you could also study factors like room temperature and differences between instruments that produce the sound.
Doing this research might make you more sensitive to the “don-don” sound of drums!
10 Musical Instruments You Can Make with Plastic Bottles
@kajiijapn We’re introducing 10 types of instruments you can make with plastic bottles!Plastic bottle#Summer vacation homeworkSummer Vacation CraftIndependent Research
Original Song – Everyday-Item Instrument Unit kajii – kajii / Future Instruments Lab
Plastic bottles are often used as materials for crafts.
So this time, how about making musical instruments with plastic bottles? Empty bottles can become drums, flutes, or maracas… With a bit of creativity, they can transform into instruments you can actually play! Bottle caps can also be turned into instruments by combining them with other materials, so don’t throw them away—save them.
It’s also a great idea to keep notes on how the sound changes depending on where you make holes and what you put inside.
[Middle School] Easy One-Day Independent Research & Craft Ideas (91–100)
Cute mysterious bottle

A mysterious bottle where two liquids won’t mix even when tilted.
It’s a fun idea that works great as interior decor or a small gift.
First, fill the bottle about halfway with baby oil.
Next, add colored water tinted with food coloring.
Put in glitter or holograms as you like, cap it, and decorate the bottle to make it cute—and you’re done! The method is very simple, so even younger elementary school children can enjoy making it.
Along with the craft, try summarizing both your own ideas and the correct explanation for why baby oil and water don’t mix.